how to delete wifi network from laptop

Title: How To Delete WIFI Network Profile From Windows 10 PC or Laptop
Channel: Discover You
How To Delete WIFI Network Profile From Windows 10 PC or Laptop by Discover You
how to delete wifi network from laptop, how to forget wifi network from laptop, how to delete wireless network from laptop, how to delete wifi connection from laptop, how to remove wifi network from dell laptop, how to remove wifi network from hp laptop, how to remove internet connection from laptop, how to remove wireless connection from laptop, how to forget wifi network dell laptop, how to forget wifi network hp laptop
Erase That Wi-Fi! Delete ANY Network From Your Laptop INSTANTLY!
Erase That Wi-Fi! Your Laptop's Network Reset - Simplified
Have you ever felt like your laptop's Wi-Fi is a tangled web? Sometimes, it can be a frustrating experience. You might constantly disconnect and reconnect. Furthermore, you might get errors when trying to access the internet. Fortunately, there's a simple solution for resetting your network settings. This method can often fix those pesky connection problems quickly.
Why Bother Erasing Your Network?
Let's be honest, dealing with Wi-Fi glitches is annoying. Therefore, it makes sense to want to fix them swiftly. Resetting your network connections is a beneficial step. It typically resolves a myriad of connectivity problems. For example, it can help in cases of incorrect password entries. Sometimes, it's just a corrupted configuration. This can then prevent you from connecting to the internet. But don't worry, this is usually a swift procedure.
Step-by-Step: Your Network Reset Guide
Ready to wipe the slate clean? Deleting a network is a straightforward process. It requires just a few clicks. For example, it's like pressing the reset button on your device. That should resolve the issue. First, we should consider how we go about this on Windows devices.
Windows: The Network Purge
- Access the Settings: Begin by opening your Windows settings. You can usually locate it in the Start Menu. Alternatively, press the Windows key + I.
- Navigate to Network & Internet: After opening Settings, find the "Network & Internet" option. Locate it there.
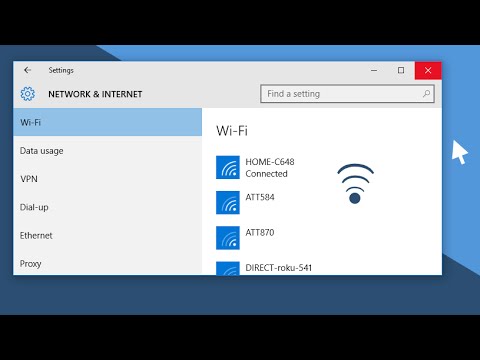
- Manage Wi-Fi Settings: You'll see a few options. Click on "Wi-Fi." Then, choose "Manage known networks".
- Remove the Network: A list of saved networks will appear. Select the network you want to erase. Finally, click "Forget."
Mac: The Wireless Wipe
Now, we switch gears to the Apple world. The process on a Mac is similar, yet slightly different. Nevertheless, the goal is the same: to wipe the slate clean.
- Open System Preferences: Click the Apple icon in the top-left corner. Then, select "System Preferences".
- Go to Network: In System Preferences, click on "Network".
- Choose Wi-Fi & Advanced: Select "Wi-Fi" in the left sidebar. Next, click the "Advanced" button.
- Remove Networks: Within the "Preferred Networks" list, find the network to eliminate. Click the "-" button to delete it. Afterward, hit "OK" and "Apply".
Reconnecting After the Wipe
Once the network is forgotten. It's time to get back online. The next step is to reconnect. Therefore, you're going to have to remember your network password.
- Scan for Networks: On your laptop, click the Wi-Fi icon. It's usually in the system tray (Windows) or the menu bar (Mac).
- Select your Network: Choose your preferred network from the list.
- Enter Your Password: Input your Wi-Fi password. This is essential to access your network.
- Connect!: Finally, click "Connect". Hopefully, the connection will then succeed.
Troubleshooting Tips
Sometimes, things don't go as planned. If you're still struggling to connect, try these simple steps. These are some things you should always consider.
- Restart Your Laptop: A classic solution, yes. But it often works.
- Restart Your Router: Unplug your router for 30 seconds. Plug it back in. This can resolve several connectivity issues.
- Update Drivers: Outdated network drivers can cause problems. Update them through Device Manager (Windows) or check for updates (Mac).
- Check Your Password: Double-check your Wi-Fi password. It's easy to make a typo.
- Contact Support: If all else fails, reach out to your internet service provider. They often have useful solutions.
Beyond the Basics: Further Considerations
Now you know how to wipe the Wi-Fi from your laptops. But, there are other potential things to consider. For instance, consider your network security. Moreover, be mindful of network performance.
Security Best Practices: Always use a strong password. Moreover, use WPA2 or WPA3 encryption. This is essential for protecting your network. Additionally, periodically change your router password.
Boosting Performance: Keep your router firmware up to date. Then, position your router in a central location. In addition, minimize obstructions. These small steps can significantly affect your connection speed.
The Bottom Line
Erasing a network from your laptop is a useful skill. It is easy to master with practice. Moreover, it can save you time and frustration. From now on, consider this solution when you face Wi-Fi woes. It's a simple, reliable way to restore your connection. So next time, you're struggling with connectivity. Don't hesitate to erase and reconnect. Now you know how to do it with ease!
Unlock Your Laptop's Hidden Hotspot: No Software Needed!Erase That Wi-Fi! Delete ANY Network From Your Laptop INSTANTLY!
Hey tech-savvy friends! Ever been in a situation where you're juggling Wi-Fi networks like a clumsy air traffic controller? Maybe you're at a coffee shop, the Wi-Fi keeps cutting out, and you've got too many networks saved on your laptop, begging for connection. Or perhaps you've hopped on an unsecured network out of desperation and now your laptop's memory is filled with networks you'd rather erase from existence. Trust me, we’ve all been there, staring at a confusing list, muttering, "Delete, DELETE, DEEELETE!" Well, put down that digital crowbar! Today, we're diving deep into how to banish unwanted Wi-Fi networks from your laptop forever, quicker than you can say "disconnect." Think of it as digital spring cleaning, but for your internet connections!
1. Why Delete Networks? The Case for Digital Decluttering
Before we jump into the how-to, let's chat about why. Why bother deleting networks? Isn't it easier to just… leave them? While technically, yes, leaving all those networks lingering in your settings could lead to a few (or many) headaches. It's like having a cluttered drawer; eventually, you can't find what you need.
- Security Concerns: Remember that unsecured Wi-Fi network you impulsively joined? By deleting it, you're minimizing the risk of unintentionally connecting to it again. Think of it as locking the door after you've left a sketchy bar - security first!
- Improved Connection Speed: Your laptop automatically tries to connect to known networks. Having a massive list can slow down the connection process. Deleting the excess networks helps your laptop focus on the strong, reliable ones.
- Simplified Experience: Let's admit it, a cleaner list is just pleasing to the eye! Less clutter, less confusion, and quicker connections to your preferred networks.
- Troubleshooting Savior: When facing network connectivity issues, a vast list of previously saved networks can be an absolute pain. Deleting some of them will simplify the task.
2. Windows Way: The Simple Steps to Wi-Fi Wipeout on Windows
Okay, Windows users, let's get down to business. We're going to banish those unwanted networks with a few simple clicks. Think of Windows as your trusty steed; we're just giving it a good grooming!
- Navigate to Network Settings: Click on the little Wi-Fi icon in your system tray (usually in the bottom right corner of your screen). This will open the Wi-Fi networks list.
- Open Network and Sharing Center: You will see a list of available networks. Scroll down and click on "Network and Sharing Center." You can also search for this in the Windows search bar.
- Manage Wireless Networks: In the Network and Sharing Center window, click on "Change adapter settings" on the left-hand menu. Find the "Wi-Fi" option. Then, right-click on it and select "View wireless networks." This will bring up the "Manage wireless networks" window.
- Delete the Culprit: Now, you'll see a list of all the Wi-Fi networks your computer has ever connected to. Right-click on the network you want to delete and select "Remove network."
- Confirmation (Optional): You might be prompted to confirm the deletion. Click "Yes," and poof! It’s gone!
Easy peasy, right? Consider it your digital eraser.
3. Mac Magic: Deleting Wi-Fi Networks on Your MacBook
Alright, Apple aficionados, let's not let Windows have all the fun! Deleting Wi-Fi networks on a Mac is equally straightforward. Think of your Mac as a sleek, sophisticated sports car; this process is its quick pit stop.
- Open System Preferences: Click the Apple icon in the top-left corner of your screen and select "System Preferences."
- Go to Network Settings: In System Preferences, click on "Network."
- Advanced Options: Select "Wi-Fi" from the left-hand menu and click the "Advanced…" button in the bottom right corner.
- Network Management: In the "Preferred Networks" list, you'll see all your saved networks.
- Delete the Network(s): Select the network you wish to remove and click the "-" button (minus sign) at the bottom of the list.
- Apply Your Changes: Click "OK" to save your changes, and you're done!
And there you have it! Your Mac is now cleaner than ever.
4. The Perils of Public Wi-Fi: Why Delete After Use?
This is incredibly important, so listen up! Public Wi-Fi is a bit like a crowded buffet: tempting, but often with hidden risks. After using a public Wi-Fi network (coffee shops, libraries, airports, etc.), always remember to delete it from your saved networks.
- Man-in-the-Middle Attacks: Hackers can create fake Wi-Fi hotspots that look legitimate, allowing them to intercept your data. Deleting the network prevents your laptop from automatically connecting to a malicious imposter.
- Data Exposure: Public networks are often less secure. Your browsing history, passwords, and other sensitive information could be vulnerable if your device automatically connects to the wrong network.
- Peace of Mind: Honestly, it's just good digital hygiene. Think of it as washing your hands after touching a public surface. It's a simple step that can prevent bigger problems.
5. Troubleshooting Troubles: What if Deletion Goes Wrong?
Sometimes, technology throws a curveball. What if deleting a network doesn't work as expected? Don't worry, we've got some troubleshooting tips.
- Restart Your Laptop: This sounds basic, but often works wonders. A fresh start can clear up temporary glitches.
- Update Drivers: Outdated network drivers can cause connection issues. Check for driver updates in your device manager.
- Check for Conflicts: Ensure no other software is interfering with your network settings.
- Network Reset (Advanced): If all else fails, you can reset your network settings to their default values. Be cautious with this one, as it will remove all saved networks and settings. You can usually find this option within your network settings (search online for specific instructions for your operating system).
6. The Impact of Unsaved Networks on Your Privacy: A Deeper Dive
Beyond the practicalities of faster connections and security, think about privacy. Every network your laptop remembers is a little digital breadcrumb you've left behind. You can’t always make sure your data is safe, but you can surely take a conscious effort to minimize that risk.
Deleting networks helps minimize your exposure. Let's be honest, how many times have you logged into a network with an old password, a password you don't even remember anymore? By deleting the network, you can't make that mistake again.
7. Beyond the Basics: Advanced Network Management Techniques
For those of you who are a bit more tech-savvy, let's explore some advanced techniques.
- Command Line Magic (Windows): You can use the command prompt to manage/delete networks. Open the Command Prompt as an administrator and use commands like
netsh wlan show profilesto see the list of remembered networks andnetsh wlan delete profile name="YourNetworkName"to delete them. - Third-Party Software: There are various software tools that can help you manage Wi-Fi networks more effectively, offering features like automatic network deletion and security scans.
- VPNs (Virtual Private Networks): When using public Wi-Fi, always use a VPN. A VPN encrypts your internet traffic, making it much harder for hackers to steal your data.
8. The Art of the Reboot: When to Refresh Your Network Landscape.
Consider regular network maintenance as good practice. Periodically, take a moment to review and delete obsolete or unwanted networks. Think of it as a semi-annual digital house cleaning for your computer's internet settings.
This practice is especially useful if:
- You travel often and connect to many different Wi-Fi networks.
- You experience frequent connection problems that you can't easily diagnose.
- You are concerned about your online privacy and security.
9. Understanding Network Profiles: More Than Just Saved Networks
When your laptop 'remembers' a network, it's actually storing a profile associated with that network. This profile includes things such as the network name (SSID), security settings, and even the password.
The concept of profiles highlights how the system is remembering the network. By deleting the profile, you're essentially deleting the memory of that connection.
10. Wi-Fi Etiquette 101: Staying Safe on Public Networks
Let’s cover a few tips for using public Wi-Fi safely:
- Avoid Sensitive Activities: Don’t do any banking, shopping, or other activities that require you to enter sensitive information on public Wi-Fi.
- Use HTTPS: Always browse websites that use HTTPS (look for the padlock icon in the address bar). HTTPS encrypts the connection between your browser and the website.
- Disable File Sharing: Disable file sharing on your device to prevent unauthorized access to
Forget or Remove a Wireless Network on Windows 10 How-To
By Windows Explained Forget or Remove a Wireless Network on Windows 10 How-To by Windows Explained
How Hackers Spy on you from your own WiFi

By Tech Raj How Hackers Spy on you from your own WiFi by Tech Raj
How to Delete WIFI Network From Laptop Solution

By MDTechVideos International How to Delete WIFI Network From Laptop Solution by MDTechVideos International

Title: Chromebook - Wifi Issues, Delete known networks.
Channel: Lakeview Technology
Chromebook - Wifi Issues, Delete known networks. by Lakeview Technology
Wifi On Laptop Phone
Erase That Wi-Fi! Delete ANY Network From Your Laptop INSTANTLY!
We've all been there. You're at a coffee shop, a friend's house, or maybe even a hotel, and you're staring at a list of Wi-Fi networks. Some are familiar, some are new, and some… well, let's just say you'd rather they disappear. Perhaps you've connected to a network you no longer trust or maybe you just want a clean slate to avoid accidental connections. Whatever the reason, the ability to instantly remove a Wi-Fi connection from your laptop is a remarkably convenient skill. We are here to show you exactly how.
Why Delete a Wi-Fi Network? More Than Just Privacy
The reasons for purging a Wi-Fi profile go far beyond simply protecting your privacy, though that's certainly a significant concern. Outdated or compromised Wi-Fi networks can be a security risk, potentially exposing your data to malicious actors. Regularly removing networks you no longer use minimizes your attack surface.
Beyond security, deleting a Wi-Fi network can also improve your overall network experience. Cluttered connection lists can lead to errors and slow down the process of connecting to the right network. Removing unnecessary profiles simplifies your selection process, ensuring faster and more reliable connections. It's digital decluttering at its finest!
Deleting Wi-Fi Networks on Windows: Your Step-by-Step Guide
Windows, the operating system powering a vast majority of laptops globally, offers several methods to effortlessly erase a Wi-Fi network. We'll cover the most effective and universally applicable techniques.
Method 1: The Settings App – Your Primary Tool
The Settings app, often found through the Start menu, is the go-to place for managing your Wi-Fi connections.
- Open the Settings App: Click on the Start menu (the Windows logo) and select the gear icon representing the Settings app. Alternatively, you can use the keyboard shortcut: Windows key + I.
- Navigate to Network & Internet: Within the Settings app, find the "Network & Internet" category and click on it.
- Select Wi-Fi: The "Wi-Fi" option should be visible on the left-hand side of the window. Click on it.
- Manage Known Networks: Scroll down to the "Manage known networks" section. This is where the magic happens. Click on this option.
- Choose and Forget: You'll now see a list of all the Wi-Fi networks your laptop has previously connected to. Select the network you want to remove by clicking on it.
- "Forget" the Network: Once you've selected the network, a "Forget" button will appear. Click this button, and Windows will immediately remove the network profile from your system. It's as simple as that!
Method 2: The Control Panel – Legacy but Reliable
While the Control Panel is gradually being phased out in favor of the Settings app, it still provides a functional way to manage Wi-Fi profiles.
- Open the Control Panel: Type "Control Panel" in the Windows search bar (located in the taskbar, usually at the bottom of your screen) and select the Control Panel app.
- Network and Sharing Center: Within the Control Panel, navigate to "Network and Internet" and then select "Network and Sharing Center."
- Manage Wireless Networks: In the left-hand pane, click on "Manage wireless networks." This will open a new window displaying your saved Wi-Fi profiles.
- Remove the Network: Right-click on the Wi-Fi network you wish to delete and select "Remove network." This instantly removes the profile.
- Confirmation: A confirmation prompt is usually not needed; once you click "Remove network," the profile is deleted.
Method 3: Command Prompt or PowerShell – For the Tech-Savvy
For those comfortable with the command line, the Command Prompt or PowerShell offers a faster and more programmatic approach.
- Open Command Prompt or PowerShell: You can find either application by searching for them in the Windows search bar. Run either application as an administrator (right-click and select "Run as administrator"). This is critical for making changes to network settings.
- Use the
netshCommand: In the Command Prompt or PowerShell window, type the following command, replacing"Network Name"with the actual name of the Wi-Fi network you want to delete:netsh wlan delete profile name="Network Name" - Verify the Deletion: After executing the command, a message confirming the deletion will appear. To verify, you can type the following command to list all saved profiles:
netsh wlan show profilesThe network you deleted should no longer be listed.
Deleting Wi-Fi Networks on macOS: A Simple Approach
macOS, the operating system for Apple laptops like MacBooks, simplifies Wi-Fi network management, providing an intuitive interface.
- Open System Preferences: Click the Apple menu in the top-left corner of your screen and select "System Preferences." (In newer versions of macOS, this is now called "System Settings").
- Navigate to Network: Click on the "Network" icon.
- Select Wi-Fi: In the left-hand sidebar, make sure "Wi-Fi" is selected.
- Advanced Settings: Click the "Advanced…" button. This will open a new window containing a list of your preferred networks.
- Remove the Network: Select the Wi-Fi network you want to forget from the list. Click the "-" (minus) button at the bottom of the list.
- Apply the Changes: Click "OK" to close the Advanced window and then click "Apply" in the Network window. The network profile is now deleted.
Troubleshooting Common Issues
While deleting Wi-Fi networks is a straightforward process, you might encounter a few minor hiccups. Here's how to resolve them:
- Insufficient Permissions (Windows Command Prompt/PowerShell): Ensure you're running the Command Prompt or PowerShell as an administrator. Right-click on the application and select "Run as administrator."
- Network Name Incorrect (Command-Line): Double-check the network name you're using in the
netshcommand. It must precisely match the network's name as it appears in your Wi-Fi settings. Spaces and special characters matter! - Network Still Appears: If the network still appears after deletion, try restarting your laptop. This can sometimes clear lingering cached information. If the issue persists, try deleting the network profile again, using a different method if necessary.
- Software Conflicts: Rarely, third-party network management software can interfere with the built-in Wi-Fi management tools. Temporarily disabling or uninstalling such software can help identify if it’s the source of the problem.
- Corrupted Profile: In rare cases, a Wi-Fi profile might be corrupted, preventing it from being deleted using the standard methods. You might need to reset your network settings (be aware this will remove all saved Wi-Fi passwords) or, as a last resort, reinstall your network drivers.
Best Practices for Wi-Fi Security & Management
Deleting Wi-Fi networks is just one piece of the puzzle when it comes to network security and efficient Wi-Fi management. Here are some additional practices to consider:
- Password Protection: Always protect your Wi-Fi with a strong password. This is the first line of defense against unauthorized access. Use a passphrase that is at least 12 characters long and includes a mix of upper and lowercase letters, numbers, and symbols.
- Regular Password Changes: Rotate your Wi-Fi password periodically, especially if you suspect your network might have been compromised or shared with untrusted individuals.
- Enable Encryption: Ensure your router is configured to use WPA2 or WPA3 encryption. These are the most secure encryption protocols currently available. Avoid using older, less secure protocols like WEP.
- Update Your Router Firmware: Regularly update your router's firmware. Firmware updates often include security patches that address vulnerabilities.
- Disable WPS: Wi-Fi Protected Setup (WPS) is a feature that simplifies connecting devices to your Wi-Fi network, but it also has security vulnerabilities. It's generally recommended to disable WPS on your router.
- Network Isolation: If your router supports it, enable network isolation or guest network features. This prevents devices connected to your Wi-Fi from communicating with each other, which can enhance security.
- Monitor Your Network: Keep an eye on your network activity. Most routers provide tools to monitor connected devices and data usage. This can help you identify any suspicious activity.
- Use a VPN: When connecting to public Wi-Fi networks, consider using a Virtual Private Network (VPN). A VPN encrypts your internet traffic, protecting your data from eavesdropping.
Conclusion: Take Control of Your Wi-Fi Experience
Deleting Wi-Fi networks from your laptop is a simple yet powerful action. It enhances your security, improves your connection reliability, and contributes to a cleaner digital life. By understanding the various methods for deleting Wi-Fi networks, as well as implementing the related best practices, you can confidently navigate the world of Wi-Fi and
