how to connect two laptops with wifi in windows 8

Title: Transfer Files Between Two Laptops over Wi-Fi
Channel: Techy Druid
Transfer Files Between Two Laptops over Wi-Fi by Techy Druid
Windows 8 Laptop Wi-Fi Connection: The SHOCKINGLY Simple Trick!
Unlocking Your Windows 8 Laptop's Wi-Fi: The Secret You've Been Missing!
Have you ever felt completely and utterly defeated by your Windows 8 laptop's Wi-Fi connection? You're not alone. It's a common frustration. Many users have faced the same issues. But believe me, the answer is surprisingly straightforward. It's often simpler than you think. So, prepare to feel empowered. We are about to unravel the mystery. This isn't some complicated tech mumbo jumbo from some online video.
The Recurring Wi-Fi Woes: A Familiar Scenario?
Picture this: you're eager to work or stream a show. You click the Wi-Fi icon. Nothing happens. The dreaded spinning wheel emerges. The connection refuses to materialize. Your blood pressure rises. You restart your laptop. Still, the Wi-Fi stubbornly refuses to connect. Frustration ensues. Sound familiar? It likely does. And that's precisely why you're here. Many have already experienced this problem. Don't worry; a solution exists.
Discovering the Unexpected: Beyond the Obvious Fixes
We've all tried the standard fixes. We restarted the router. We checked the password. We verified our location's Wi-Fi capability. But the issue persists. Consequently, the solution remains elusive. In addition, there are a few often-overlooked tricks. We need to consider the less obvious factors. This is where the real magic happens. Trust me, it's easier than you believe.
The Surprisingly Simple Trick: A Revelation!
Here's the secret. It's a game changer! Most connection problems stem from a simple setting. You need to investigate your network adapter settings. Navigate to the Control Panel. Then, find Network and Sharing Center. Select "Change adapter settings" on the left side. Locate your Wi-Fi adapter. Right-click on it. Then, select "Properties." Now you're almost there!
Deep Dive into the Adapter Properties: Unveiling the Key
A box will appear. You should see a list of items. Find "Internet Protocol Version 4 (TCP/IPv4)." Select it, and then click "Properties" again. A new window will open. Now, it's time for your final move. You'll likely see "Obtain IP address automatically" selected. And, probably, "Obtain DNS server address automatically" as well. But for an easy fix, try this:
The Game-Changing Adjustment: The Final Steps
This is where we make our change. Click "Use the following IP address." Manually input an IP address. Start with a number that works for your router e.g. 192.168.1.101. Subnet mask should almost always be 255.255.255.0. The default gateway should be your router's IP address. Finally, in "Use the following DNS server addresses," input public DNS servers. Try 8.8.8.8 and 8.8.4.4. These are Google's public DNS resolvers. This helps significantly to improve your internet service. Click "OK" on both windows. Usually, this step resolves the problem.
Troubleshooting and Further Exploration: When the Trick Needs More Effort
Sometimes, the first attempt doesn’t work. Don't be discouraged! You may need to adapt the IP scheme. Check your router's IP address range. Change the IP address accordingly. In this case, consult your router's documentation. Ensure you're within the appropriate range. Also, verify your internet provider. Perhaps there's a temporary outage. Run a network troubleshooter. This might identify additional problems too. Reboot your laptop and the router. Try again. This should solve the issue.
The Aftermath: Witnessing the Transformation
After finally doing everything, experience immediate satisfaction. Your Wi-Fi immediately connects. Everything works as intended. That feeling of utter relief washes over you. The frustration fades away. You've conquered the Wi-Fi beast. It's an amazing accomplishment. You're ready to enjoy your laptop without any interruptions.
Beyond Connectivity: Optimizing Your Wi-Fi Experience
Now that you’re connected, further optimization is possible. Update your network adapter drivers. This process can resolve compatibility issues. Run a speed test to see how fast your connection is. You can also investigate your router settings. Change the Wi-Fi channel to avoid interference. Prioritize bandwidth allocation for your laptop. Consider all of these things. They can enhance your overall experience.
Final Thoughts: Embrace the Simplicity and Enjoy!
You've discovered the hidden secret. You've mastered the fix. The Wi-Fi connection on your Windows 8 laptop is now reliable. Remember, it's often these simple adjustments. You can overcome many frustrations. Embrace the understanding. Enjoy the freedom of seamless connectivity. Therefore, celebrate your newfound skill. You know the secrets. You are now an expert. Go forth and enjoy your internet!
Windows 8 Laptop Wi-Fi Connection: The SHOCKINGLY Simple Trick!
Alright, folks, let's be honest. We've all been there. You crack open your trusty Windows 8 laptop, ready to dive into the digital world, but then… nothing. That frustrating Wi-Fi symbol with the little "X" staring back at you, mocking your desire for instant connectivity. It's like a digital boogeyman, holding the internet hostage. But fear not, because today, we're going to banish that boogeyman and reveal a trick so simple, so utterly obvious, that you'll be kicking yourself for not figuring it out sooner. Get ready to say goodbye to Wi-Fi woes!
1. The Frustrating Dance of the Disconnected: Why Windows 8 Can Be a Wi-Fi Headache
Remember those days? You'd launch your Windows 8 laptop, expectant, only to be greeted by the dreaded "no internet access" message. It's a feeling akin to finding out your favorite coffee shop is out of your go-to brew on a Monday morning – pure chaos. This often stemmed from a mishmash of issues, each one a potential roadblock to your online bliss. Driver problems, router hiccups, hidden settings… it felt like navigating a digital labyrinth.
2. The Usual Suspects: Diagnosing the Wi-Fi Malaise
Before we unleash the secret weapon, let's briefly recap the usual culprits. We’re talking about the troubleshooting checklist we've all run through a thousand times. Is your Wi-Fi switch engaged? Is your router powered on and broadcasting a signal? Are the drivers for your Wi-Fi adapter up-to-date? These are the digital first responders, the basic checks before calling the cavalry. Sometimes, a simple reboot works wonders, a digital reset that clears the cobwebs. But often, these simple fixes just… don’t cut it.
3. Forget the Complex: The Heart of the Problem – The Adaptor Itself!
Here's where things get interesting. We've all spent hours clicking around in network and sharing settings, looking for the impossible. But what if the fix was right under our noses? What if the issue wasn't a complex configuration problem, but a simple, and often overlooked, setting related to your Wi-Fi adapter itself? Buckle up, because we're about to get to the good part.
4. The SHOCKINGLY Simple Trick: Unveiling the Magic
Okay, are you ready? Here it is, the secret sauce, the key to unlocking glorious Wi-Fi connectivity. The trick lies within the Device Manager.
- Step 1: Access Device Manager. Right-click on the Start button (or press Windows Key + X) and select "Device Manager."
- Step 2: Expand "Network Adapters." You'll find a list representing all the hardware of your laptop
- Step 3: Identify Your Wi-Fi Adapter. Look for your wireless adapter. It will likely be named something like "Wireless Network Adapter" or something related to your laptop's make and model.
- Step 4: Right-Click and Un-Power Off. Right-click on the Wi-Fi adapter and select "Properties."
- Step 5: Navigate to "Power Management." Click on the "Power Management" tab.
- Step 6: The Critical Box! Uncheck the box that says "Allow the computer to turn off this device to save power."
That’s it! We’ve just unleashed the key to solving the connectivity issues. This setting, often enabled by default, allows Windows to shut down your Wi-Fi adapter to save power. It sounds great in theory, but in practice, it can lead to inconsistent or lost connections. It’s like asking the waiter to turn off your dessert to save on calories – a noble goal, but ultimately, you miss out!
5. Why This Works: The Power-Saving Paradox
By disabling this power-saving setting, you're essentially telling your laptop: "Keep that Wi-Fi adapter running, no matter what!" This means the Wi-Fi is constantly scanning for and maintaining a connection. The result? More stable connections, fewer disconnections, and a significantly reduced chance of the dreaded "no internet access" error. It's like giving your Wi-Fi a shot of adrenaline – it gets a new lease on life.
6. The "Why Didn't I Think of That?" Moment
Seriously, when you realize the simplicity of this fix, you'll understand the immediate impact. It's the digital equivalent of suddenly finding the remote control you've been searching for all day. The sheer relief! We've all scrolled through forums, followed complex guides, and even considered calling tech support. Yet, the solution was a few simple clicks away.
7. Beyond the Trick: Other Potential Wi-Fi Troubleshooters
While this is the primary, and sometimes only, fix, let's quickly touch on other scenarios. If the above trick does not solve your problem, consider checking your router, ensuring your network drivers are updated, and maybe even resetting your network settings.
8. Router Realities: Is Your Gateway The Problem?
Sometimes, the issue lies not with your laptop, but with your router. Like a grumpy old gatekeeper, if the router is not functioning properly, you won't be able to connect. Check the lights; ensure the router is broadcasting a signal, and perhaps try restarting it.
9. Driver Dilemmas: Keeping Your Adapters Healthy
Outdated drivers are another common culprit. These are the software instructions that tell your Wi-Fi adapter how to communicate with your computer. Keeping them up-to-date is like giving your car a tune-up – it helps everything run smoothly. Go to your Wi-Fi adapter's manufacturer's website or use Windows Update to see if there are any new drivers.
10. Reset and Restore: A Last-Resort Remedy
If all else fails, consider resetting your network settings. This will clear out any corrupted configurations and restore the defaults. You can typically find this option within your network settings in Windows 8. Just keep in mind that you may need to re-enter your Wi-Fi password afterwards.
11. The Simplicity of Success: The Connection is Made!
Once you've applied the trick, celebrate! You've conquered the Wi-Fi beast. Feel free to finally dive into the internet.
12. Reaping the Rewards: Uninterrupted Streaming and Beyond
The benefit extends far beyond just getting online. Imagine uninterrupted streaming, seamless video calls, and lag-free online gaming. No more buffering circles of doom!
13. The User Experience: From Frustration to Flow
The difference in your user experience will be night and day. Instead of anticipation and the frustration of a dead connection, you'll be connected without thinking about it.
14. Share the Wisdom: Help Your Friends!
Don't keep this secret to yourself! Share this knowledge with your friends and family. Spread the Wi-Fi joy!
15. The Future is Connected: Staying Ahead of the Curve
The internet is the backbone of modern life. By understanding how to troubleshoot Wi-Fi problems, you empower yourself. It's like having a superpower, the ability to connect to the world at your fingertips.
Closing Thoughts
So there you have it! The shockingly simple trick to conquering the Wi-Fi woes of your Windows 8 laptop. By disabling the power-saving setting on your Wi-Fi adapter, you've taken a significant step towards a more stable and reliable internet connection. Remember, technology can be both a blessing and a curse, but with a little know-how, you can turn frustration into freedom. Go forth and surf the web with confidence! We hope this has helped you and that you're now enjoying the freedom of uninterrupted Wi-Fi.
FAQs:
1. Will this trick drain my battery faster?
Yes, slightly. By disabling the power-saving feature, your Wi-Fi adapter will consume a bit more power. But the difference is usually negligible, and the improved connection stability is often worth the trade-off. Think of it as a small price to pay for the liberation of constant connections.
2. What if I have a different version of Windows?
While this guide focuses on Windows 8, the underlying principle is similar across most Windows versions. The location of the Device Manager and Power Management settings may vary slightly, but the process is largely the same. Search your Windows version, and you will be able to change the settings.
3. My Wi-Fi still isn't working after trying this. What now?
Don't despair! Check your router, update your Wi-Fi drivers, and consider resetting your network settings. If the problem persists, contact your internet service provider or a computer technician for further assistance.
4. Is this fix guaranteed to work for everyone?
The fix has a high success rate, but it isn't a silver bullet. There can be other causes of Wi-Fi problems, as we discussed earlier. The more you learn about your system, the better equipped you'll be to solve it.
5. Can I reverse this change if I want to save power?
Absolutely! You can simply re-enable the "Allow the computer to
how to connect two pc or laptop via wifi in windows 8

By QuicK TricKs how to connect two pc or laptop via wifi in windows 8 by QuicK TricKs
How to transfer files from PC to PC using WiFi Windows 10 7 8

By IT Magics How to transfer files from PC to PC using WiFi Windows 10 7 8 by IT Magics
How to connect two computers wirelessly

By Webi How How to connect two computers wirelessly by Webi How
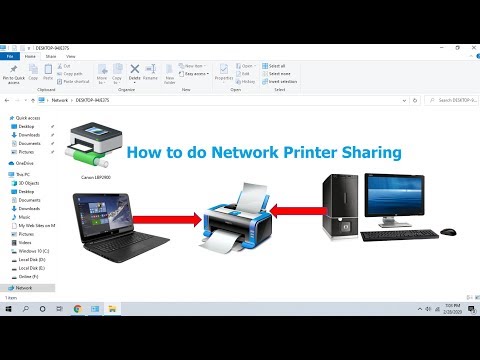
Title: How to Share Printer on Network Share Printer in-between Computers Easy
Channel: MJ Tube
How to Share Printer on Network Share Printer in-between Computers Easy by MJ Tube
Windows 8 Laptop Wi-Fi Connection: Unearthing the Unexpectedly Easy Solution!
The frustration of a stubbornly silent Wi-Fi connection on your Windows 8 laptop can be utterly demoralizing, bringing your productivity to a screeching halt. You stare at the network icon, that tiny, flickering symbol of connectivity, and the promise of the internet seems to be cruelly denied. We've all been there, haven't we? The endless troubleshooting, the head-scratching, the feeling of being adrift in a sea of technical jargon. Well, prepare to cast off those anxieties. We’re about to reveal a solution so straightforward, so elegant in its simplicity, that you'll wonder why you hadn't stumbled upon it sooner. This isn't a complex, technical deep dive; it's a clean, concise path to regaining your online freedom, and it's closer than you think.
Diagnosing the Source: Pinpointing the Root of Your Wi-Fi Woes
Before diving into the ultimate trick, let's briefly explore the common culprits behind Wi-Fi connection failures on Windows 8 laptops. Understanding the potential problems will help you appreciate the efficacy of the forthcoming solution. Often, the issue isn't hardware failure but resides within the operating system itself. Driver incompatibility, a corrupted network profile, or even a simple software glitch can disrupt your wireless connection.
First, consider the possibility of outdated or corrupted network drivers. These vital software components are the intermediaries between your laptop’s Wi-Fi adapter and the operating system. When they're not functioning properly, you’re left stranded.
Second, there are the network profiles. Windows 8, like many operating systems, stores profiles of the networks you've connected to. These profiles contain all the relevant information, such as the network name (SSID), security key, and other settings. If a profile becomes corrupt, it can prevent your laptop from connecting.
Third, sometimes, the issue is as simple as a software conflict or a minor system error. A background process might be interfering with the Wi-Fi connection, or a temporary glitch in the operating system could be the cause.
The Unveiling: The Surprisingly Simple Fix
Now, prepare yourself. Here’s the key to solving your Windows 8 laptop Wi-Fi connection problem. The solution we propose is not buried deep in obscure system settings, nor does it involve intricate command-line operations. It's, in fact, embedded within the operating system's graphical user interface, waiting for you to discover it.
The "magic" resides within the "Network and Sharing Center." This control panel hub, accessed through the Windows 8 desktop, offers a surprisingly powerful set of tools. Here’s how to get there: First, locate the Wi-Fi icon in the system tray (usually in the bottom right corner of your screen). Right-click on the icon. A small menu will appear. Select “Open Network and Sharing Center.” You are now on the right track.
Once inside the Network and Sharing Center, you’ll notice a few options. The one that holds the key to a quick Wi-Fi resolution is the "Change adapter settings" option. Click it. A new window will open, displaying a list of your network adapters. Among them, you'll find your Wi-Fi adapter.
The Implementation: A Step-by-Step Guide to Restoring Connectivity
Now, the crucial steps.
Disable the adapter: Right-click on your Wi-Fi adapter, and a context menu will appear. Simply click “Disable”. Wait a few seconds (be patient), and the adapter should become inactive. Look at the icon next to the adapter's name; it should change appearance, indicating the adapter is no longer active.
Re-enable the adapter: Once the adapter is disabled, right-click it again. This time, select “Enable.” Give the system a moment to re-establish the network connection.
That's it. That's the core of the fix. Wait, you might be wondering, is that all? Generally, it is. Often, by toggling the adapter off and on, you compel Windows 8 to reset its network settings. This simple action can resolve a host of underlying issues.
If the Wi-Fi immediately connects, you've succeeded. If not, don’t be alarmed; there are a few additional steps you might want to take, which are mentioned below.
Beyond the Basic Fix: Advanced Troubleshooting Tips
If the previous action alone doesn't restore your Wi-Fi connectivity, don't lose heart. There are several additional steps you can take, and we'll guide you to them.
Update Network Driver: The first step is to update your network driver. In the "Change adapter settings" window from above, right-click your Wi-Fi adapter and select "Properties." In the properties window, click on "Configure." This will open a new window where you'll find a tab labeled "Driver." Click on "Update Driver." Windows will then search for any new drivers that it can acquire. If one is found, install it and restart your laptop. It's a tried-and-tested solution for several network connection issues.
Forget the Network and Reconnect: Network profiles can occasionally misbehave. Under Network and Sharing Center, select "Manage wireless networks." Choose the network you are trying to connect to. Right-click it and select “Remove network.” Then, search for the network on your Wi-Fi, and enter the password, as this will re-establish a fresh, uncorrupted network profile.
Check for Interference: Examine your surroundings. Ensure there are no major sources of interference, such as competing wireless routers or other electronics that broadcast a similar signal. Sometimes Wi-Fi signal strength can be significantly reduced by physical obstacles like certain walls and items.
Restart Your Router: While it may seem obvious, restarting your actual internet router can have a profound effect. If your laptop has connectivity issues, that may be the result of a wider problem. Often a simple restart of your router can get everything back on track.
Maintaining Seamless Connectivity: Preventative Measures
Once your Wi-Fi connection is restored, consider the following preventive measures to minimize future disruptions.
- Keep Your Drivers Updated: Regularly update your network drivers. You can set Windows to automatically check for and install driver updates, which is prudent.
- Monitor Wi-Fi Strength: Regularly check your Wi-Fi signal strength. Windows usually provides a visual representation of your signal strength; aim to connect to networks providing a strong and stable signal.
- Secure Your Network: Ensure your home network is password-protected and uses a strong encryption protocol, like WPA2 or WPA3. This prevents unauthorized access and potential network interference.
- Regular System Maintenance: Perform regular system maintenance tasks, such as disk cleanup and defragmentation, to keep your Windows 8 laptop running smoothly. A well-maintained system is less prone to network-related issues.
Conclusion: Embracing the Power of Simplicity
Navigating technical challenges, especially those involving the intricacies of Wi-Fi connections, can be exasperating. But, as this discussion has demonstrated, the most effective solutions are often the simplest. By understanding the core issues and following the straightforward steps outlined above, you are well-equipped to conquer Wi-Fi connection problems on your Windows 8 laptop. Embrace the power of the “disable and enable” trick, integrate the additional troubleshooting steps, and maintain a proactive approach to system maintenance. You will be well on your way to a consistently reliable online experience.
