can a turned off laptop mess with wifi

Title: How to Turn on Wifi on Window 10 in Laptop Wifi Not Turning on Problem Solved Wifi Turned Off
Channel: Zeeshan Awan
How to Turn on Wifi on Window 10 in Laptop Wifi Not Turning on Problem Solved Wifi Turned Off by Zeeshan Awan
Laptop Killing Your Wi-Fi? This SHOCKING Reason Will BLOW Your Mind!
Is Your Laptop Secretly Sabotaging Your Wi-Fi? The Unexpected Culprit!
Have you ever felt like your Wi-Fi connection is perpetually teetering on the brink of a digital implosion? The frustration is real, and the culprit might be closer than you think. Laptop Wi-Fi issues can range from intermittent dropouts to agonizingly slow speeds. So, let's dive into the overlooked reason your laptop might be your Wi-Fi's nemesis.
The Unseen Enemy: Interference & the Wireless Battlefield
The airwaves are a battlefield, a chaotic symphony of radio signals. Your laptop, along with everything else wireless in your home, is constantly battling for bandwidth. This constant struggle can cause significant Wi-Fi interference. Consequently, this invisible war directly impacts your internet performance. Imagine trying to shout over a roaring crowd. It's difficult, right? This is precisely the challenge your Wi-Fi signal faces.
Decoding the Culprit: Your Laptop's Internal Mechanisms
Your laptop, though a sleek marvel of modern technology, can be a source of surprising interference. It is equipped with components that emit radio frequencies. Specifically, these are designed to communicate wirelessly. These components, however, can sometimes clash with your Wi-Fi router’s signals. These internal components, in essence, become the silent saboteurs. For example, metal components inside your laptop can further exacerbate this problem.
The Overlooked Link: Physical Proximity and Placement
The location of your laptop matters profoundly. Believe it or not, where you place your laptop directly affects its wireless performance. Now, consider this: positioning your laptop near other electronic devices can amplify the issue. In addition, placing it on a metal surface can worsen interference. Indeed, optimizing your laptop's position is undeniably worth your attention.
Strategic Placement: Optimizing Your Wireless Experience
Fortunately, there are simple solutions to address this problem. First, try to keep your laptop away from other electronics. In addition, move your laptop off metal surfaces. These minor adjustments can yield significant improvements. Moreover, always keep your router in an open location. Eventually, you will begin to experience a more stable connection.
Other Contributing Factors: Beyond Your Laptop
While your laptop is a primary suspect, other factors can affect your Wi-Fi. Router placement, for example, plays a vital role. Furthermore, the age of your router can also contribute. Furthermore, physical obstructions, such as thick walls, can degrade the signal. Therefore, consider all elements within your home's wireless ecosystem.
Troubleshooting Steps: A Simple Guide
Feeling overwhelmed? Don’t be. You can troubleshoot common Wi-Fi problems independently. For instance, restart both your laptop and your router. Then, check your router's firmware for updates. Similarly, perform a speed test to gauge your connection's efficacy.
The Importance of Router Management: A Key Consideration
Router management, in essence, is critical for optimal performance. Regularly checking and updating your router’s settings is beneficial. Moreover, selecting the optimal channel for your Wi-Fi signal is essential. This is because Wi-Fi channels can become crowded. Lastly, consider using a dual-band router.
Beyond the Basics: Advanced Techniques
For truly advanced users, consider these strategies. Explore your router’s advanced settings for customization. Furthermore, explore Wi-Fi analyzers. These tools help to identify the best channel for your network. Above all, remember that experimentation is key.
Conclusion: Reclaiming Your Wireless Freedom
The battle for a strong Wi-Fi signal is ongoing. With a few key adjustments, however, you can significantly improve your connection. In particular, being mindful of your laptop's location is immensely helpful. Therefore, you can enjoy a smoother, more reliable online experience. To conclude, take control of your wireless destiny!
Brother Printer WiFi Setup: Lightning-Fast Connection Guide!Laptop Killing Your Wi-Fi? This SHOCKING Reason Will BLOW Your Mind!
Hey everyone, ever felt like your Wi-Fi is in a constant battle with your laptop? One minute you're streaming a movie like a boss, the next – buffering hell. We've all been there, staring at that dreaded spinning circle, wondering if our internet provider is waging war, or if it's something far more sinister. Well, buckle up, because we're about to dive deep into a surprising culprit, a reason that might just have you facepalming in disbelief.
1. The Wi-Fi Whisperer: Why Is My Laptop a Wi-Fi Saboteur?
Let’s be honest, modern life hinges on a strong Wi-Fi signal. From work to entertainment, it's the lifeblood of our digital existence. But what happens when that vital connection becomes unstable, slow, or completely drops out? Troubleshooting Wi-Fi issues can feel like navigating a labyrinth, and frankly, it can be incredibly frustrating. We often point fingers at the router, the internet provider, or even the weather (hey, it happens!), but the truth? Your laptop itself could be the primary suspect.
2. The Usual Suspects: Ruling Out the Obvious Wi-Fi Killers
Before we get to the big reveal, let's quickly dismiss the usual suspects. Think of these as the elementary school bullies of the Wi-Fi world – easy to identify and usually easy to deal with.
- Distance from the Router: The further you get from your Wi-Fi source, the weaker the signal. Think of it like shouting across a football field – your voice gets lost in the distance.
- Obstructions: Walls, furniture, and even your microwave can interfere with the Wi-Fi signal, absorbing or reflecting it like a mirror.
- Router Overload: Too many devices connected at once? It's like trying to squeeze a crowd into a tiny elevator.
- Outdated Router: Old routers aren’t built to handle today’s bandwidth demands. It's like driving a classic car on a Formula 1 track – it's just not going to keep up.
Okay, checked all those boxes? Still having problems? Then let's move on.
3. The SHOCKING Culprit: It's Not the Router (Usually) – It's Your Laptop's Internal Clock!
Here’s the bombshell, folks: the most common reason your laptop might be sabotaging your Wi-Fi isn't hardware, software, or an angry neighbor. It's the clock inside your laptop! And by clock, I mean the real-time clock (RTC), that little chip that keeps time ticking even when your laptop is off. Now, how on earth could that possibly be the culprit?
4. The Clock's Connection: How the RTC Affects Your Wi-Fi
Believe it or not, the RTC plays a vital role in your laptop's communication with the Wi-Fi network. This is because it's used for Network Time Protocol (NTP), the mechanism your laptop uses to synchronize the system clock with a time server. Now, when the internal clock of your laptop is significantly off, it can interfere with the secure connections needed for proper networking. This can manifest in decreased speeds, consistent dropouts, or total connectivity failure.
5. The Time Flies: The Impact of Clock Drift
Over time, the RTC can start to drift, meaning it gradually loses accuracy. This drift can be caused by various factors, including battery depletion (especially in older laptops), temperature changes, and even manufacturing imperfections. The bigger the drift, the bigger the problem!
6. Proof Positive: Seeing the Clock's Errors in Action
How can you check if this timing issue is the root of your Wi-Fi woes? Here's a simple way to find out:
- Access Your Laptop's Clock Settings: Usually, you can access these through the system's control panel or settings app.
- Check the Time: Compare your laptop's time to that of an accurate time source, like a clock on your smartphone or a reliable website that provides precise time.
- The Verdict: If your laptop's time is noticeably behind or ahead (more than a few minutes), then the clock could be the problem.
7. A Simple Fix: Synchronizing Your Laptop’s Clock
Thankfully, fixing this is generally straightforward. You usually have two options:
- Automatic Time Synchronization: Ensure you have your laptop set to automatically synchronize the time with a time server. This is usually the default setting on most operating systems.
- Manual Time Synchronization: If automatic doesn’t work, you can manually synchronize the time. There are tutorials online on how to go about doing this on your computer.
8. The Power of Prevention: Keeping Your Clock Ticking Right
Prevention is always key. Here are some ways to help keep your laptop’s clock running smoothly:
- Keep the Battery Charged: If your laptop has a built-in battery for the RTC, keep it charged by using the device or keeping it plugged in.
- Regular Updates: Make sure your operating system is updated, which helps keep the clock software more stable.
- Battery Replacement: If your laptop is getting old, consider replacing the CMOS battery, which can help fix errors.
9. Beyond the Clock: Other Potential Causes of Wi-Fi Woes (and how to address them)
While the clock is frequently the guilty party, many elements can affect your Wi-Fi. Here are some other things you can investigate if the clock is not your problem:
- Outdated Drivers: Outdated wireless network adapter drivers can be a prime cause of Wi-Fi troubles. Regularly check for driver updates through Device Manager (Windows) or System Information (macOS).
- Interference from Other Devices: Devices like microwaves and Bluetooth devices can interfere with Wi-Fi signals. Try to minimize interference by locating your router away from these devices.
- Router Issues: A failing router is another common cause. Make sure you are using the right kind of router for your needs. If the router has been running for too long, a factory restart (after backing up your settings) may restore it to full function.
10. The Router's Role in the Wi-Fi Tango
Though your laptop is often the culprit, your router indeed plays a starring role in the Wi-Fi performance. A poor router (or one that's not correctly configured) can cause all sorts of connectivity issues.
- Router Firmware: Much like your laptop, your router needs frequent firmware updates.
- Channel Congestion: If you live in a densely populated area, your Wi-Fi can be competing for the same "channels." Try changing the channel your router uses to reduce interference.
- Router Placement: Placing your router in the wrong place can kill your Wi-Fi. Ideally, place it in a central, open spot in your home, away from obstacles like walls or metal objects.
11. Advanced Troubleshooting: Diving Deeper into Wi-Fi Diagnostics
If simple fixes aren't cutting it, you may want to try more advanced diagnostics.
- Network Diagnostic Tools: Your operating system may have built-in network diagnostic tools to identify problems.
- Command Prompt/Terminal Commands: Try using ping or tracert commands to test your connection.
- Consider a Wi-Fi analyzer: If you are experiencing connectivity problems, consider using a Wi-Fi analyzer to check how congested your Wi-Fi network is.
12. The Wi-Fi Detox: Reclaiming Your Connection
We've covered a lot, but here's the good news: resolving your Wi-Fi woes is often easier than you think.
- Prioritize the Basics: Check the simple things first: distance, obstructions, device overload.
- Check Your Clock: It may sound crazy, but the chances are that issues with the internal clock are the root cause of your problems.
- Update Firmware: Keep firmware updated for your router, your computer's drivers, and your operating system.
- Reclaim Your Wi-Fi: Apply these solutions, and you're on your way to a smoother, faster, and more reliable wireless experience.
13. Avoiding the Wi-Fi Blues: Proactive Practices
Maintaining a strong Wi-Fi connection is about more than just fixing problems as they appear. Proactive practices can save you a lot of headaches.
- Regular Maintenance: Restart your router and other devices periodically.
- Monitor Your Network: Keep an eye on your data usage, and be aware of the devices using it.
- Invest in Quality Equipment: A good router and a reliable Wi-Fi adapter on your laptop can make a big difference.
14. The Future of Wi-Fi: Staying Ahead of the Curve
Wi-Fi technology is constantly evolving. Staying informed about the latest standards and best practices ensures you remain on the cutting edge.
- Understand Wi-Fi Standards: Learn about Wi-Fi 6 (802.11ax) and the benefits it offers.
- Embrace the Latest Technologies: Be open to adopting mesh Wi-Fi systems or other advanced solutions if they fit your needs.
- The Wi-Fi Revolution: With each new advance in Wi-Fi technology, we get the power to do more, reach further, and be more connected than ever.
WiFi Disconnects Automatically Windows 10 8 7 Laptop How to fix WiFi Automatically Turning Off

By How to Fix Your Computer WiFi Disconnects Automatically Windows 10 8 7 Laptop How to fix WiFi Automatically Turning Off by How to Fix Your Computer
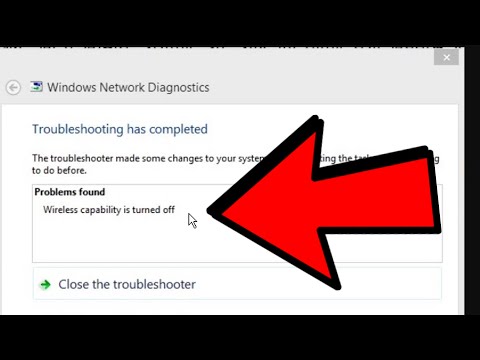
Wireless capability is turned off in Windows 10 1187 How To Fix Wifi Capability Is Turned Off

By Victor Explains Wireless capability is turned off in Windows 10 1187 How To Fix Wifi Capability Is Turned Off by Victor Explains
Wireless capability is turned off Fix
By The Geek Page Wireless capability is turned off Fix by The Geek Page

Title: Wi Fi turns off by itself in Windows 11
Channel: TheWindowsClub
Wi Fi turns off by itself in Windows 11 by TheWindowsClub
Wifi On Laptop Phone
The Art of Sourdough: A Comprehensive Guide to Baking Perfection
The aroma of freshly baked bread, a symphony of yeasty notes and subtle tang. The satisfying crunch of a perfectly blistered crust, giving way to a tender, airy crumb. These are the hallmarks of exceptional sourdough, a testament to the magic that unfolds when flour, water, and time intertwine. For generations, bakers have revered the process, and now, it's your turn to embark on this rewarding journey. This comprehensive guide will equip you with the knowledge and techniques to master the craft of sourdough baking, transforming your kitchen into a haven of deliciousness.
Understanding the Heart of Sourdough: The Starter
The cornerstone of any great sourdough loaf is, without question, a thriving starter. This living culture, a complex ecosystem of wild yeasts and beneficial bacteria, is what gives sourdough its characteristic flavor and texture. Creating a robust starter is not merely a matter of mixing ingredients; it demands patience, observation, and a keen understanding of the microbial dance within.
Cultivating Your Own Starter: The Building Blocks of Flavor
To begin, you'll need equal parts unbleached all-purpose flour and non-chlorinated water. The starting ratio is typically 1:1 by weight – let's say 50 grams of flour and 50 grams of water. Combine these in a clean glass jar, ensuring thorough mixing to eliminate any dry pockets of flour. Cover loosely with a lid or a breathable cloth, like cheesecloth secured with a rubber band.
Over the course of the first week, observe the changes. You may not see much immediately, but within a few days, you'll likely notice subtle bubbling, a sign that the yeast is beginning to activate. Maintain the starter by discarding about half of the mixture each day, then adding a fresh dose of 50 grams of flour and 50 grams of water. This process, known as feeding, provides the starter with the fuel it needs to thrive. A warm environment, ideally around 75-80°F (24-27°C), will accelerate the fermentation process.
Recognizing a Healthy Starter: Telling the Tale
A healthy starter is a dynamic entity. It will double in size within a matter of hours after feeding, displaying a bubbly, airy texture and a slightly acidic aroma, reminiscent of yogurt or green apples. The color should be a creamy off-white, with no signs of mold or discoloration. The timing of the doubling will vary depending on the temperature and the strength of your culture, but generally, a starter that reliably doubles within 4-8 hours at room temperature is considered robust.
Troubleshooting: Navigating the Starter Challenges
Sometimes, a starter can be a bit temperamental. If your starter is not showing signs of activity after a few days, don't despair. Ensure your water is chlorine-free, as chlorine can inhibit yeast growth. Check the temperature of your environment; a cooler environment may slow down the process. A touch of whole wheat flour can sometimes give it a boost, providing nutrients that can help the starter come to life. Bad smells suggest you should start over. Remember, patience is key.
Formulating the Dough: The Symphony of Ingredients
With a thriving starter in hand, the journey towards sourdough perfection continues with the formulation of the dough. The ingredients are few, but each plays a crucial role in the final product.
The Flour Choice: Unleashing the Potential
The type of flour you select will significantly impact the final loaf. Unbleached all-purpose flour is a great starting point, providing a balance of protein and gluten development. For a more complex flavor and a heartier crumb, consider incorporating whole wheat flour, rye flour, or spelt flour. Experimentation is key; each flour imparts its unique character to the dough. Higher-protein flours will generally result in a more robust structure and a more open crumb, while lower-protein flours create a more delicate texture.
Water: The Essence of Hydration
Water is essential for hydrating the flour and activating gluten development. The water temperature should be lukewarm, around 75-80°F (24-27°C), to encourage fermentation without overheating the yeast. The hydration level, expressed as a percentage of water relative to flour, significantly influences the dough's texture and handling. Higher hydration doughs are more open and airy but can be more challenging to work with.
Salt: The Flavor Enhancer and Structural Support
Salt does more than just enhance flavor; it also plays a vital role in controlling yeast activity and strengthening the gluten network. Without salt, the dough will ferment too quickly and lack the structure needed to rise properly. Use sea salt or kosher salt for optimal flavor.
Mixing the Dough: The Art of Incorporation
The initial mixing stage, known as the autolyse, is a critical step that involves combining the flour and water and allowing them to rest, typically for 30-60 minutes. This process allows the flour to fully hydrate, which improves gluten development and enhances the final texture of the bread.
Methods of Dough Mixing: Embracing the Techniques
There are several dough-mixing methods you can use, each with its own nuances. Hand mixing, though labor-intensive, allows you to feel the dough’s consistency and develop a deeper connection with the process. Using a stand mixer with a dough hook provides a powerful alternative. Incorporate the starter and salt after the autolyse.
Bulk Fermentation: The First Rise
After mixing, the dough undergoes bulk fermentation, the first full rise, during which the yeast and bacteria work their magic. This stage is crucial for developing flavor and structure. The length of this process depends on several factors, including the temperature of your environment, the strength of your starter, and the type of flour you're using.
The Art of Folding: Developing Strength and Structure
During bulk fermentation, regular folding is essential to strengthen the dough and develop gluten. Every 30-60 minutes for the first 2-3 hours of bulk fermentation, perform a set of folds. Gently stretch one side of the dough upwards and fold it over onto itself. Repeat this process around the entire dough.
Monitoring the Rise: The Signs of Readiness
The dough is ready for the next stage when it has increased in volume by approximately 50-75% and shows signs of air bubbles throughout. A simple way to assess readiness is the "poke test": gently poke the dough with a floured finger. If the indentation slowly springs back, the dough is ready. If it springs back immediately, it needs more time; if it collapses, you've gone too far.
Shaping the Loaf: Crafting Beauty and Form
Once the dough has completed its bulk fermentation, it's time to shape it into the desired form. This crucial step gives the loaf its final shape and helps to trap the gases produced during fermentation, contributing to the beautiful open crumb and oven spring.
Gentle Shaping: Preserving Air and Structure
Remove the dough from its proofing container and gently shape it into a round (boule) or an oblong (batard), depending on your preference. Avoid degassing the dough too aggressively, as this will eliminate the air pockets that contribute to the airy crumb. Shape it with care. This method involves stretching the dough into a rough rectangle and then folding the sides inward like an envelope.
The Proofing Stage: A Resting Period
After shaping, the loaf undergoes a final proofing stage, which typically takes place in a banneton basket or a well-floured bowl lined with a cloth. This stage allows the dough to relax and develop further flavor.
Banneton Baskets: The Shaping Support
Banneton baskets are specifically designed for proofing sourdough loaves. They provide support for the dough's structure while allowing the exterior to develop a beautiful pattern. Ensure that the banneton is well-floured with rice flour or a mixture of rice flour and all-purpose flour to prevent the dough from sticking.
The Art of Baking: Transformation in the Oven
The final act of sourdough baking is where the magic truly happens. The oven's heat transforms the dough, creating the crust, developing the flavor, and giving the bread its final form.
Preheating the Oven: The Preparation
Preheat your oven to 450-500°F (232-260°C) with a Dutch oven or a baking stone inside. The Dutch oven provides a humid environment that encourages the oven spring and the development of a beautiful crust. The baking stone provides radiant heat from the bottom, contributing to an evenly baked loaf.
Scoring the Loaf: A Creative Expression
Before baking, score the top of your loaf with a sharp blade or a lame. Scoring allows the loaf to expand in a controlled manner and create a beautiful pattern on the surface. Experiment with different scoring patterns to add a personal touch to your bread.
The Baking Process: Unveiling the Delight
Carefully place the loaf in the preheated Dutch oven, or onto the preheated baking stone. If you are using a Dutch oven, cover it with the lid. Bake the loaf for about 20 minutes covered, then remove the lid and continue baking for another 25-35 minutes, or until the crust is deeply golden brown and the internal temperature reaches 205-210°F (96-99°C). If using a baking stone, you may want to add steam to the oven initially by adding water to a preheated pan.
Cooling: The Unsung Hero of Sourdough
Resist the urge to cut into your freshly baked sourdough immediately.
