attach 2 laptops to a wifi printer
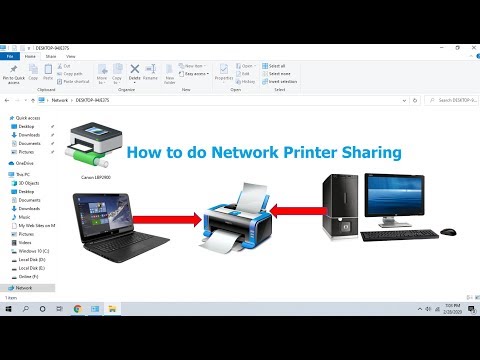
Title: How to Share Printer on Network Share Printer in-between Computers Easy
Channel: MJ Tube
How to Share Printer on Network Share Printer in-between Computers Easy by MJ Tube
**Laptop Wifi Printer Setup: The SHOCKINGLY Easy Trick!**
Unlocking Wireless Printing: The Surprisingly Simple Secret You've Been Missing!
Alright, let's dive in! Setting up a Wi-Fi printer with your laptop can seem daunting, but trust me, it's far easier than you think. Many people get tripped up, but you won't be one of them. This guide will unveil the shockingly simple trick to get you printing in minutes. It's time to ditch the tangled wires and embrace wireless freedom.
The Initial Hurdle: Understanding the Basics
Before we leap into the setup, let's clarify a few fundamentals. Firstly, your printer needs to be Wi-Fi enabled. Essentially, it has to speak the same wireless "language" as your laptop. Secondly, you’ll need a secure Wi-Fi network to connect. Think of it as the highway your printer and laptop will use to communicate. Consider that your laptop and printer will need to know each other to exchange information. Therefore, establish a common ground first, then proceed.
Step-by-Step: The Shockingly Simple Setup
Now, here comes the fun part! We'll break down the process into easy steps. Firstly, ensure your printer is powered on. Then, double-check that it's connected to your home Wi-Fi network. In case your printer has a screen, follow its instructions. Typically, this involves selecting your network and entering the password. Also, it's a good idea to note your network's name. Sometimes, the printer may require a WPS connection. Essentially, this means pressing the WPS button on both your router and printer. After that, they handle the connection automatically.
Downloading the Right Drivers: The Critical Component
Next, let's talk drivers. Think of drivers as the translators. These are software programs that help your laptop "understand" your printer. So, head over to your printer manufacturer's website. Find the support or download section. Now, search for the specific model of your printer. Download the latest available drivers. Consequently, you’ll be able to ensure seamless compatibility.
Installing and Configuring: The Home Stretch
Once the drivers are downloaded, install them. For PC users, double-click the downloaded file. Follow the on-screen instructions. For Mac users, the process is quite similar. After installing, you might be prompted to restart your computer. Following that, your laptop should now be familiar with your Wi-Fi printer. Navigate to your computer's settings, then devices, and finally, printers and scanners.
Adding Your Printer: The Final Touch
Click "Add printer or scanner." Your laptop will start searching for available printers. If your printer is on and properly connected to your Wi-Fi, it should appear in the list. Select your printer and follow any remaining on-screen prompts. You might be asked to confirm the printer's connection or test print a page. Ultimately, it’s just to confirm everything works.
Troubleshooting Common Issues: Don't Panic!
What if something goes wrong? Don't worry! Here are some quick troubleshooting tips, often a lifesaver. Firstly, double-check that your printer and laptop are on the same Wi-Fi network. Is your printer turned on? It seems obvious, but it's a common mistake. Furthermore, restart both your printer and laptop. Sometimes, a simple reboot can fix the problem. Then, run the printer troubleshooter on your operating system. It might identify and resolve the issue. If all else fails, consult your printer’s manual or the manufacturer's support website.
Beyond the Basics: Tips for Success
Let's elevate your printing experience with some extra tips. Regular driver updates are crucial. Keep your drivers up-to-date for optimal performance. Consider the printer's location. Ensure your printer is within the range of your Wi-Fi signal. Otherwise, you might experience connectivity problems. Additionally, organize your print queue. This prevents printing delays. If you’re using multiple devices, consider printer sharing. It allows everyone on your network to print.
The Wireless Advantage: Embrace the Freedom
You've done it! You've successfully set up your Wi-Fi printer. Now, you can enjoy the freedom of wireless printing. No more tangled cords. Therefore, print from virtually anywhere in your home. Streamline your printing process. Because this is one of the most convenient things to do with modern technology.
Final Thoughts: Printing Made Easy!
Setting up a Wi-Fi printer doesn't have to be a headache. Now you know the steps, you can quickly get your printer up and running. Remember to be patient, follow the instructions carefully, and don't be afraid to troubleshoot. So, go ahead and embrace the wireless world of printing. Your documents are just a click away. Enjoy your newfound printing freedom!
Windows 7 WiFi Nightmare? Find Your Connection NOW!Okay, buckle up, buttercups! Because we're about to dive headfirst into the often-dreaded world of setting up your laptop with your Wi-Fi printer. I know, I know, the thought alone might send shivers down your spine, conjuring images of tangled wires, cryptic error messages, and the overwhelming urge to chuck your printer out the window. But hold on! I'm here to tell you – and I mean this wholeheartedly – that it doesn't have to be a technological Armageddon. In fact, there's a shockingly easy trick that’ll have you printing wirelessly in minutes. Let's do this!
Laptop Wifi Printer Setup: The SHOCKINGLY Easy Trick!
1. The Wi-Fi Printing Predicament: Why Does It Seem So Complicated?
Let's be honest, setting up a Wi-Fi printer can feel like navigating a labyrinth blindfolded. It's like trying to assemble IKEA furniture without the instructions – confusing, frustrating, and ultimately, leaving you feeling defeated. But why is this seemingly simple task so often a pain? Well, it stems from a few key culprits:
- Driver Drama: Printer drivers, those tiny pieces of software that allow your laptop to "talk" to your printer, can be a nightmare. They're often outdated, incompatible, or just plain missing. It's like trying to speak a foreign language without a translator.
- Network Nightmares: Your home Wi-Fi network, that seemingly invisible web that connects all your devices, can sometimes trip you up. Think of it as a messy room where your printer is hidden. If it isn't visible to your computer it will be a struggle.
- The User Manual Monster: Let's face it, user manuals can be intimidating. They're often written in technical jargon and seem designed to confuse, not clarify. They are filled with technical jargon to confuse you.
- Port Protocol Puzzles: Then there are port issues and protocol problems.
But fear not! We’re here to demystify the process and unveil The Shockingly Easy Trick!
2. Before We Begin: A Quick Tech Check & Essential Supplies
Before we jump into the nitty-gritty, let's make sure we're playing with a full deck. You'll need a few things:
- Your Laptop: This is your command center! Make sure it's charged, connected to your Wi-Fi, and running an operating system like Windows or macOS.
- Your Wi-Fi Printer: This is the star of the show! Make sure it’s plugged in, powered on, and connected to your Wi-Fi network.
- Your Wi-Fi Network Details: Have your Wi-Fi password handy. You WILL need it.
- Patience (and a Pinch of Humor): Because sometimes, even the easiest things can throw you a curveball. A sense of humor is very helpful.
Think of this like setting up an epic game night. You need the players (laptop, printer), the venue (Wi-Fi), and the snacks (patience!).
3. Unveiling The Secret Weapon: The WPS Button (Your Printing Superhero!)
Here’s the SHOCKINGLY easy trick I've been hinting at. It centers around the WPS (Wi-Fi Protected Setup) button. Most modern Wi-Fi printers have one, often marked with a logo that looks like two arrows forming a circle. Think of it as the super-powered button that cuts through all the technical mumbo-jumbo. It is the key.
- How It Works: The WPS button streamlines the connection process by allowing your printer and laptop to automatically exchange the necessary information to join your Wi-Fi network. It's like a secret handshake between your devices, bypassing the need for entering complicated passwords or navigating complex menus.
- Finding the WPS Button: The location varies depending on your printer model. It might be on the front, side, or back. Consult your printer's manual if you're having trouble locating it.
- The Universal Application: This is a universal tool, it works on any laptop.
4. The WPS Setup: The Step-by-Step Guide to Printing Nirvana
Ready to unleash the WPS magic? Follow these simple steps:
- Initiate WPS on Your Printer: Press and hold the WPS button on your printer. The indicator light on the printer will start blinking, signaling that it's in pairing mode.
- Initiate WPS on Your Laptop (Sometimes!): Often, this step is not required, as modern laptops will detect the printer's WPS signal automatically. However, if your laptop doesn't automatically detect the printer, you might need to initiate the WPS connection from your laptop's Wi-Fi settings. The exact steps vary based on your operating system (Windows or macOS).
- Windows: Go to "Settings" > "Devices" > "Printers & scanners" and click "Add a printer or scanner." Your laptop should discover your printer.
- macOS: Go to "System Preferences" > "Printers & Scanners" and click the "+" button to add a printer. Your laptop should detect your printer.
- Wait for the Magic: Give it a few seconds (or up to a minute) for your laptop to establish a connection with your printer. The indicator light on your printer should turn solid, indicating a successful connection.
- Print a Test Page: Once the connection is established, it's time to confirm. Print a test page via the printer's menu to confirm it's the right printer and the system is running.
5. Windows vs. macOS: Tailoring the Setup to Your Operating System
While the core WPS process remains the same, there might be slight variations depending on whether you're using Windows or macOS.
- Windows: Windows has a more extensive system for setting up your printer and detecting the necessary drivers. Take a look at the printers and scanners panel.
- If you have a Windows OS, then make sure the printer is connected to the same network as your laptop. Go to your laptop's Settings and Printers & Scanners, then click "Add a printer or scanner." Windows should automatically find your printer.
- macOS: macOS makes the process very simple and user-friendly.
- Similarly, macOS has an easy interface. Start with the System Preferences and then select Printers & Scanners. Click the + button to add a printer. You will be able to then select the printer of choice.
6. Driver Dilemmas? Handling Printer Driver Hiccups
Even with the WPS magic, you might encounter driver-related issues. If your laptop doesn't automatically install the correct printer drivers, here's what to do:
- Manufacturer's Website: Go to your printer manufacturer's website (e.g., HP, Epson, Canon). Search for your printer model and download the latest drivers for your operating system.
- Manual Installation: Once the drivers are downloaded, run the installation file and follow the on-screen instructions.
- Troubleshooting: If you're still facing problems, consult the printer manufacturer's support page or online forums for troubleshooting tips.
7. Wi-Fi Signal Strength: Ensuring a Strong Connection
A weak Wi-Fi signal can lead to printing dropouts and frustrating delays. Ensure your printer is within a reasonable range of your Wi-Fi router. If necessary:
- Move the Printer: Position your printer closer to your router for a stronger signal.
- Wi-Fi Extender: Consider using a Wi-Fi range extender to boost the signal in areas with weak coverage.
8. Troubleshooting Common Wi-Fi Printing Problems
Let us look at some common problems experienced by people.
- Printer Not Found: Double-check that your printer is turned on, connected to the same Wi-Fi network as your laptop, and that the WPS process has been completed successfully.
- Printing Errors: Check for paper jams, ink/toner levels, and any error messages displayed on your printer's screen.
- Slow Printing: Ensure there's no high network traffic and move the printer closer to the router.
- Printer Offline: Make sure the printer is turned on and connected to the network.
- Spooler Problem: There is a printing spooler problem. You can try to cancel the printing job, or restart your computer.
9. Beyond the Basics: Maximizing Your Wi-Fi Printing Experience
Once you've mastered the basics, you can explore additional features to enhance your Wi-Fi printing setup.
- Mobile Printing: Many printers support mobile printing, allowing you to print from your smartphone or tablet.
- Cloud Printing: Enable cloud printing services (e.g., Google Cloud Print) to print from anywhere with an internet connection.
- Printer Settings & Preferences: Adjust settings such as print quality, paper size, and color settings from your laptop's printer settings.
10. Security First: Protecting Your Wi-Fi Printer
Like any connected device, your Wi-Fi printer is vulnerable to security threats. Protect your printer by:
- Securing Your Wi-Fi Network: Use a strong password for your Wi-Fi network.
- Updating Printer Firmware: Regularly update your printer's firmware to patch
How can two computers use a printer with only one USB interface

By eKL Official How can two computers use a printer with only one USB interface by eKL Official
How To Share a Printer Between Multiple Computers

By Speedy Tutorials How To Share a Printer Between Multiple Computers by Speedy Tutorials
How to Share a Printer Between Multiple Computers

By HOWTECH How to Share a Printer Between Multiple Computers by HOWTECH

Title: How to Share a USB Printer over Network
Channel: Techy Druid
How to Share a USB Printer over Network by Techy Druid
Wifi On Laptop Phone
Here's the title: "The Definitive Guide to Mastering Sourdough: From Starter to Slice"
The Definitive Guide to Mastering Sourdough: From Starter to Slice
Embark on a culinary journey that transcends mere baking; delve into the fascinating world of sourdough. This ancient art, a testament to patience and precision, yields a loaf unlike any other. Forget the bland uniformity of store-bought bread; here, we'll unlock the secrets to crafting a sourdough masterpiece from the ground up. This is more than a recipe; it's a comprehensive exploration, a guide that will transform you from a novice into a confident sourdough artisan.
Cultivating the Heart of the Loaf: Your Sourdough Starter
The cornerstone of any exceptional sourdough loaf is the starter, a living culture of wild yeasts and beneficial bacteria. Treat your starter with the reverence it deserves; it's the engine that drives the entire process.
Initiating the Magic: The First Feed. Your journey begins with equal parts, by weight, of unbleached, all-purpose flour and non-chlorinated water. Combine these in a clean glass jar. Stir thoroughly. Cover loosely – cheesecloth secured with a rubber band is ideal – to allow air circulation while preventing contamination. Let this mixture rest at room temperature (ideally between 70-75°F or 21-24°C). Over the next 24 hours, you might see little to no action, and that's perfectly fine.
Daily Ritual: The First Week. For the next 5-7 days, discard half of your starter each day and feed it with equal parts, by weight, of flour and water. Observe the changes. Initially, expect only subtle signs: a slight thickening, a few bubbles. As the wild yeast colonizes, you'll witness increased activity: bubbles will become larger and more numerous. The starter might double in volume, and you'll detect a subtle tang, a hint of the deliciousness to come. The aroma should evolve, transitioning from a bland floury scent to something pleasantly sour and fruity. Discarding is vital to maintain balance, preventing the buildup of undesirable organisms.
Recognizing Readiness: Maturity and Activity. The magic number here is consistency. A mature starter is a testament to a thriving ecosystem. It reliably doubles or triples in volume within 4-8 hours after feeding at room temperature. It will exhibit a bubbly, airy texture, and possess a distinctive sour aroma. You'll notice the starter’s sides will display small bubbles. The texture is similar to a light and airy yogurt. This stage takes time. The exact time will depend on ambient elements, and the type of flour used.
Maintenance and Hydration: Keeping Your Starter Happy. Once your starter is mature, you can adjust the feeding schedule based on your baking frequency. If you bake regularly (once or twice a week), you can keep your starter at room temperature and feed it daily. If you bake less frequently, store your starter in the refrigerator. To use a refrigerated starter, remove it from the refrigerator, feed it, and allow it to double in size before using it for baking. The hydration of your starter – the ratio of water to flour – impacts the final loaf. A 100% hydration starter (equal parts flour and water) is the most common and versatile. However, you might experiment with higher or lower hydrations to tweak the dough's properties.
Crafting the Dough: From Autolyse to Bulk Fermentation
With a thriving starter, you’re ready to create the dough itself. This is where you transform simple ingredients into a work of art.
The Autolyse: Unlocking Gluten Potential. This essential step pre-blends the flour and water, allowing the flour to hydrate fully before kneading. This process, typically lasting 30-60 minutes, vastly improves gluten development. Incorporate the flour and water in your chosen mixing bowl, blending until no dry flour remains. Cover and rest.
Incorporating the Starter: A Symphony of Flavors. After the autolyse, add the active, bubbly starter. Mix well until it is completely incorporated into the dough. The amount of starter used varies, but a common ratio is about 20% of the total flour weight. Add the salt at this time. Salt is critical not just for flavor, but also for controlling fermentation; it slows down the yeast activity.
Kneading or Folding: Building Strength. Kneading develops the gluten network, which provides structure to your loaf. You can knead by hand or with a stand mixer. If kneading by hand, use the stretch-and-fold method. This is where you grab one edge of the dough, stretch it upward, and fold it over the rest. If you use a stand mixer, use the dough hook. Start on a low speed. Knead until the dough feels elastic and smooth. Alternatively, you can perform a series of stretch-and-folds during bulk fermentation.
Bulk Fermentation: The Rise to Flavor. This is where most of the flavor development occurs. The dough rests in a bulk container, undergoing fermentation. During bulk fermentation, the wild yeasts and bacteria in the sourdough starter will consume the carbohydrates in the flour. This process will create carbon dioxide, which will inflate the dough's internal structure. Bulk fermentation is dependent on temperature. At room temperature, expect this process to take 4 to 6 hours.
Understanding Gluten Development: Monitor the dough's progress. During bulk fermentation, perform a series of folds, typically every 30-60 minutes for the first few hours. These folds help develop strength and evenly distribute the gases produced. The dough should increase in volume by about 30-50%. The final dough should be light and airy.
Shaping and Proofing: Sculpting the Perfect Loaf
Now it's time to shape your dough into its final form.
Pre-Shaping: Gentle Handling. Gently turn the dough out onto a lightly floured surface. Shape the dough into a round or an oval shape. Cover and let rest for 20-30 minutes. This is called a pre-shape and helps relax the gluten, making the final shaping easier.
Final Shaping: The Art of the Boule or Batard. The final shaping determines the appearance of your loaf. A boule is a round loaf, while a batard is an oval loaf. The crucial part of shaping is the creation of surface tension. For a boule, gently stretch the edges of the dough towards the center, creating a tight surface. For a batard, roll the dough tightly, like a jelly roll, and ensure that the seam is sealed.
Proofing: A Patient Rest. Place the shaped dough in a banneton basket or a bowl lined with a floured cloth. This is where the loaf rests, or proofs, until it is ready to bake. The final proofing time depends on the strength of your starter and the temperature. Place your proofed loaf, seam-side up, into a banneton basket lightly dusted with rice flour. Cover it with a plastic bag or damp towel and let it proof, preferably in the refrigerator, for at least 12 hours to several days.
Baking the Masterpiece: From Oven to Table
Baking is the final act, transforming the proofed dough into a golden-crusted, flavorful loaf.
Preheating: The Foundation of a Good Bake. Preheat your oven with a Dutch oven inside to 450-500°F (232-260°C). The Dutch oven creates a steamy environment crucial for developing a good oven spring and crust.
Scoring: Control and Aesthetics. Carefully remove the hot Dutch oven from the oven. Gently place the proofed dough into the hot Dutch oven. Score the top of the loaf with a sharp knife or lame. Scoring controls the expansion of the loaf during baking, creating a beautiful pattern.
Baking with Steam: The Crust's Best Friend. Cover the Dutch oven with the lid and bake for 20 minutes. This creates a steamy environment that allows the loaf to rise fully. This sets the crust, forming a beautifully textured crust. Remove the lid and bake for an additional 25-35 minutes, or until the crust is a deep golden brown. The internal temperature should reach 200-210°F (93-99°C).
Cooling: Patience Rewarded. Remove the baked loaf from the Dutch oven and let it cool completely on a wire rack before slicing. This is essential for preventing a gummy texture. Cool for at least two hours. Yes, it is hard to resist the aroma, but the crumb will finish setting during this cooling period.
Troubleshooting and Refinement: The Path to Sourdough Excellence
Baking sourdough is a journey; expect some bumps along the way. Don't be discouraged!
Flat Loaves: Identifying the Culprit. A flat loaf is often a sign of under-proofing or a weak starter. Ensure your starter is doubling in size after feeding and that you are allowing for adequate proofing time.
Dense Crumb: Refining Your Techniques. A dense crumb could result from over-kneading, under-proofing, or insufficient gluten development. Adjust your kneading technique, proofing time, and folding schedule.
Sourness Levels: Adjusting the pH. The level of sourness is influenced by the starter's maturity and the bulk fermentation time. If you desire a milder flavor, reduce bulk fermentation or proof
