how to turn laptop into wifi hotspot windows 8.1

Title: Turn Windows 8 Laptop into WiFi HotSpot How To
Channel:
Turn Windows 8 Laptop into WiFi HotSpot How To by
Turn Your Windows 8.1 Laptop into a WiFi Hotspot: The SHOCKINGLY Easy Trick!
Unleash Your Inner WiFi Wizard: Transform Your Windows 8.1 Laptop into a Hotspot!
Have you ever been in a connectivity conundrum? Picture this: you’re on the road, desperate for the internet. Moreover, your phone's data plan is dwindling. Suddenly, a solution appears, seemingly out of thin air! With your Windows 8.1 laptop, you can create your own personal WiFi hotspot. Consequently, you're no longer tethered to public networks or relying solely on your phone. Thus, let’s dive into this surprisingly simple trick.
Why Bother? The Perks of a Portable WiFi Hub
Firstly, let's address the elephant in the room: why bother? Primarily, transforming your laptop into a hotspot offers incredible convenience. For instance, consider the scenario of patchy WiFi signals. You can create a private, secure connection. Another advantage is the ability to connect multiple devices. Your tablet, phone, and even a secondary laptop can all benefit. Furthermore, you can avoid the dreaded data overage charges by utilizing your laptop's existing internet connection. Also, imagine situations where you need to share internet access with a friend or colleague. Therefore, your laptop becomes a versatile, portable networking powerhouse. But that's not all!
The Surprisingly Simple Steps: Your Quick Guide
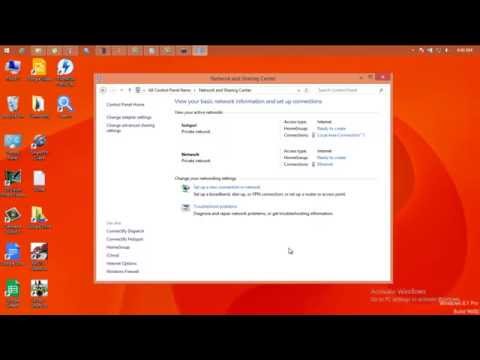
Ready to become a WiFi guru? The process is remarkably straightforward. First, ensure your Windows 8.1 laptop has a working internet connection. Because you'll be sharing this connection, it's the cornerstone of the process. Next, access the "Network and Sharing Center." You can find this by right-clicking the network icon in your system tray. Then, click "Change adapter settings.” After that, locate your current active internet connection (likely Ethernet or WiFi). Now, right-click on that connection and select "Properties." Consequently, a new window will pop up. Here is where the magic happens.
Sharing the Magic: Enabling Internet Connection Sharing
Within the "Properties" window, navigate to the "Sharing" tab. Check the box that says, "Allow other network users to connect through this computer's internet connection." Then, from the dropdown menu, select the network adapter you intend to use for your hotspot. In most cases, this will be your Wireless Network Connection. However, double-check to be sure.
Setting Up Your Hotspot: Name and Security
Before activating your hotspot, you have to set it up. So, back in the "Network and Sharing Center," click "Set up a new connection or network." Then, choose "Set up a wireless ad-hoc network." Then, give your hotspot a memorable name (SSID). Next, select your security type (WPA2-Personal is generally recommended). Finally, create a strong password; you are protecting your connection. After this, you're almost ready.
Igniting the Connection: Activating Your Hotspot
Now, you’re ready to bring your hotspot to life! Therefore, return to your laptop's network connections. Then, right-click the wireless network adapter, and choose "Enable." After that, search for the hotspot on your other devices. Then enter the password you set. The connection should now be live, ready to connect!
Troubleshooting Common Hiccups and Common Solutions
Even with simple steps, you might encounter a snag or two. In these situations, don’t panic. Make sure your internet connection is active. Also, confirm that your wireless adapter is functioning correctly. Furthermore, check your firewall settings; they might be blocking the connection. If, after all these steps, you still have problems, try restarting your laptop. But don't stop there!
Advanced Tweaks and Tips: Elevating Your Hotspot Game
Want to level up your game? Consider these advanced tips. Firstly, you can monitor your hotspot’s data usage. Secondly, for increased security, regularly change your password. Also, check for updated network drivers. They often resolve compatibility issues. Moreover, if you're concerned about battery life, consider connecting your laptop to a power source. Consequently, you can maintain a reliable connection for longer. Furthermore, explore third-party hotspot software. They offer more advanced features. Therefore, you can tailor your hotspot experience precisely.
The Bottom Line: Embrace the Ease
In conclusion, turning your Windows 8.1 laptop into a WiFi hotspot isn’t just convenient. It's also incredibly empowering. So, break free from restrictive connections and embrace the freedom of your own portable network. Armed with these simple steps, you're well on your way to becoming a WiFi wizard. Consequently, you can conquer any connectivity challenge that comes your way. Now go forth and share the internet!
Laptop WiFi Password Change: The SHOCKINGLY Easy Method!Turn Your Windows 8.1 Laptop into a WiFi Hotspot: The SHOCKINGLY Easy Trick!
Hey tech adventurers! Ever found yourself in a Wi-Fi wilderness, desperately seeking an internet oasis? We’ve all been there. That dead zone at the coffee shop, the spotty connection in your hotel room, or maybe you just need to share your precious internet with a friend. Well, guess what? Your Windows 8.1 laptop is a secret weapon, a digital Swiss Army knife, capable of turning into a fully functional Wi-Fi hotspot. And the best part? It's not a complex tech feat that requires hours of head-scratching. It's surprisingly simple – a trick, in fact. Let’s dive in and unlock this hidden power!
1. The Frustration of the WiFi Wilderness: Why This Matters
Let's be honest, being disconnected in today's world feels like being stranded on a desert island. We rely on the internet for everything – staying connected with loved ones, working remotely, streaming our favorite shows, even just checking the weather. That frustrating feeling when your phone or tablet can't connect to Wi-Fi? It’s the modern-day equivalent of being without oxygen. This is where your Windows 8.1 laptop steps in, ready to save the day. This isn't just about convenience; it's about freedom!
2. Unveiling the Magic: The Built-in Windows 8.1 Hotspot Feature
Believe it or not, Microsoft snuck a nifty little feature into Windows 8.1 that allows you to create a Wi-Fi hotspot directly from your laptop. Think of it as your personal Wi-Fi router, ready to beam internet access to all your nearby devices. No extra software download is needed – it's already built-in! It's like having a super-powered utility built into your laptop that you didn't even know about.
3. Before You Begin: What You'll Need – And What to Expect
Before we jump into the how-to, let's make sure you're prepared. You'll need:
- A Windows 8.1 laptop (obviously!).
- An active internet connection (Ethernet or Wi-Fi – the laptop will share this connection).
- A little bit of patience (seriously, this is easy!).
Now, a heads-up: The speed of your hotspot will depend on your main internet connection. Don’t expect miracles if you're already on a snail-paced connection. But for browsing, emailing, and general use, it’s more than sufficient.
4. Step-by-Step Guide: Creating Your Wi-Fi Hotspot – It’s Easier Than You Think!
Alright, let's get down to brass tacks. Here’s the simple, step-by-step guide to creating your Wi-Fi hotspot:
- Open Command Prompt (as administrator): Click the Windows icon (or press the Windows key on your keyboard). Type "cmd" in the search bar. Right-click on "Command Prompt" and select "Run as administrator." This step is critical; otherwise, the configurations won't take effect.
- Create the Hosted Network: Inside the command prompt, type the following command and press Enter:
netsh wlan set hostednetwork mode=allow ssid="YourHotspotName" key="YourPassword". Replace "YourHotspotName" with the name you want your hotspot to have (e.g., "MyLaptopWiFi") and "YourPassword" with the password you want to use (at least 8 characters). - Start the Hosted Network: Type
netsh wlan start hostednetworkand press Enter. This activates the hotspot. - Share Your Internet Connection: Open "Network Connections" (Right-click on the Wi-Fi icon in the system tray or type "Network Connections" in the Start menu search). Find the connection you're using for internet access (usually the one labeled "Wi-Fi" or "Ethernet," depending on how you're connected). Right-click on that connection and select "Properties."
- Sharing Tab: Click the "Sharing" tab. Check the box that says: "Allow other network users to connect through this computer's Internet connection." Select the hosted network you just created from the dropdown menu.
- Connect Your Devices! Now, on your other devices (phone, tablet, etc.), search for available Wi-Fi networks. You should see your new hotspot name! Enter the password you set, and voila – you're connected!
5. Customizing Your Hotspot: Name and Password Tips
Choosing a memorable hotspot name is a great way to personalize your connection. "LaptopLifeSavers" or "GetConnectedGo" are cool choices, but don't make it your actual name. And for security, use a strong password! Think a mix of uppercase and lowercase letters, numbers, and symbols. It's like putting a digital lock on your connection.
6. Troubleshooting Common Issues: When Things Don't Go Smoothly
Sometimes, things don't go as planned. Don't panic! Here are some common issues and how to fix them:
- "The hosted network couldn't be started": This usually means you either didn’t run Command Prompt as administrator or have a driver issue. Double-check you've run it as an admin and try updating your network adapter drivers.
- "The internet connection isn't shared": Make sure you've enabled Internet Connection Sharing in the "Sharing" tab of your main connection's properties (see step 5 above).
- Devices can connect but don't have internet access: Double-check the selected network in the "Sharing" tab. Sometimes, it defaults to something else. Ensure you select the hosted network you want to use.
7. The Power of the Command Prompt: Understanding The Backbone
We used the command prompt in this process. Imagine the command prompt as the backstage of your computer's operating system, where you can directly command the system. It may seem intimidating, but we kept it simple! The commands we used essentially told Windows 8.1 to enable the hosted network feature and set its name and password.
8. Security First: Safeguarding Your New Hotspot
Security is critical. Always use a strong password for your Wi-Fi hotspot. Never share your password with strangers. Consider the risks of using your hotspot in public places. It's like having a party, and only allowing people you know and trust into your house.
9. Monitoring Your Data Usage: Keeping an Eye on Things
Be mindful of your data usage, especially if you have a limited data plan. Streaming videos or downloading large files can quickly eat up your bandwidth. Keep tabs on how much data your devices are using in your laptop's Wi-Fi settings.
10. Stopping the Hotspot: Shutting Down When You're Done
When you're finished using your hotspot, you can easily shut it down. Open the command prompt (as administrator again) and type netsh wlan stop hostednetwork and press Enter. Then, if you wish, you can disable Internet Connection Sharing by unchecking the box in your main connection's properties. It’s like turning off the lights after a party.
11. Beyond the Basics: Advanced Customization Options
There are more advanced ways to customize your hotspot, but we've focused on the simplest method. Experiment with different settings!
12. The Advantages and Disadvantages: Weighing the Options
Advantages:
- Convenience: Share your internet connection wherever you are.
- Cost-Effective: Doesn't require purchasing a separate Wi-Fi router.
- Accessibility: Uses built-in Windows 8.1 features.
Disadvantages:
- Battery Drain: Creates a hotspot can drain your laptop's battery faster.
- Limited Range: The range of your hotspot is typically limited to the range of your laptop's Wi-Fi adapter.
- Can Affect Performance: Sharing your internet connection may slightly reduce your laptop's overall performance.
13. When To Consider Alternatives: When This Trick Isn't Enough
In certain situations, your laptop hotspot may not be the ideal solution. For instance, if:
- You need a strong, wide-ranging Wi-Fi signal for multiple devices.
- You want to avoid draining your laptop's battery.
- You have a very slow internet connection and need optimal speed for all devices.
In these cases, a dedicated portable Wi-Fi router or a mobile hotspot device might be a better choice.
14. Conclusion: Embrace the Power – You're Now a WiFi Wizard!
And there you have it! Turning your Windows 8.1 laptop into a Wi-Fi hotspot is not just a trick; it's an empowering skill. Now, you can conquer the digital wilderness, ensuring you're connected wherever you go. We hope this guide has demystified the process and left you feeling confident and ready to share your internet connection. Go forth and connect!
15. The Future of Connectivity: The Ever-Evolving Landscape
The world of connectivity is ever-changing. Technology evolves at lightning speed. Keep your eyes on the horizon; new innovations are constantly emerging.
Dell Laptop WiFi: Fix Your Connection NOW!
Turn your Windows 8 Laptop into Wifi Hotspot

By Tricks That Make you Smart Turn your Windows 8 Laptop into Wifi Hotspot by Tricks That Make you Smart
Turn Windows 8 Laptop into WiFi HotSpot How To

By TechEmpty Turn Windows 8 Laptop into WiFi HotSpot How To by TechEmpty
Make a Wi fi Hotspot Using your Windows 8 Laptop

By Syed Shah Zahurullah Hussaini Make a Wi fi Hotspot Using your Windows 8 Laptop by Syed Shah Zahurullah Hussaini
Title: Create WiFi Hotspot in windows 8.1, 8, 7 LaptopPC
Channel: ANDREW CRUZ
Create WiFi Hotspot in windows 8.1, 8, 7 LaptopPC by ANDREW CRUZ
Change Wifi Settings
Let’s begin.
Title: Unveiling the Ancient Mysteries: A Comprehensive Guide to the Rosetta Stone
We find ourselves at the precipice of a linguistic and historical adventure, a journey spanning millennia and civilizations. Our destination? The Rosetta Stone, an artifact of unparalleled significance, a key that unlocked the secrets of ancient Egypt and the hieroglyphic script. This guide serves not merely as an introduction, but a deep dive, an immersive exploration of this iconic relic and its profound impact on our understanding of the past.
The Genesis of Discovery: A Napoleonic Legacy
The Rosetta Stone's story begins amidst the whirlwind of Napoleon Bonaparte's Egyptian campaign in 1799. Soldiers, while fortifying Fort Julien near the town of Rosetta (Rashid) in the Nile Delta, unearthed a fragment of black granodiorite. This unremarkable slab, seemingly, held within its weathered surface the dormant power to decipher a language lost for over a thousand years. The stone, inscribed with three versions of the same decree issued by Ptolemy V in 196 BC, became a critical tool for unlocking the mysteries of ancient Egypt. Its discovery, though initially unintentional, proved to be a pivotal moment in the history of archaeology and linguistics.
This campaign, driven by Napoleon's ambition to expand French influence, unexpectedly spurred a revolution in understanding. The stone, quickly recognized for its trilingual inscription, was transported to Cairo, where scholars and linguists converged to study it. The significance was immediately apparent: the decree, written in hieroglyphic (the formal language for religious purposes), demotic (the common script of Egypt), and Greek (the language of the ruling class), offered the potential to translate hieroglyphics, which had previously been indecipherable.
Deciphering Hieroglyphs: The Key to Ancient Egypt
The work of deciphering the hieroglyphs on the Rosetta Stone was a painstaking process, involving intense scholarly debate and the gradual piecing together of clues. The prominent figures involved in unraveling the secrets of the stone include Jean-François Champollion and Thomas Young, each contributing significantly to the successful translation.
Champollion, a brilliant French scholar, recognized that hieroglyphs were not simply pictograms representing objects, but a complex system incorporating phonetic symbols, ideograms, and determinatives. He understood that hieroglyphs could represent sounds, as well as ideas. Champollion, with his deep knowledge of Coptic, the last stage of the ancient Egyptian language, started comparing the languages on the Rosetta Stone. He correctly identified the names of Ptolemy and Cleopatra within the hieroglyphic cartouches. He correctly deduced phonetic values for many hieroglyphs. This allowed him to begin deciphering other Egyptian inscriptions.
Thomas Young, an English polymath, established that some hieroglyphs represented sounds. He realized that cartouches, ovals containing the names of royalty, used phonetic symbols. Young's contributions were critical, but Champollion is usually credited as the primary force behind the full decipherment of hieroglyphics. His work provided the foundational basis for the entire study of ancient Egyptian civilization.
The Stone's Inscriptions: A Window into Ptolemaic Rule
The Rosetta Stone’s inscriptions provide invaluable insights into the political and religious environment of Ptolemaic Egypt. The decree it bears was issued by a council of priests in Memphis to commemorate the first anniversary of the coronation of King Ptolemy V Epiphanes. It details the king's benevolent actions toward the temples and priests, including tax relief and the construction of new statues. It also outlines the honors that were to be bestowed upon Ptolemy V, including the establishment of his cult and the celebration of his birthday.
The decree itself demonstrates how the Ptolemaic dynasty, Greek rulers who had succeeded Alexander the Great in Egypt, sought to legitimize their rule by aligning themselves with the Egyptian religious establishment. By issuing the decree in three scripts, the Ptolemies aimed to communicate their message to all segments of society – the Greek-speaking elite, the literate Egyptian populace, and the priests who controlled the temples.
The stone, therefore, illuminates the interplay between the ruling class and the indigenous population. It showcases the efforts undertaken to bridge cultural divides. It reinforces a political strategy to solidify control.
Material and Craftsmanship: The Fabric of History
The Rosetta Stone is crafted from granodiorite, a coarse-grained igneous rock composed primarily of quartz, feldspar, and mica. This material's durability allowed it to withstand the rigors of time and the elements. Its substantial weight and the meticulous carving of the inscriptions demonstrate the importance placed on the decree. The stone's dimensions, about 114.4 centimeters in height, 72.3 centimeters in width, and 27.9 centimeters in thickness, convey a sense of authority and permanence.
The quality of the carving varies slightly between the three scripts. The hieroglyphic inscription, intended for display in temples, exhibits the highest level of detail and precision. The demotic script, carved with a simpler style, was designed for more everyday usage. The Greek text, which was intended for broader audiences, offers a clear and accessible style.
The Stone's Journey: From Egypt to the British Museum
Following the French surrender in Egypt in 1801, the Rosetta Stone was ceded to the British as part of the Treaty of Alexandria. It was transported to England and placed in the British Museum, where it has remained on permanent public display ever since. The legal ownership of the stone has been a subject of much debate, with Egypt occasionally requesting its return.
The stone's visibility in a world-renowned museum has increased the number of people interested in this significant artifact. It has been a major draw for millions of visitors, inspiring countless scholars and enthusiasts to study the ancient world. The British Museum's commitment to preserving and exhibiting the stone for public education further solidifies its cultural importance.
The Legacy of Understanding: Impact on Egyptology
The decipherment of the Rosetta Stone revolutionized the study of ancient Egypt. It provided the key to understanding the hieroglyphic script, opening a window to thousands of years of history, culture, and religious beliefs. This breakthrough enabled scholars to access a wealth of information that was previously inaccessible.
The decipherment of the Rosetta Stone also revolutionized our knowledge of ancient Egyptian literature. The Rosetta Stone provided the key to unlock thousands of hieroglyphic inscriptions. This allowed scholars to read and interpret previously unknown texts. They also began to learn about their culture and society. The Rosetta Stone showed us that Egyptian writing used both pictorial and phonetic values. The knowledge that hieroglyphs comprised both of these values was critical for understanding the writing system.
The Stone in the Modern World: Continuing Influence
The Rosetta Stone continues to captivate and inspire. It has transcended its role as a historical artifact and become a symbol of knowledge and discovery. Its image and story are widely known. It is often referenced in popular culture, further solidifying its recognition as a cultural icon.
The Rosetta Stone is a testament to human ingenuity and the enduring power of language. The Rosetta Stone has become a symbol of understanding and communication. It is a reminder that we can overcome challenges by approaching them with scholarly dedication.
The stone's digital presence is also constantly evolving. The British Museum has created online resources, including high-resolution images and interactive tools, to allow people worldwide to explore the Rosetta Stone in detail. These digital initiatives extend the stone's reach and promote global understanding of the ancient world.
Preservation and Future Research: Safeguarding the Past
The Rosetta Stone’s preservation is of paramount importance. The British Museum employs conservation experts to monitor the stone's condition and ensure it remains accessible for generations. These efforts include careful cleaning, controlled environmental conditions, and regular assessment of its structure.
Ongoing research continues to refine our understanding of the Rosetta Stone. New interpretations of the inscriptions and comparisons with other ancient texts continually provide new insights into the language, culture, and history of ancient Egypt. Scholars are now working to fully understand the entire process of creating hieroglyphs. The Rosetta Stone remains at the heart of an ongoing scholarly discourse.
Conclusion: A Timeless Treasure
The Rosetta Stone is more than just a piece of rock; it is a portal to the past, a testament to human endeavor, and a symbol of the power of knowledge. Its discovery and decipherment marked a turning point in our ability to understand ancient civilizations. The stone continues to inspire awe and wonder and serves as a reminder that the past is never truly lost, but can be recovered through dedicated study and unwavering curiosity. Its story is a powerful testament to the enduring human spirit and an invitation to continue our exploration of the mysteries of the ancient world. This invaluable piece of history will continue to be deciphered and studied for centuries to come.
