canon g16 wifi to laptop

Title: Canon Powershot G16 WiFi Setup & Demo
Channel: Omar Correa
Canon Powershot G16 WiFi Setup & Demo by Omar Correa
Canon G16 Wi-Fi to Laptop: The SHOCKINGLY Easy Trick You NEED!
Canon G16 Wi-Fi to Laptop: Unleash Your Photos in Seconds!
Remember those frustrating days of battling cables and card readers? You wanted a quick photo transfer from your Canon G16 to your laptop. Well, those days are officially over. This isn't just a simple tutorial; it’s a revelation. You'll discover a shockingly easy trick. It will transform your workflow forever. So, buckle up; your photo-sharing life is about to get a serious upgrade.
The Wireless Revelation: Ditching the Dreaded Cables
We all love the Canon G16, don't we? It’s a fantastic camera. Its image quality is phenomenal. But transferring photos used to be a hassle, right? Let's be honest, those USB cables were a pain. They tangled. They got lost. They slowed you down. Fortunately, Canon equipped the G16 with Wi-Fi. This is a game-changer, especially for modern photographers like you. Furthermore, it opens up a world of wireless possibilities. You can transfer photos with incredible ease. You will get rid of all the cable clutter.
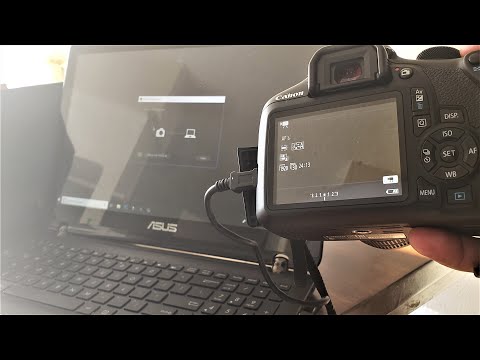
Setting Up Your Canon G16 for Wireless Magic
The initial setup might seem daunting. This is completely normal. But trust me; it's not as complex as you think. You'll be sharing photos wirelessly in a matter of minutes. First, go to your camera's menu. Next, look for the Wi-Fi settings. These are usually under the "Wireless" or "Connectivity" options. Once you find it, enable Wi-Fi. Then, select "Connect to Computer". The camera will need to connect to your home Wi-Fi network. However, this connection is critical. If you haven't connected your G16 before, it may prompt you to enter your Wi-Fi password. Ensure this is entered correctly.
Installing the Canon Image Gateway Software
Before you can transfer photos, you'll need the right software. You’ll have to install the Canon Image Gateway software on your laptop. You can download this software directly from Canon’s website. Be sure to get the correct version for your operating system (Windows or macOS). Follow the installation instructions. This is usually a straightforward process. Once installed, launch the software. You’ll need to register your Canon G16 with the software. Most of the time, this step is critical.
Connecting Your Canon G16 to Your Laptop Wirelessly
Now for the moment of truth! Turn on your Canon G16. Make sure the camera is connected to your Wi-Fi network. Consequently, open the Canon Image Gateway software on your laptop. You'll have the choice to choose to connect to your Canon G16. Your laptop can now "see" your camera. After that, select the camera from the software’s interface. However, if you are successful, the camera should now connect to your laptop. You can then initiate the transfer.
Transferring Photos: The Simple, Speedy Process
Once connected, transferring photos is remarkably easy. In the Canon Image Gateway software, you'll see a list of photos on your camera. You can select individual photos or entire albums. However, this depends on your preference. Click the "Transfer" button. The photos begin transferring wirelessly to your laptop. The speed of the transfer will depend on your Wi-Fi connection, but it's generally fast. As a result, you won't have to wait around for hours.
Fine-Tuning Your Wi-Fi Connection for Maximum Speed
A strong Wi-Fi signal is crucial for optimal transfer speeds. If you're experiencing slow transfers, try a few troubleshooting steps. Move your camera and laptop closer to your Wi-Fi router. This improves signal strength. Because of that, ensure that there aren't any obstructions blocking the Wi-Fi signal. Also, restart your router. It can sometimes resolve connectivity issues. Finally, consider upgrading your router. A better router means faster transfer speeds.
Troubleshooting Common Problems
Sometimes, things don't go according to plan. Don't worry; it's completely solvable. If your camera isn't connecting, double-check your Wi-Fi password. Similarly, ensure your camera and laptop are on the same network. If the software shows an error, restart the Canon Image Gateway software. Consequently, you should also restart your camera. Furthermore, make sure your camera's firmware is up-to-date. You can check this on Canon’s website.
Beyond the Basics: Advanced Wi-Fi Tricks
Once you master the basics, you can explore some advanced tricks. You can set up the Canon G16 to automatically transfer photos. This instantly sends photos to your laptop as you shoot them. This is exceptionally convenient for certain types of photography. You can also use the Wi-Fi to control your camera remotely. Use your smartphone as a remote viewfinder and control. This increases your creative possibilities.
The Bottom Line: Embrace the Wireless Revolution
So, there you have it! The shockingly easy trick to transfer photos from your Canon G16 to your laptop. The process is simple and rewarding. You can ditch the cables and embrace the wireless revolution. You'll save time and frustration. You'll get more time to actually enjoy photography. Therefore, start sharing those photos instantly.
Unlock ANY WiFi: Windows 8.1 Secret Trick Revealed!Canon G16 Wi-Fi to Laptop: The SHOCKINGLY Easy Trick You NEED!
Hey there, fellow photography enthusiasts! Remember the days of wrestling with USB cables, desperately hoping your laptop would recognize your Canon G16? I do! And let me tell you, it felt like an Olympic sport sometimes. But guess what? We’re officially waving goodbye to those cable-tangled nightmares. Because today, we're diving headfirst into a ridiculously simple trick to get your Canon G16 transferring photos wirelessly to your laptop. Prepare to have your mind blown (and your workflow streamlined!).
1. The Frustration: Why Cables Should Be Canned
Let’s be real, those USB cables are a pain. They get lost, they fray, they’re just… clunky! And the constant plugging and unplugging? Talk about a headache. I distinctly remember a time I nearly tripped over mine during a particularly enthusiastic editing session. It’s the digital dark ages, and we’re ready to evolve! Transferring photos directly through Wi-Fi is like upgrading from a horse-drawn carriage to a sleek, modern sports car. Faster, more convenient, and significantly less likely to cause a wardrobe malfunction.
2. Canon G16: The Undervalued Gem!
Before we get into the how-to, let's give the Canon G16 some love. This camera is a powerhouse! Its image quality is fantastic, the zoom is impressive, and it's the perfect companion for travel and everyday snapshots. But its true potential shines when you pair it with the convenience of Wi-Fi. We are talking about a camera that still holds its own, producing stunning photos even now, years after its release. It's a testament to Canon's enduring quality.
3. The Shockingly Simple WiFi Revelation: It’s Easier Than You Think!
Okay, here’s the good stuff. Forget complex software installations and cryptic menus. The core trick revolves around the Canon G16's built-in Wi-Fi capabilities. Most people think it's a tech maze, but it's actually pretty straightforward. We’ll break it down, step-by-step, making it as easy as pie (and hopefully tastier than cable-related frustration!).
4. Step 1: Camera Setup – Your Wi-Fi Gateway
First things first: we need to activate the Wi-Fi on your G16. This usually involves navigating the camera's menu (the little "Menu" button is your friend here!). Look for options related to "Wi-Fi," "Wireless Settings," or something similar.
- Finding the Menu: It might be under the "Setup" tab (the one that looks like a wrench).
- Enabling Wi-Fi: Once you find it, select "Enable" or "On."
- Select Connect: Most cameras will have a 'Connect' option.
- Select a Connection: Choose 'Send Images to Computer' (or something close to this.)
5. Step 2: Laptop Prep – Finding Your Wireless Receiver
Now we're moving to your laptop. This is where things get even easier. You'll want to ensure your computer is connected to the same Wi-Fi network that your Canon G16 will be using. This is absolutely critical. This is like making sure both ends of a phone call are connected (duh!).
6. Step 3: The MAGIC Trick – The Canon Image Gateway Software (Probably the Easiest Step!)
This is the money shot! Now, Canon used to provide software called "Canon Image Gateway" (or something similar) that used to facilitate the photo transfers. The good news is, most modern laptops don't actually need this!
- Your Operating System: Modern OS's will identify your Camera.
- Locate Photos: Select the Canon G16 using your computer. Select the photos, transfer, and VOILA!
7. Troubleshooting Troubles: What To Do If Things Go Awry
Sometimes, things don't go according to plan. Don't panic! Here are a few common troubleshooting tips:
- Incorrect Wi-Fi Connection: Double-check that both your camera and laptop are connected to the same Wi-Fi network. This is the number one culprit.
- Firewall Issues: Your laptop's firewall might be blocking the connection. Temporarily disable your firewall (just for testing!) to see if that’s the problem. Just remember to switch it back on once you're done.
- Camera Firmware: Ensure that your G16's firmware is updated to the latest version. You can usually find firmware updates on Canon's website.
- Restart Everything: Sometimes, a simple reboot of both your camera and your laptop can magically solve the problem. It's the digital equivalent of "turning it off and on again."
8. Unleash Your Inner Photographer: Streamlined Workflow Benefits
Once you get this Wi-Fi connection sorted, your photography workflow will transform. Picture this:
- Instant Gratification: No more waiting! Your photos are available on your laptop almost instantly after you take them.
- Effortless Backups: Back up your photos in real-time as you take them. No more accidental deletions!
- Easy Sharing: Share your stunning photos on social media in a matter of minutes.
- Remote Shooting: Some Canon models allow you to control the camera from your laptop or smartphone over Wi-Fi. This is perfect for tricky shots or self-portraits. I use this function all the time for creative experiments.
9. Beyond Basic Transfers: Exploring More Advanced Features
Once you've mastered the basic Wi-Fi transfer, consider exploring the G16's more advanced features. Some models allow you to:
- Print Directly: Print your photos wirelessly to a compatible printer.
- Use the App: Some Canon models work with a mobile app that lets you control your camera and transfer photos directly to your phone or tablet.
10. Wi-Fi vs. The Cloud: Deciding Your Best Approach
While Wi-Fi is great for quick transfers, cloud storage is also a powerful tool. Cloud services like Google Photos, Dropbox, and iCloud offer automatic backups and easy sharing. Consider which method suits your needs:
- Wi-Fi: Ideal for quick, local transfers to your laptop.
- Cloud: Perfect for automatic backups, sharing photos with others, and accessing your photos from anywhere.
11. Secure Your Connection: Protecting Your Precious Images
Security is crucial, especially when dealing with wireless connections.
- Use a Secure Network: Make sure your Wi-Fi network is password-protected.
- Update Your Software: Keep your camera's firmware and your laptop's operating system up-to-date to patch any security vulnerabilities.
12. Competing Alternatives: Why Wi-Fi Wins the Race
Compared to other transfer methods, like using SD card adapters or USB cables, Wi-Fi offers exceptional convenience. No more searching for the right cable or fumbling with tiny card readers!
13. Maximizing Your G16: Other Cool Features to Explore
The Canon G16 has hidden gems!
- Burst Mode: Perfect for capturing fast-moving action.
- Manual Control: Learn to take full control of your camera's settings to boost your creative potential.
14. The Future of Wireless: Photography's Next Evolution
Wireless technology will continue to revolutionize photography. We can expect even faster transfer speeds, more seamless integrations with cloud services, and exciting new features that will make capturing and sharing photos easier than ever before. I can’t wait!
15. Final Thoughts: Embrace the Wireless Revolution!
So there you have it! The surprisingly easy trick to transfer photos from your Canon G16 to your laptop using Wi-Fi. It’s a game-changer, believe me. Embrace the wireless revolution, ditch the cables, and unlock the full potential of your camera. Happy snapping!
Closing Thoughts:
So, there you have it – a complete guide to ditching the cables and embracing the wireless world with your Canon G16! Remember, the trick truly is shockingly easy. It's a liberating experience, freeing us from the digital chains of cords and connectors. Now go forth, create, and share your photographic masterpieces with the world! Let me know below how it goes, I can't wait to see your photos!
FAQs:
1. My Canon G16 doesn't seem to have a Wi-Fi option in the menu. What gives?
Double-check your camera's model number. While the G16 is known for its Wi-Fi capabilities, some earlier models may lack this feature. Also, ensure you've explored all the camera menus, and that the settings are properly enabled.
2. My laptop isn't recognizing my camera even though they're on the same Wi-Fi network. Help!
First, restart both your camera and your laptop. Ensure your firewall isn't blocking the connection (temporarily disable it for troubleshooting). Also, make sure your camera's firmware is up-to-date. As a last resort, try to manually add your camera's IP address to your laptop's network settings.
3. Is Wi-Fi transfer faster than using a cable?
The speed can vary depending on your Wi-Fi network and the size
Laptop Auto-Connects to Starbjck WiFi? This Trick Makes it Happen!G16 WIFI

By Dennis Braunston G16 WIFI by Dennis Braunston
Wireless tethering a Canon Camera with your Computer using Wifi

By Touch Technology Review Wireless tethering a Canon Camera with your Computer using Wifi by Touch Technology Review
how to connect G16 with PC

By Mobitrick 820 how to connect G16 with PC by Mobitrick 820
Title: How to Connect Canon Cameras to Laptop & Desktop Computers
Channel: DownloadingPirate
How to Connect Canon Cameras to Laptop & Desktop Computers by DownloadingPirate
My Laptop Work
Title: The Ultimate Guide to Crafting the Perfect Sourdough Starter: From Scratch to Stellar Bakes
We find ourselves at the heart of a renaissance. A return to the ancestral crafts that ground us, nourish us, and connect us to something larger than ourselves. And at the forefront of this movement, we see the resurgence of sourdough. More than just a bread, sourdough represents a commitment to patience, a celebration of slow fermentation, and a tangible connection to the very essence of baking. This is where the magic truly begins. We, together, will unlock the secrets to crafting a sourdough starter so robust, so lively, that it will transform your baking from ordinary to extraordinary. Forget the dry, lifeless discards. We're here to build a thriving community of microscopic marvels that will yield crusty loaves, tangy crumpets, and a profound sense of accomplishment.
Embarking on the Journey: The Genesis of Your Sourdough Starter
Before we delve into the intricacies of cultivating a starter, it's crucial to understand the fundamental principles. A sourdough starter, at its core, is a symbiotic colony of wild yeasts and lactic acid bacteria, naturally occurring on grains and in the air. These microorganisms are the tireless workers responsible for fermenting the flour, creating the characteristic sour flavor, the airy crumb, and the complex, nuanced taste profiles that define true sourdough. The process begins with just two ingredients: flour and water. But the simplicity hides a symphony of action.
Choosing Your Flour: The Foundation of Flavor
The flour you select will profoundly impact the personality of your starter and, ultimately, your bread. While all-purpose flour will function, we advocate for more flavorful options. Unbleached, organic flours are excellent choices, as they retain a greater percentage of the nutrients and natural yeasts vital to kickstarting the fermentation process. We recommend starting with a blend, experimenting with different ratios to discover what suits your tastes. Consider these flour varietals:
- Whole Wheat Flour: Rich in bran and germ, introducing complex flavors and more robust nutrition. Be mindful that its higher fiber content can sometimes necessitate adjustments to your feeding schedule.
- Rye Flour: Offers a distinctive, slightly tangy flavor and a unique crumb structure. It also harbors a higher concentration of enzymes that promote fermentation.
- Spelt Flour: An ancient grain lauded for its delicate, slightly sweet flavor and a higher moisture content. It's an excellent choice if you want to incorporate ancient grains into your breadmaking.
Whatever flour you choose, prioritize quality. Seek out flours that are freshly milled and stored properly to retain their flavor and potency. Avoid flours that have been treated with preservatives, as these can inhibit the growth of the wild yeasts.
The Initial Mix: Bringing Life to Your Starter
Now, let's get our hands dirty. In a clean glass jar (a mason jar works perfectly), combine equal parts by weight of your chosen flour and non-chlorinated water. The ratio is crucial. We recommend a 1:1 ratio, for example, 50 grams of flour to 50 grams of water. Thoroughly mix the flour and water, ensuring no dry clumps remain. The mixture should resemble a thick, slightly sticky paste. Cover the jar loosely with a lid or a piece of cheesecloth secured with a rubber band, allowing air to circulate while preventing contamination.
The First Week: Patience and Observation
This initial week requires patience and observation. The environment you're in, temperature plays a critical role. For best outcome, a temperature range between 70-75°F (21-24°C) is ideal. Place your jar in a location that maintains a consistent temperature, away from direct sunlight or drafts.
- Days 1-3: Initially, you may observe very little activity. This is perfectly normal. The environment is settling, and the initial microorganisms are starting to colonize. You might see tiny bubbles forming, indicating the beginnings of fermentation.
- Days 4-5: This is where the magic begins. You should begin to see more pronounced activity, with a significant rise in the volume of the starter, followed by a gradual fall. This rise and fall is a key indicator that the yeast and bacteria are becoming active. You might also notice a slightly sour, yeasty smell, a sign that fermentation is underway. At this point, begin discarding half of the starter and feeding it with a fresh combination of flour and water daily. The discard can be used in pancakes/waffles recipes!
- Days 6-7: Continue discarding half and feeding with equal parts flour and water every 24 hours. The starter should exhibit a noticeable rise and fall, a distinct sour smell, and a slightly bubbly texture. You may start to see a thin layer of dark liquid (hooch) on top of the starter. This is a byproduct of fermentation and simply means it's hungry. Stir it back in and continue feeding.
Maintaining Your Flourishing Culture: Ongoing Care and Feeding
Once your starter is consistently doubling in size within 4-8 hours after feeding, is bubbly, and has a strong, sour aroma, it's ready to be used in baking. But the journey does not end there. Maintaining a healthy starter is an ongoing practice that ensures you always have a potent leavening agent ready to use.
- Feeding Schedule: The frequency of feeding depends on your schedule and how often you bake. The less you use your starter, the more often you will need to feed it. A starter fed every 24 hours at room temperature will ferment rapidly. If you bake regularly (once or twice a week), you can keep your starter at room temperature and feed it daily. If you bake less frequently, you can store your starter in the refrigerator. Feed it once a week.
- Refrigeration: Refrigeration slows down the fermentation process, putting the yeast and bacteria "to sleep." To refrigerate, feed your starter, let it rise for a few hours at room temperature, and then place it in the refrigerator with a lid on.
- Reviving from Refrigeration: To revive a refrigerated starter, take it out of the fridge, feed it, and let it sit at room temperature until it doubles in size and is bubbly. This may take a few feedings.
- Feeding Ratios: While a 1:1:1 ratio (starter: flour: water) is common, you can adjust the ratios based on your baking schedule and your starter's activity. A higher ratio of flour and water to starter will ferment for longer.
- Stiff vs. Loose Starters: You can adjust the consistency of your starter by altering the water-to-flour ratio. A stiffer starter (lower hydration) will produce a more sour flavor and a tighter crumb. A looser starter (higher hydration) will produce a more open crumb and a slightly less pronounced sour flavor.
Troubleshooting Your Starter: Addressing Common Challenges
Even seasoned bakers encounter the occasional hiccup. Here's how to navigate some common challenges:
- Lack of Activity: If your starter isn't rising, it may be too cold. Move it to a warmer spot and feed it. It could also be that your flour is stale or lacks sufficient nutrients. Try using a different type of flour or a blend of flours.
- Weak Rise: A weak rise can indicate that the starter is underfed. Feed it more frequently, or try a higher feeding ratio.
- Mold: If you see any signs of mold, discard the starter immediately. Start fresh.
- Hooch: While a small amount of hooch is normal, excessive hooch indicates the starter is extremely hungry. Stir it in and feed it.
- Off-Putting Smell: If your starter smells like nail polish remover, it's lacking essential nutrients. You can try feeding it with more flour, or discard and start again.
Putting Your Starter to the Test: Baking Your First Loaf
Once your starter is mature and active, the real fun begins: baking. The process might feel daunting initially, but we will guide you along for a fantastic success.
- The Levain: Before starting your recipe, you will need to build a levain.
- The Autolyse: Autolyse is a crucial step that improves the dough's extensibility. Let the flour and water rest and hydrate.
- The Bulk Fermentation: This is where the dough develops its flavor. The ambient temperature is critical.
- Shaping and Proofing: In shaping, the dough is gently formed. Proofing is the final rest time given to the dough after it's shaped but before baking.
Conclusion: Embrace the Sourdough Life
Crafting the perfect sourdough starter is not merely a step-by-step process; it's a deeply rewarding experience. It's a journey of patience, observation, and a profound connection to the ancient art of baking. With each feeding, with each loaf, you're not just creating bread; you're cultivating a tangible piece of culinary history. We encourage you to embrace the sourdough life. Experiment with different flours, refine your techniques, and enjoy the delightful process of creating something truly extraordinary. Cheers to your baking adventures!
