how to enable wifi hotspot in windows xp laptop
Title: How to connect Windows XP to your wireless network
Channel: NetComm
How to connect Windows XP to your wireless network by NetComm
Unlock Your XP Laptop's Hidden Hotspot Power!
Unleash the Wi-Fi Wizard Within Your XP Laptop!
Remember those trusty XP laptops, the workhorses of a bygone era? They're still around, aren't they? Well, prepare for a revelation! These digital veterans possess a secret: the ability to become a powerful Wi-Fi hotspot. That's correct. You can transform your old laptop into a wireless internet provider. It is pretty cool. This is your guide to doing just that.
The XP Hotspot Awakening: Why Bother?
First and foremost, why should you even bother? Perhaps your main router is acting up. Maybe you need internet access on the go. Consider travel scenarios. Or perhaps you’re simply a tech enthusiast at heart. Then the XP laptop hotspot offers a practical solution. It's a fantastic way to extend your network. It’s also a convenient fallback in emergencies. Think about this. You could provide internet for various devices. Tablets, smartphones, and even other laptops can connect. Indeed, the possibilities are numerous.
Setting the Stage: Pre-Flight Checklist
Before we begin our hotspot adventure, we must prepare. Firstly, you’ll need your XP laptop. You will also need a working internet connection. It could be Ethernet, or a USB modem. Secondly, be sure your laptop has a wireless network adapter installed. If not, you’ll need to acquire one. You will also require administrative privileges on your laptop. Therefore, ensure you have the necessary permissions. Finally, gather your patience. This isn’t rocket science. But it does take a few steps.
Digging into the Control Panel's Secrets
Now, let's delve into the settings. Navigate to your Control Panel. Then, you'll need to navigate to "Network Connections." Right-click on the connection you will use for the internet. Then, choose "Properties." Then, a window will pop up – don't panic. You can do this. Now, locate the "Advanced" tab. You might need to scroll. Select the option "Allow other network users to connect through this computer's Internet connection." A list of network adapters may appear. Then, choose your wireless network adapter. Finally, confirm the changes.
The Magic of ICS: Internet Connection Sharing
This process activates a feature. It is called Internet Connection Sharing, or ICS. Essentially, your laptop shares its internet connection. Furthermore, it makes it available to other devices. ICS is the heart of our hotspot. It's the crucial element that allows everything to function. It's worth noting that this is a powerful tool. Still, be careful about the security implications. Ensure you have a strong password set or a secured network. The security of your hotspot is paramount.
Configuring Your Wireless Network
Now, it is time to configure your wireless network. You will probably need to set up a name for your network. This is the SSID (Service Set Identifier). It's what devices will see when they are seeking Wi-Fi. Choose a unique and memorable name. Also, select a security protocol. WPA2 is usually the best, if available. It encrypts the data that is transmitted. Set a strong password. Keep your network secure from unauthorized access. Otherwise, others could easily access your system.
Troubleshooting the Wi-Fi Wilderness
Sometimes things don’t work as expected. Don't panic. Troubleshooting is part of the game. Are other devices not connecting? Make sure that the wireless network adapter is enabled. Check the SSID and password. Double-check that you entered them correctly. Is the internet not working on the connected devices? Verify your XP laptop actually has internet access. Furthermore, consider whether your wired connection is working too. Check the network adapter settings again. Restart the laptop and connected devices. Sometimes a simple reboot resolves the issue.
Enhancing Your Hotspot Experience: Advanced Tips
Want to take your hotspot to the next level? Consider these extra tips. One, update your wireless network adapter drivers. Outdated drivers lead to instability. Second, configure your hotspot to automatically start. Then it will begin when the laptop boots up. Third, think about setting up a static IP address. This helps ensure the connected devices always connect. Fourth, monitor the data usage carefully. The device can easily consume a lot of your internet. Fifth, choose a location with a strong signal. Do not place it in a Wi-Fi dead zone.
Beyond the Basics: Exploring Further Options
Beyond these steps, there could be more advanced steps. Some specialized software programs can do the hotspot configuration. These often offer additional features. They might offer more control over your network. They can also provide security settings. However, they are not always necessary. The built-in ICS usually works perfectly fine.
The XP Hotspot Finale: Embrace the Wireless Power
Congratulations! You should now have an operational Wi-Fi hotspot. You successfully turned your XP laptop into a wireless access point. You can now share your internet connection. It is for your devices and/or for your guests. Remember, your old laptop, though aged, still has some tricks up its sleeve. Enjoy the freedom and the convenience of your newfound wireless power. As a result, you've breathed new life into your trusted XP laptop. Now, go forth and explore the wireless world!
Is Your ASUS Laptop's WiFi Killing You? (Windows 10 FIX Inside!)Unlock Your XP Laptop's Hidden Hotspot Power!
Hey there, tech adventurers! Remember that trusty old Windows XP laptop gathering dust in the attic? Yeah, the one with the quirky startup sound and the slightly yellowed keys? Well, guess what? That seemingly ancient relic still holds a secret weapon: the ability to become a Wi-Fi hotspot, letting you share your internet connection with all your devices. Forget shelling out for expensive portable hotspots; we're diving deep into how to resurrect that XP machine and unleash its hidden power!
1. The Reluctant Revival: Why Bother with an XP Hotspot?
Let's be honest, an XP laptop isn't exactly cutting-edge. But hear me out! Think of it as a digital Swiss Army knife. Need internet on the go? Don't want to drain your phone's battery by tethering? Craving a secure connection when you're at a public Wi-Fi hotspot? Your XP laptop can be your answer. It's like bringing a time machine that still works (kind of!). Plus, it’s a fun project, right? Remember, we're all about breathing new life into the old and making the most of what we've got.
2. Prerequisites: What You'll Absolutely Need
Before we get started, let's make sure we have all the right tools. This is like prepping your workshop before building a birdhouse. You wouldn’t start without a hammer, would you?
- Your Windows XP Laptop: Obviously. Make sure it has a Wi-Fi adapter. Most laptops do, but double-check in Device Manager (right-click "My Computer," then select "Manage").
- An Internet Connection: This is the lifeblood of our hotspot. It can be a wired Ethernet connection or, ideally, a working Wi-Fi connection.
- A Little Patience: Things might get a little technical, but don't sweat it. We'll walk through it step-by-step.
- A Touch of Adventure: This is supposed to be fun, so embrace the process!
3. The First Step: Enabling Internet Connection Sharing (ICS) – The Heart of the Matter
This is where the magic truly begins. Internet Connection Sharing (ICS) is the feature that allows your XP laptop to share its internet connection. It's like lending your friend your phone charger; without it, nothing happens!
Here’s how to activate it:
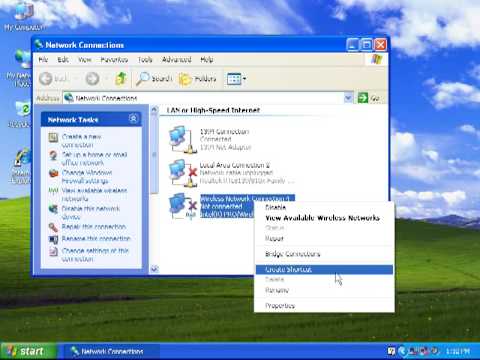
- Open Network Connections: Click on "Start," then "Control Panel," and finally "Network Connections." (If you’re in the "Category View," you'll find it under “Network and Internet Connections.”)
- Identify Your Internet Connection: This is the active connection you're using to get online. It could be labeled "Local Area Connection" (for a wired connection) or a Wi-Fi adapter name like "Wireless Network Connection."
- Right-Click and Select "Properties": This opens a window with various settings.
- Click the “Advanced” Tab: Here's where ICS lives.
- Check the Box: Look for the "Allow other network users to connect through the Internet connection of this computer" box and enable it.
- Select Your “Home Networking Connection”: Beneath the first option, there's a drop-down menu. Select the Wi-Fi adapter you want to use for your hotspot (typically your wireless network adapter, if you have one).
- Click “OK”: Now, your XP laptop is ready to share.
4. Configuring Your Wi-Fi Network - Setting Up Your Hotspot
Now that ICS is enabled, let’s set up the Wi-Fi element of your hotspot by turning on your wireless adapter. Think of it as tuning your radio to a specific station.
- Go Back to Network Connections: You're already familiar with this area!
- Find Your Wireless Network Connection: It's the one you identified earlier (e.g., Wireless Network Connection).
- Right-Click and select "Properties": Again.
- Select the Wireless Networks Tab: Now, click “Add” in the wireless networks tab.
- Network Name (SSID): Create the network name you want to use (your hotspot's name). This is what your other devices will see. Be creative! Think "XPHotspot," "DigitalNomad," or whatever sparks your imagination.
- Network Authentication: Choose WPA-PSK or WEP (WEP is easier but less secure – only use it if you absolutely have to!). WPA-PSK (TKIP or AES) is the gold standard for security.
- Data Encryption: Select TKIP or AES.
- Network Key: Create a strong password (at least eight characters of mixed letters, numbers, and symbols). This keeps your network secure.
- Confirm: Click “OK” to save your settings and then “OK” again to close the properties window.
5. Giving Your XP Laptop a Static IP Address – The Digital Address
This step ensures that your hotspot is easily found by others.
- Go Back to Network Connections: You're becoming a pro!
- Find your newly configured Wireless Network Connection: Properties, yet again.
- Find Internet Protocol (TCP/IP): Choose Internet Protocol (TCP/IP) and click “Properties”.
- Set the Static IP Address: Change the settings to the following:
- IP: 192.168.0.1
- Subnet Mask: 255.255.255.0
- Default gateway: Leave blank.
- DNS: Use your provider's DNS servers (you can find these in your current network adapter’s properties if you are using DHCP). Google Public DNS or Cloudflare DNS are also great options.
- Apply: Click “OK” to close the windows.
6. Troubleshooting: When Things Don't Go as Planned
Sometimes, things don't work perfectly the first time. Don't worry; that’s part of the learning process. Here's a quick troubleshooting guide:
- Check Your Internet Connection on the XP Laptop: Make sure your XP machine actually has internet.
- Verify ICS is Enabled: Double-check the steps in Section 3.
- Check Your Firewall: Windows XP’s built-in firewall (or any third-party firewalls) may be blocking connections. Temporarily disable the firewall (for testing only) to see if that's the issue. If it is, you’ll need to configure your firewall to allow the hotspot.
- Restart Everything: Seriously, sometimes a simple restart fixes everything!
- Driver Issues: Make sure your Wi-Fi adapter drivers are up to date.
7. Security Considerations: Keeping Your Hotspot Safe
Security is paramount. A public Wi-Fi hotspot (even one you create) can be a target for hackers. It’s like setting up a buffet for cybercriminals if you aren’t careful.
- Strong Password: As mentioned previously, use a strong, unique password.
- WPA-PSK: Use WPA-PSK (TKIP or AES) encryption for maximum security.
- Firewall: Keep your Windows XP firewall enabled and updated!
- Monitor Usage: Keep an eye on the devices connected to your hotspot. If you see anything suspicious, disconnect them.
- Use a VPN: For added security, consider using a Virtual Private Network (VPN) on any device connected to your XP hotspot. This encrypts your internet traffic.
8. Testing Your New Hotspot: Does it Work?
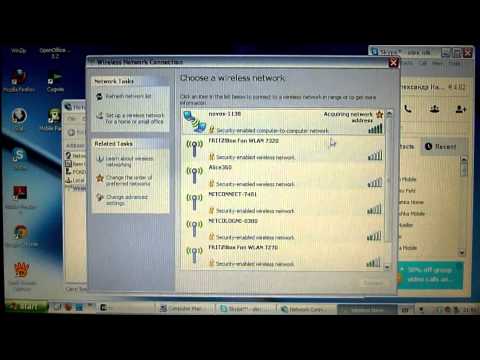
Time for the moment of truth! Grab your phone, another laptop, or any other Wi-Fi-enabled device and search for the hotspot you created (the SSID you chose in Section 4). Connect to it using the password you created. Then browse the web. If all goes well, congratulations! You’ve successfully unlocked your XP laptop's hotspot power!
9. Advanced Tweaks: Taking It To The Next Level
For the truly adventurous, let's delve into some extra capabilities.
- Configure DHCP: Manually assign static IP addresses to client devices. Go to “Local Area Connection Properties”, then “Sharing” tab, and then “Settings”. Scroll through the settings to find the DHCP settings to change them to match your network settings.
- Use a Static IP: If you have a static IP from your internet provider, configure your XP laptop to use it (in the TCP/IP settings mentioned above).
- Bandwidth Limiting: While XP doesn’t have built-in bandwidth limiting, you can explore third-party software to manage bandwidth usage for connected devices. This helps prevent one device from hogging all the bandwidth.
- Experiment with Wireless Modes: If you have a dual-band Wi-Fi adapter on your XP laptop, explore different wireless modes (e.g., 802.11g, 802.11n) to optimize performance.
10. Battery Life: Maximizing Your XP Laptop's Endurance
XP laptops aren't famous for their battery life. So, how do we
Laptop WiFi Cable: The SHOCKING Truth You NEED To Know!How to Setup Wifi in Windows XP

By Etechlic How to Setup Wifi in Windows XP by Etechlic
How To Fix Wifi Not Working In Windows XP Tutorial

By MDTechVideos How To Fix Wifi Not Working In Windows XP Tutorial by MDTechVideos
Wi-Fi Hotspot in Windows XP Step by Step
By alexn1138 Wi-Fi Hotspot in Windows XP Step by Step by alexn1138

Title: How to Connect to the Internet in Windows XP PC
Channel: How-To Guide
How to Connect to the Internet in Windows XP PC by How-To Guide
Laptop Wifi Connect
Unlock Your XP Laptop's Hidden Hotspot Power!
In a world perpetually tethered to connectivity, the humble laptop serves as both a portal and a command center. While modern machines boast innate Wi-Fi capabilities, those still wielding the stalwart Windows XP operating system may find themselves yearning for the freedom of a personal hotspot. Fear not, as a treasure trove of hidden potential lies within your XP laptop, patiently awaiting the key to unlock its hotspot prowess. We shall embark on a journey, navigating the intricacies of the system to transform your trusted device into a beacon of wireless connectivity.
Understanding the Foundation: XP's Networking Capabilities
Before diving into the conversion process, a fundamental grasp of Windows XP's networking engine is paramount. XP, in its architectural wisdom, allowed for the sharing of internet connections across various devices through its built-in features, although it didn't explicitly brand this functionality as a "hotspot" in the contemporary sense. This is the cornerstone upon which we will build. The key players in this arena are, among others, the Network Connections settings and the ability to enable Internet Connection Sharing (ICS). Furthermore, the presence of a supported Wi-Fi adapter is critical. Assess your laptop's hardware; most XP-era laptops were equipped with Wi-Fi cards, though some may require driver updates for optimal performance.
To begin, access your Network Connections window, most commonly by right-clicking the "My Network Places" icon on your desktop and selecting "Properties," or through the Control Panel. Within this window, you will encounter your existing network adapters. Identify the connection through which your XP laptop receives its internet. This could be an Ethernet connection to a wired network or a Wi-Fi adapter receiving a wireless signal. This connection is the source from which the hotspot will draw its internet feed.
Internet Connection Sharing: The Gateway to Wireless Freedom
Internet Connection Sharing (ICS) is the engine that drives the hotspot functionality. Selecting the sharing function requires meticulous configuration to ensure seamless data transfer. Within the properties of your established internet connection (identified in the previous step), you will find a "Sharing" tab. Click on this tab. Here, you'll find the primary setting: "Allow other network users to connect through this computer's Internet connection." Enable this option. A crucial follow-up step involves selecting your network adapter for the secondary connection, the one that the hotspot will use to broadcast. This is generally your wireless network adapter, but confirm that it is correctly detected. If you have multiple network adapters, ensure you choose the right one.
Beneath this main setting, you’ll find a prompt that will allow the configuration of another feature with additional settings. The system will advise you on the necessary steps to proceed. This usually involves configuring the IP address and DNS settings on your primary network adapter. The system will assist in this. The ICS feature will assign IP addresses to devices connecting to the hotspot, ensuring they can communicate with your XP laptop, and subsequently, with the internet.
Configuring Your Wireless Network: Setting Up Your Personal Hotspot
With ICS activated, the next critical step is to configure your wireless network adapter. Within the Network Connections window, identify your wireless network adapter, again. Right-click and select "Properties." Within the "Wireless Networks" tab, you will encounter the configuration settings for your hotspot.
Network Name (SSID): Choose a unique and easily identifiable name for your hotspot. This is the name that will be displayed on devices searching for available Wi-Fi networks.
Network Authentication: Select a security protocol to safeguard your hotspot. The most robust option is WPA2-PSK, although older devices might require WEP for compatibility. If WPA2-PSK is unavailable, WPA-PSK is the next best choice. Ensure all connected devices support the chosen security protocol.
Data Encryption: Choose a data encryption method to secure your wireless network. AES is the strongest encryption method, and TKIP can be found. Again, ensure that all devices are compatible.
Network Key: Set a strong, unique password for your hotspot. This password will be required for any device to connect to your wireless network. Use a combination of upper and lowercase letters, numbers, and symbols for heightened security.
Once these settings are configured, click "OK" to save the changes. Your XP laptop should now be broadcasting a wireless network, ready to accept connections.
Fine-Tuning Your Connection: Addressing Potential Hiccups
While the above steps should suffice, certain factors may hinder the seamless operation of your hotspot. Diagnosing and resolving these issues is essential for optimum performance.
Driver Compatibility: Ensure your wireless network adapter drivers are up-to-date. Outdated drivers can cause connectivity problems, slow data transfer speeds, or overall instability. Obtain the most current drivers from your laptop manufacturer's website or the network adapter manufacturer's website.
Firewall Interference: Windows XP's built-in firewall or any third-party firewall software could potentially block the hotspot function. Temporarily disable the firewall or configure it to allow traffic through the network adapter associated with the hotspot. Exercise caution when disabling firewalls and ensure you re-enable them once the hotspot is operational.
IP Address Conflicts: In some cases, your hotspot may experience IP address conflicts with other devices on your network. Check the IP address range assigned by ICS. Consider assigning static IP addresses to devices connecting to the hotspot to eliminate potential conflicts.
Channel Selection: In crowded wireless environments, interference from other Wi-Fi networks can degrade performance. Access your wireless adapter's configuration settings and manually select a less-congested Wi-Fi channel. Experiment with different channels to optimize your network's performance.
Troubleshooting and Advanced Configuration:
Even with careful configuration, problems can happen. Here are some additional troubleshooting steps and more advanced setup options.
Check the DHCP service: ICS acts like a very basic DHCP server. If clients can't get an IP in the 192.168.0.x range, the DHCP service might be failing. Restarting the service can sometimes help. You can find this in the Services applet in the Control Panel.
Verify the connection. Once you’ve set up the access point, you should be able to connect with other devices. Test by connecting your phone. If this works, then your setup is good. If there are problems, try connecting a second device, such as another laptop, to verify the problem isn't with the first device.
Advanced IP Configuration: For more granular control, explore static IP assignment for devices connected to your hotspot. This helps prevent IP address conflicts and can increase network stability. Within your wireless adapter's properties, navigate to the "Internet Protocol Version 4 (TCP/IPv4)" properties and configure a static IP (e.g., 192.168.0.100) along with a subnet mask (255.255.255.0) and the default gateway (192.168.0.1).
The Benefits of an XP Laptop Hotspot:
Transforming your XP laptop into a hotspot unlocks a plethora of benefits.
On-the-Go Connectivity: Create a Wi-Fi network on the fly, allowing you to share your internet connection with other devices wherever you have a wired or wireless internet source.
Enhanced Security: By sharing your internet connection through a password-protected hotspot, you can protect your main internet connection from unauthorized access.
Legacy Device Compatibility: Breathe new life into legacy devices that lack native Wi-Fi capabilities, connecting them to the internet for essential updates, file transfers, and more.
Cost Savings: At times, using your XP laptop hotspot can be cheaper than paying for multiple data plans or relying on public Wi-Fi, especially if you have a reliable, low-cost internet plan on your XP laptop.
Conclusion: Embracing the Revival of XP Hotspot Prowess
The transformation of your Windows XP laptop into a hotspot is not merely a technical exercise; it's a testament to the enduring power of ingenuity and the adaptability of technology. By following these steps, you have taken the key to unlock previously unavailable capabilities. Your XP laptop, once relegated to the past, will now serve as a gateway to the vast digital world, connecting your devices.
