create laptop into wifi hotspot

Title: How to turn your Windows laptop into a WiFI HotSpot
Channel: KlaydPro
How to turn your Windows laptop into a WiFI HotSpot by KlaydPro
turn laptop into wifi hotspot, turn laptop into wifi router, turn laptop into wifi access point, turn old laptop into wifi router, can you turn your laptop into a wifi hotspot, can i use my laptop as a wifi hotspot, create wifi hotspot windows 10
Laptop to WiFi Hotspot: The SHOCKINGLY Easy Trick You NEED to Know!
Turn Your Laptop into a WiFi Hotspot: The Secret You’ve Been Missing!
It feels like magic. Suddenly, you’re tethered to the internet, even when Wi-Fi deserts you. It's a simple trick, yet surprisingly few people know it. That's right, your laptop holds the key to unlocking Wi-Fi freedom. Let's explore how to transform your laptop into a powerful Wi-Fi hotspot. You can share your internet connection with ease.
The Untold Truth About Laptop Hotspots
Think of your laptop as a versatile chameleon. It can adapt to become anything. In this case, it becomes your personal Wi-Fi router. It broadcasts an internet signal. It's a lifesaver in countless scenarios. Imagine you're on the road. Public Wi-Fi is spotty. Or maybe, your phone's data is running low. Instead, use your laptop! You'll be connected in moments.
Unveiling the Simple Steps: Windows Edition
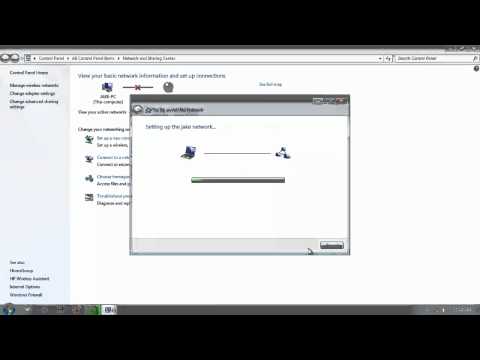
Here’s how to turn your Windows laptop into a hotspot. Firstly, you have to head to the settings. Click the "Start" button. Then, select the "Settings" gear icon. Now, choose "Network & Internet.” Then, navigate to "Mobile hotspot.” Make sure the "Share my internet connection from" option is correct. This will choose which connection to share. It's usually your Wi-Fi or Ethernet. Next, select "Wi-Fi" in the "Share my internet connection with" option. You will see the "Edit" button. Click it. This will allow you to customize your network settings. Customize the network name and password. Make it memorable. Then, toggle the "Mobile hotspot" switch to "On." Now, your laptop is broadcasting a Wi-Fi signal. Finally, connect your other devices. Locate the Wi-Fi network. Enter the password. Enjoy your internet connection.
Mac Mavericks: The Easy Path to a Hotspot
Mac users, don't feel left out. It's just as simple on your devices. It’s slightly different than on Windows. First, select “System Preferences.” Then, click on “Sharing.” Find “Internet Sharing” in the left panel. Now, click on the checkbox next to "Internet Sharing." You select how to share your connection. Choose the option “Share your connection from.” Select your internet source. It's likely to be your Wi-Fi or Ethernet. Beneath that, choose "AirPort" to connect devices wirelessly. Click on "AirPort Options…" Configure your network name, also known as SSID and password. Make this secure to avoid unwanted access. Click "OK" to save your settings. Finally, connect other devices to your hotspot. You're now connected to the internet.
Troubleshooting Common Hotspot Issues
Sometimes, things don't go as planned. But don't panic! First, ensure your laptop is connected to the internet. If you're not online, your hotspot won't work. Check your Wi-Fi adapter drivers. Outdated drivers can cause problems. It's generally simple for an update. Similarly, check your firewall settings. Your firewall might be blocking the hotspot. Make sure your firewall allows the hotspot function. Consider restarting your laptop. This often resolves minor glitches. Confirm your password is correct. Double-check the password when connecting to your hotspot. Still having trouble? Consult your device's documentation.
Beyond the Basics: Smart Hotspot Tips
Maximize your hotspot experience. Firstly, monitor your data usage. Hotspots can consume data quickly. Secondly, use a strong password. This protects your network security. Thirdly, manage connected devices. You'll improve performance by limiting devices. Fourthly, consider a wired connection. A wired connection can be better than Wi-Fi. Finally, stay updated. Keep your operating system and drivers current.
Seizing Control of Your Connectivity
Your laptop's hidden power is amazing. You now know how to create a mobile hotspot. This knowledge ensures you're always prepared. Be it working on the go. Bе it when traveling. Or simply enjoying the pleasure of seamless connectivity. Embrace this easy trick. You'll experience a newfound level of freedom. So, the question remains: Why haven't you done this already?
Laptop to Multiple TVs Wireless: The SHOCKINGLY Easy Trick!Laptop to WiFi Hotspot: The SHOCKINGLY Easy Trick You NEED to Know!
Hey there, fellow digital nomads and internet wanderers! Ever been stranded, stuck in a digital desert with a laptop and no Wi-Fi oasis in sight? We've all been there, right? That frantic flailing, the desperate search for a signal, the gnawing feeling of being cut off from the digital world. Well, prepare to breathe a sigh of relief, because we're about to unlock a ridiculously simple secret – the magic trick of turning your laptop into a Wi-Fi hotspot! Trust me, this isn't rocket science, it's more like…well, it's easier than ordering pizza online (and that's pretty darn easy!).
1. The Digital Desert's Savior: Why You NEED This Trick
Think of your laptop as a powerful, versatile Swiss Army knife. It can write emails, edit videos, and even (gasp!) actually connect to the internet. But what happens when you're in a coffee shop with terrible Wi-Fi, or traveling on a train with a questionable internet connection, or maybe you just want to share your precious Wi-Fi with a friend? This is where your laptop's hidden superpower – its ability to become a Wi-Fi hotspot – shines. It’s the ultimate survival tool for the connected age.
2. Decoding the Mystery: What Is a Wi-Fi Hotspot, Anyway?
Alright, let’s get the tech jargon out of the way in a way that makes sense. Think of a Wi-Fi hotspot like a central hub. It's a device, in this case, your laptop, that shares its internet connection with other devices. It uses your existing internet – either from a wired connection, a built-in cellular modem (if your laptop has one), or even another Wi-Fi network you're already connected to – and broadcasts it wirelessly, allowing your phone, tablet, or even your friend’s laptop to connect and surf the web. Simple, right?
3. Preparing for Launch: What You'll Need to Get Started
Before we dive into the step-by-step instructions, let's make sure you've got everything you need. Think of this as your mission checklist. We need:
- A Laptop: Pretty crucial, wouldn’t you say? This is the star of the show.
- An Internet Connection: This could be a wired Ethernet connection, existing Wi-Fi, or even a mobile data connection with a USB dongle.
- A Dash of Patience: It's really easy, but even the simplest things can seem daunting at first.
4. Windows Users, Rejoice!: Setting Up a Hotspot on Windows
Okay, Windows users, this one's for you. The process is incredibly straightforward. Imagine you're assembling LEGOs; each step builds on the last until you've got a functional Wi-Fi hotspot. Here's how it breaks down:
- Step 1: Head to Settings: Click the Windows Start button (that little Windows logo), then click the Settings icon (it looks like a gear).
- Step 2: Network & Internet: In the Settings window, select “Network & Internet.”
- Step 3: Mobile Hotspot: On the left side, you'll see "Mobile hotspot." Click on that.
- Step 4: Turn It On: Toggle the switch that says "Share my Internet connection from." You'll configure your hotspot's settings here.
- Step 5: Customize, Customize, Customize: Click on “Edit” to change the network name (SSID) and password. Choose something memorable but secure. Think of it like naming your own secret Wi-Fi world! Save your settings.
- Step 6: Connect Your Devices: From any Wi-Fi enabled device, scan for available Wi-Fi networks and select your newly created hotspot. Enter the password, and voila! You're online! Consider this step like plugging in the last light on your Christmas tree.
5. Mac Mavericks, It's Your Turn!: Creating a Hotspot on macOS
Don’t worry, Apple aficionados, we haven’t forgotten about you. Setting up a hotspot on your Mac is just as easy, maybe even easier. Ready? Let’s go!
- Step 1: System Preferences: Click the Apple menu (the little apple icon in the top left corner of your screen). Then select “System Preferences.” (It might be called "System Settings" depending on your macOS version, on newer systems.)
- Step 2: Sharing Is Caring: Click on "Sharing."
- Step 3: Internet Sharing: Select "Internet Sharing" from the list on the left.
- Step 4: Share Your Connection: In the dropdown menu next to "Share your connection from," choose the internet connection you want to share (e.g., Wi-Fi, Ethernet, or your mobile data).
- Step 5: The Magic Sauce: In the "To computers using" section, check the box next to "Wi-Fi."
- Step 6: Wi-Fi Options: Click the "Wi-Fi Options" button.
- Step 7: Name and Password: Set a network name (again, choose something unique) and a strong password. This is akin to setting a password to your secret club. Click "OK."
- Step 8: Activate the Sharing: Check the box next to "Internet Sharing" to enable the hotspot. If prompted, click "Start."
- Step 9: Connect and Conquer!: Just like Windows, connect your devices by selecting your hotspot from the Wi-Fi settings and entering the password.
6. Troubleshooting Time: Common Pitfalls and How to Avoid Them
Even the best-laid plans can go astray. Here are a few common hiccups and how to get back on track, presented in the most comforting way possible:
- Can't See Your Hotspot: Double-check that you've actually turned it on! Seriously, sometimes the simplest things trip us up. Also, make sure your Wi-Fi adapter on the laptop is enabled.
- Slow Internet Speed: Remember, your hotspot is only as fast as your original internet connection.
- Connection Issues: Make sure there are no network restrictions or firewalls blocking the connection. Sometimes, a simple restart of your laptop or devices will smooth things out.
- Battery Drain: Using your laptop as a hotspot can drain the battery faster. Make sure you have a charger handy, or consider plugging your laptop in.
7. The Security Factor: Staying Safe in a Shared Digital Space
When creating a Wi-Fi hotspot, you're essentially opening a door to your internet connection. It’s vital to keep this door secure:
- Strong Passwords: Use a strong password for your hotspot. The longer and more complex, the better. Think of it as a lock on your digital castle.
- Encryption: Ensure your hotspot uses WPA2 or WPA3 encryption for added security.
- Monitor Connected Devices: Keep an eye on which devices are connected, in case something seems suspicious.
- Turn It Off When Done: Once you are finished sharing your internet connection, disable the hotspot feature on your machine.
8. Beyond the Basics: Exploring Advanced Hotspot Tricks
Ready to level up your hotspot game? Here are some advanced tricks:
- Bandwidth Management: Some laptops or third-party hotspot software let you control the bandwidth allocated to each connected device. This is great if you want to prioritize a specific device, and helps to prevent one device from hogging all the bandwidth.
- Third-Party Software: While Windows and macOS have built-in hotspot functionality, third-party apps offer more features, such as advanced security options and better bandwidth control.
- Mobile Data Considerations: Be mindful of your data usage, especially if you're using mobile data. The bandwidth consumption on a laptop can be significant, and you might quickly burn through your data allowance.
9. The Power of Portable: Hotspot Use-Cases
Think about the situations where this trick comes in handy:
- Traveling: Great for hotel Wi-Fi that only allows for one device, or on trains.
- Sharing with Friends: Helping out a friend who's run out of data.
- Emergency Situations: Temporary internet access during internet outages.
- Presentations: Sharing internet access in meetings.
10. The Cost Factor: Understanding Data Usage and Charges
While the hotspot feature is generally free to use, the internet connection you base it on might not. This is particularly important on the road with mobile data:
- Data Plans: Know how much data your plan allows and keep track. Overages can be costly.
- Wi-Fi First: Prioritize using Wi-Fi whenever possible to avoid using your data allowance.
- Monitor Usage: Most operating systems and third-party apps track data usage.
11. Maximizing Connection Strength: Tips for Optimal Performance
To get the best performance from your Wi-Fi hotspot, try these tips:
- Proximity: Place your laptop in a central location for best signal coverage.
- Obstacle Avoidance: Keep your laptop away from walls and other obstructions that can interfere with the signal.
How to Turn your Windows Laptop into a WiFi Hotspot

By TechEmpty How to Turn your Windows Laptop into a WiFi Hotspot by TechEmpty
How to turn your Windows 10 laptop into a WiFi hotspot - Wireless hotspot - Free & Easy

By nickscomputerfix How to turn your Windows 10 laptop into a WiFi hotspot - Wireless hotspot - Free & Easy by nickscomputerfix
Turn Any Windows 1011 PC into WiFi Hotspot WO Hosted Network Support

By Gaurav Turn Any Windows 1011 PC into WiFi Hotspot WO Hosted Network Support by Gaurav
Title: Create a laptop WiFi hotspot in under 30 seconds Windows 7
Channel: jacobspeeds
Create a laptop WiFi hotspot in under 30 seconds Windows 7 by jacobspeeds
Working With Laptop
Here is the title: The Ultimate Guide to Choosing the Perfect Hiking Boots
The Ultimate Guide to Choosing the Perfect Hiking Boots
Embarking on a hiking adventure is an invigorating experience, a journey that connects us with the raw beauty of nature. However, the success of that journey, and often the very enjoyment of it, hinges on a single, crucial piece of equipment: your hiking boots. Ill-fitting or inappropriate footwear can transform a blissful trek into a painful ordeal, filled with blisters, discomfort, and potential injury. Conversely, the right boots can elevate your experience, providing comfort, support, and confidence as you traverse challenging terrain. This guide provides comprehensive knowledge, empowering you to select the perfect hiking boots, ensuring your next outdoor escapade is both safe and supremely enjoyable.
Understanding Your Hiking Needs: Delving into Terrain and Activity
The first, and arguably most important, step in selecting hiking boots is a thorough assessment of your hiking needs. This involves a meticulous evaluation of the terrain you intend to tackle, the frequency of your hikes, and the weight you will be carrying. This preliminary analysis will shape the crucial decisions that follow, as the boots best suited for a leisurely stroll on a well-maintained trail will differ significantly from those required for a grueling multi-day backpacking expedition.
- Terrain: Consider the typical surfaces you will encounter. Are you mostly hiking on maintained trails, navigating rocky scree slopes, or forging through muddy bogs? For well-groomed paths and gentle inclines, a lightweight hiking shoe or a mid-cut boot might suffice. These offer excellent flexibility and breathability. However, for rugged, uneven terrain, where ankle support and protection from sharp rocks are paramount, choose a sturdy, high-cut boot. This will provide enhanced stability and shield your feet from potential hazards. Think about the elevation gain and loss. Steep ascents demand boots with excellent grip, while descents require robust cushioning to absorb the impact.
- Frequency: How often do you plan to hike? If you are a casual hiker who embarks on occasional day trips, you might prioritize comfort and breathability over ultimate durability. Frequent hikers and those who undertake longer trips or multi-day excursions need boots built to withstand rigorous use. These boots should be made with durable materials and strong construction. The investment in a higher-quality, more robust boot will pay dividends in terms of longevity and performance.
- Weight Carried: The weight you carry in your backpack significantly influences your boot selection. Day hikers carrying minimal gear can often opt for lighter boots. Backpackers carrying heavier loads, including food, water, and camping equipment, should prioritize boots with superior support and stability. This is crucial for preventing ankle injuries and reducing fatigue. Look for boots with stiffer midsoles and robust ankle support.
Deciphering Boot Categories: A Spectrum of Choices
The hiking boot market offers a diverse range of options, categorized by their intended use and design features. Understanding these categories is essential for narrowing down your search and finding the appropriate boot for your specific needs.
- Hiking Shoes: These are the lightest and most flexible option, resembling a trail running shoe. They offer excellent breathability, making them ideal for day hikes on established trails and fastpacking adventures. Hiking shoes are typically low-cut, providing less ankle support than boots. They are great for quick jaunts and warmer weather conditions. Consider hiking shoes if the majority of your hikes involve well-maintained trails and you prioritize agility.
- Mid-Cut Hiking Boots: These boots offer a balance of support and flexibility. The mid-cut design provides some ankle support, making them suitable for day hikes on moderately challenging trails and light backpacking trips. They offer more protection than hiking shoes, and are versatile enough for a variety of conditions. Their mid-cut design generally allows for a very comfortable fit, while offering extra support for the ankles when compared to hiking shoes.
- Hiking Boots (High-Cut): The quintessential hiking boots, these offer maximum ankle support and are designed for more demanding terrain and extended backpacking trips. They usually feature a stiffer construction and durable materials. High-cut boots are an excellent choice for rugged trails and multi-day backpacking. They provide superior protection from the elements and offer optimal support when carrying heavy loads. They are the go-to option for serious hikers.
- Mountaineering Boots: These are specialized boots engineered for use in alpine environments, including ice climbing and mountaineering. They are characterized by their stiff construction, compatibility with crampons, and extreme durability. Mountaineering boots are a niche category, best suited for experienced climbers and those venturing into challenging, high-altitude environments.
Unveiling Key Boot Features: Delving into Construction and Materials
Beyond the general categories, several key features significantly impact a hiking boot's performance, comfort, and durability. Understanding these elements is vital for making an informed selection.
- Uppers: The upper is the portion of the boot that surrounds the foot. The materials used in the upper determine the boot's durability, breathability, and water resistance.
- Leather: Leather uppers are renowned for their durability, water resistance, and ability to conform to the foot over time. Full-grain leather is the most durable but requires periodic care and conditioning. Split-grain leather is lighter and more breathable but less waterproof.
- Synthetic Materials: Synthetics often include nylon, polyester, and various polyurethane blends. These materials are lightweight, breathable, and quick-drying. They are more resistant to water. They are an exceptional choice for hikers, but may not offer quite as much durability or longevity as leather.
- Midsole: The midsole provides cushioning and shock absorption, protecting your feet from impact and enhancing comfort.
- EVA (Ethylene-Vinyl Acetate): EVA is a lightweight and flexible foam that provides good cushioning.
- Polyurethane (PU): PU is more durable and supportive than EVA but can be heavier.
- Considerations: The choice of midsole material depends on the type of hiking you plan to do. For lighter hikes and shorter distances, choose a softer midsole for more comfort. For tougher terrain, look for something with greater support provided by PU.
- Outsole: The outsole provides traction, which is the grip between the boot and the ground.
- Rubber Compounds: Various rubber compounds are used, each with unique properties. Vibram is a popular brand known for its high-quality outsoles.
- Lug Pattern: The lug pattern determines the boot's grip. Deeper, more aggressive lugs provide better traction on loose terrain.
- Considerations: Different outsoles are better for different conditions. Choose an outsole with deep lugs for hiking on muddy or rocky trails. For hiking on well-maintained trails, a less aggressive lug pattern might suffice.
- Waterproofing: Waterproofing is essential for keeping your feet dry in wet conditions.
- Waterproof Membranes: Gore-Tex is a popular choice. These membranes allow water vapor to escape while preventing water from entering.
- Durable Water Repellent (DWR) Coating: A DWR coating helps water bead up and roll off the boot's surface.
- Considerations: Waterproof boots are a must-have for hiking in wet climates or across streams. While they offer excellent protection, they can also reduce breathability.
- Construction: The construction method affects the boot's durability and repairability.
- Stitched Construction: Stitching the upper to the midsole results in a durable and repairable boot.
- Cemented Construction: This uses adhesives to attach the upper to the midsole. It is a more cost-effective method but may be less durable.
The Art of the Perfect Fit: Achieving Optimal Comfort and Performance
Finding the right fit is paramount. A poorly fitting boot can lead to blisters, pressure points, and overall discomfort, ruining your hiking experience. Take your time and follow these steps to ensure an ideal fit.
- Foot Measurement: Measure your feet accurately. Measure the length and width of both feet, as many people have one foot that is slightly larger than the other.
- Sock Choice: Always try on boots with the socks you plan to wear hiking. This is important, as the thickness of the socks can greatly affect fit.
- Lacing Techniques: Experiment with different lacing techniques to find the best fit. Adjust the lacing in different areas to address any pressure points or imbalances.
- Sizing Up: It is best to buy your boots a half size or even a full size larger than your regular shoe size. Your feet typically swell during hiking, especially on longer trips, so this extra space will help minimize foot problems and blisters.
- The Heel Test: Place your foot in the boot and push your heel to the back. You should be able to slide a finger down the back of your heel.
- Toe Room: There should be ample space in the toe box for your toes to wiggle.
- The Walk Test: Walk around the store for a few minutes to evaluate the boot's comfort and feel. Try walking on an incline. If possible, test them on various surfaces.
Caring for Your Hiking Boots: Extending Lifespan and Performance
Proper care and maintenance are essential for extending the lifespan of your hiking boots and ensuring their optimal performance throughout their life.
- Cleaning: After each hike, clean your boots to remove dirt, mud, and debris. Use a soft brush, warm water, and mild soap.
- Drying: Allow your boots to air dry naturally. Never place them near a direct heat source, as this can
