hp laptop not showing wifi driver

Title: Fix HP Laptop Wi-Fi is Not Working Problem in Windows 1087
Channel: FIXsage
Fix HP Laptop Wi-Fi is Not Working Problem in Windows 1087 by FIXsage
hp laptop no wifi driver, why is my wifi not showing up on my hp laptop, hp wifi driver not working, hp laptop not picking up wifi network
HP Laptop WiFi GONE? Fix the Missing Driver NOW!
HP Laptop WiFi Woes? Conquer the Missing Driver Crisis!
Imagine this: You’re ready to binge-watch your favorite show, and suddenly, poof – your Wi-Fi connection vanishes. You frantically click the Wi-Fi icon, but nothing. Your HP laptop is refusing to cooperate. Don't panic! You are not alone, and, thankfully, there's likely a simple fix. This is a common issue, and most times it boils down to a missing or corrupted driver. Let’s get your connection restored, pronto.
Unmasking the Culprit: Why Did My Wi-Fi Vanish?
The digital realm can be unpredictable. Sometimes the culprit is a simple glitch. But, other times, the root cause of your Wi-Fi woes is a missing or outdated network adapter driver. This driver acts as the translator between your laptop and your Wi-Fi hardware. Without it, your laptop simply can’t “speak” the language of wireless networks. Furthermore, driver corruption, possibly caused by a failed update or a virus, might be the cause. Moreover, accidental disabling of your Wi-Fi adapter can stop your internet access. However, don't jump to conclusions. First, let's try some simple checks.
Step 1: The Obvious—Is Wi-Fi Actually On?
Before you dive into driver troubleshooting, let's cover the basics. Is your Wi-Fi switch enabled? Many HP laptops have a physical switch or a keyboard shortcut (often involving the Fn key and a Wi-Fi symbol) to toggle Wi-Fi on and off. Therefore, double-check this first. Afterwards, explore your taskbar. Sometimes the Wi-Fi icon is greyed out, indicating it's disabled. Consequently, enabling it may be the only step needed.
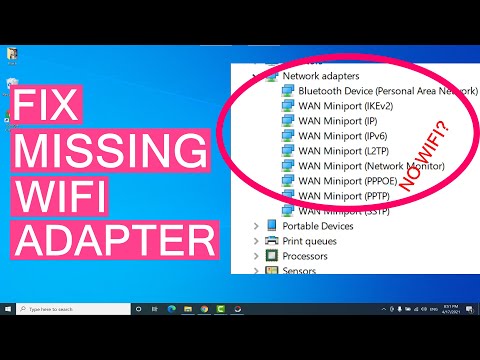
Step 2: The Device Manager Detective: Uncovering the Driver's Status
If the Wi-Fi is on but still not working, we'll need to dig deeper. Device Manager is your go-to tool. To access it, type "Device Manager" in the Windows search bar and click the result. Inside Device Manager, you'll see a list of all the hardware connected to your laptop. Therefore, expand the "Network adapters" section. Look for your wireless network adapter. Does it have a yellow exclamation mark or a red "X" next to it? These symbols indicate a problem. Thus, your driver is likely the problem.
Step 3: Downloading and Installing the Right Driver
Now, what do we do if we find the missing or corrupted driver? First, the driver needs to be located and downloaded. There are a couple of ways to do this.
- Method 1: HP Support Assistant: Typically, HP laptops come with the HP Support Assistant pre-installed. This tool can often automatically identify and update your drivers. Open the HP Support Assistant and let it scan your system. Thus, it will identify any outdated drivers and guide you through the installation process.
- Method 2: The HP Website: If the Support Assistant fails, don't worry. Visit the official HP website. This is another reliable source for the correct drivers. Navigate to the "Support" or "Drivers" section. Enter your laptop's model number (found on a sticker on your laptop or in your user manual). Locate the network adapter drivers. Download the latest version. Be sure to choose the one for your operating system (Windows 10, Windows 11, etc.).
Step 4: Driver Installation: Your Path to Connectivity
After downloading the driver, it's time to install it. The process is generally straightforward. You’ll typically find an executable file (.exe). Double-click it, and follow the on-screen prompts. Most often, this process will automatically install the driver. Restart your laptop after the installation. After the reboot, access that Wi-Fi again. Check to see if the Wi-Fi network is visible.
Step 5: Troubleshooting Touches: If the Problem Persists
If, after all your efforts, the Wi-Fi is still AWOL, don't give up. First, try uninstalling and then reinstalling the driver. In Device Manager, right-click on your network adapter. Choose "Uninstall device." Then, restart your laptop; Windows should try to reinstall the driver automatically. Secondly, if you recently updated Windows, consider rolling back the update. Sometimes, updates can cause compatibility issues. Finally, if all else fails, contact HP support. Technical support can give tailored advice.
The Takeaway: Don't Let Missing Drivers Derail Your Day!
A missing driver can bring your online activities to a screeching halt. In conclusion, by methodically following these steps, you can usually resolve the issue. You can regain your connection and get back to enjoying your digital life. You have the power to fix your HP laptop's Wi-Fi woes. Now get back online!
Laptop to Phone WiFi: The SHOCKINGLY Easy Trick You NEED!HP Laptop WiFi GONE? Fix the Missing Driver NOW!
Hey, we’ve all been there, right? You’re smack-dab in the middle of something important – writing that killer email, video-chatting with your bestie, or, let’s be honest, binge-watching your favorite show – and BAM! Your HP laptop’s WiFi just… disappears. The little WiFi icon down in the corner of your screen morphs into something sad and lonely, like a deflated balloon. The dreaded "No connection" message stares back at you, judging your internet-less existence. We’ve felt that frustration; we’ve panicked; we've almost chucked the laptop out the window. But before you channel your inner Hulk, take a deep breath. Chances are, the culprit is a missing or corrupted WiFi driver, and fixing it is typically straightforward! Think of it like this: your WiFi driver is the translator that allows your laptop to "speak" to your router. Without it, your HP, bless its silicon heart, just can’t understand what your router is saying. So, let's get you reconnected and back to the digital world ASAP!
1. The Mystery of the Missing WiFi: Unmasking the Culprit
So, what actually happened? Why did your WiFi suddenly pack its bags and leave? Well, there are a few usual suspects. The most common villain? A corrupted or outdated WiFi driver. Drivers, those essential pieces of software, can become corrupted over time through various reasons, like software conflicts or even a rogue Windows update. Think of a driver like a tiny little instruction manual for your hardware. If the instructions are messed up, your hardware gets confused.
Another possible culprit could be a recent Windows update that didn't play nice with your WiFi adapter. Then, there are the less likely suspects like a hardware failure or an incorrectly disabled WiFi adapter in the BIOS. But don't worry just yet; we're focusing on the easiest fixes first.
2. First Things First: Checking the Obvious
Before we dive into driver-related solutions, let's make sure we haven't overlooked the simple stuff. It's like checking if your car has gas before assuming the engine's kaput.
- Airplane Mode: Is Airplane mode accidentally switched on? It disables all wireless connections. Check the Action Center (click the notification icon in the bottom-right corner) and make sure Airplane mode is off. It’s a far too common mistake!
- WiFi Switch: Some HP laptops have a physical switch to enable/disable WiFi. Make sure it's switched on. Sounds silly, but we've all done it!
- Router Reboot: Sometimes, the problem isn't your laptop at all! Reboot your router. Unplug it for 30 seconds, plug it back in, and give it a few minutes to boot up. It’s amazing how often this simple trick works.
3. Diving into Driver Updates: Your First Line of Defense
Alright, if the quick checks didn’t do the trick, it's time to Sherlock Holmes our way into the drivers. This is where we start getting technical, but don't worry, we’ll break it down like your favorite easy-bake recipe.
The easiest method to update your drivers is through Windows Device Manager:
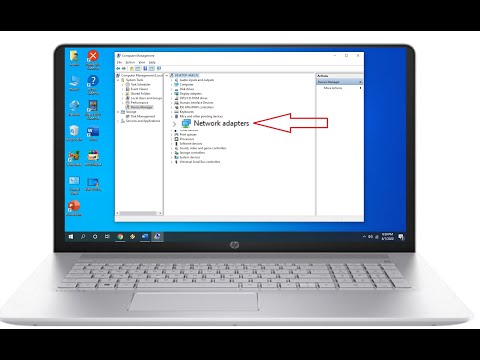
- Access Device Manager: You can search for "Device Manager" in the Windows search bar (the magnifying glass icon on your taskbar), or right-click the Start button and select "Device Manager."
- Find Your Network Adapters: In Device Manager, look for "Network adapters." Click the little arrow to expand that section. You should see your WiFi adapter listed (it might be called something like "Intel Wireless-AC," "Realtek 802.11," or something similar).
- Update the Driver: Right-click on your WiFi adapter. Select "Update driver."
- Search Automatically: Choose "Search automatically for drivers." Windows will then search for and install the latest driver.
- Restart: Once the driver is updated, restart your laptop.
If Windows can't find a newer driver automatically, don't fret! The next step is…
4. The Manual Driver Update: A Deeper Dive
If the automatic update fails, we'll have to roll up our sleeves and grab the driver ourselves. This involves some detective work to find the right driver from the HP website.
- Find Your Laptop's Model Number: This is crucial. It's usually printed on a sticker on the bottom of your laptop or inside the battery compartment. You can also find it in your system information (search "System Information" in Windows).
- Go to the HP Support Website: Head over to the official HP support website.
- Enter Your Model Number: Enter your laptop's model number in the search bar.
- Find the Drivers: Navigate to the drivers section for your laptop. Look for drivers related to “Network," "Wireless," or "WLAN." Make sure you download the correct driver for your operating system (e.g., Windows 10, Windows 11).
- Install the Driver: Download the driver, run the installer, and follow the instructions.
- Restart, Again! After the installation, restart your laptop.
This is often like finding the missing puzzle piece. Remember, patience is key!
5. Uninstalling and Reinstalling: A Fresh Start
Sometimes, a fresh start is what's needed. If updating the driver doesn't work, try uninstalling and reinstalling the WiFi adapter.
- Back to Device Manager: Go back to Device Manager.
- Uninstall the Driver: Right-click on your WiFi adapter and select "Uninstall device." In the prompt, check the box that says something like "Delete the driver software for this device" if it appears (this will remove the old drivers entirely).
- Restart: Restart your laptop. Windows should automatically attempt to reinstall the driver.
- If Necessary, Install Manually: If Windows doesn't automatically reinstall the driver (unlikely), go back to steps in "The Manual Driver Update" section and install the driver you downloaded from the HP website.
6. Troubleshooting with the Network Troubleshooter
Windows has a built-in network troubleshooter. It's like having a tech-savvy sidekick!
- Open Settings: Click the Start button and then the gear icon (Settings).
- Go to Network & Internet: Click on "Network & Internet."
- Run the Troubleshooter: Click on "Status," and then scroll down and select "Network troubleshooter." Follow the prompts.
7. Checking the Wireless Adapter in BIOS
Okay, this is getting a bit more technical, but don’t panic! Your BIOS (Basic Input/Output System) is the very first thing that loads when you boot up your laptop. Occasionally, the wireless adapter can be disabled in the BIOS.
- Access BIOS: You need to enter the BIOS during startup. The key to enter varies depending on your HP model, but common keys are Esc, F2, F10, F12, or Delete. You'll usually see a message on the screen briefly during startup indicating which key to press (e.g., "Press ESC for Startup Menu").
- Navigate to Wireless Settings: Once in the BIOS, navigate using the arrow keys, and enter the wireless or network configuration.
- Enable the Wireless Adapter: Ensure your WiFi adapter is enabled. If it’s disabled, enable it and save the changes.
- Exit and Restart: Save your changes and exit the BIOS. Your laptop will restart.
8. Resetting Network Settings (Advanced)
This is a more drastic measure, so use it as a last resort. It essentially wipes all your network settings and starts fresh.
- Open Settings: Click the Start button and then the gear icon (Settings).
- Go to Network & Internet: Click on "Network & Internet."
- Advanced Network Settings: Scroll down and click on "Advanced network settings".
- Network Reset: Click on "Network reset."
- Confirm and Restart: Click "Reset now" and confirm. Your laptop will restart. You'll need to re-enter your WiFi password after this.
9. Investigating Hardware Failure
If none of the above steps work, it's possible there's a hardware issue with your WiFi adapter. This is less common, but it’s a possibility. Contacting HP support or taking your laptop to a qualified technician will be your next best move.
10. Preventative Measures: Keeping Your WiFi Happy
Once you’ve got your WiFi back up and running, you’ll definitely want to take steps to prevent this problem from happening again!
- Keep your drivers updated: Regularly check for driver updates, either through Windows Update or the HP Support Assistant.
- Run regular system maintenance: Use the Disk Cleanup tool to clear temporary files and free up space on your hard drive.
- Protect your system: Install reliable antivirus software and keep it updated to prevent malware infections that can interfere with driver functions.
11. Understanding the Common Causes
Let's recap the common culprits again.
- Outdated Drivers: The most frequent offender.
How To Fix Wireless Adapter Missing In Windows 10 Get WiFi Adapter Back
By Sandeep Singh How To Fix Wireless Adapter Missing In Windows 10 Get WiFi Adapter Back by Sandeep Singh
HP Laptop Wifi Not Working in Windows 11 10 8 7 - How To Fix Wi-Fi Problems

By Victor Explains HP Laptop Wifi Not Working in Windows 11 10 8 7 - How To Fix Wi-Fi Problems by Victor Explains
How to Get Back Missing Network Adapter from Device Manager in Windows 1087
By MJ Tube How to Get Back Missing Network Adapter from Device Manager in Windows 1087 by MJ Tube
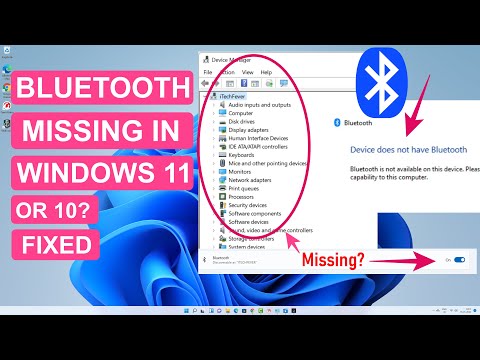
Title: Fix Bluetooth Not Showing In Device Manager On Windows 11 & 10 - Get Missing BT
Channel: Sandeep Singh
Fix Bluetooth Not Showing In Device Manager On Windows 11 & 10 - Get Missing BT by Sandeep Singh
Wifi On Laptop Phone
Title: The Ultimate Guide to Mastering Advanced Violin Techniques
The violin, an instrument of exquisite beauty and profound expressiveness, has captivated musicians and audiences for centuries. The journey to mastering the violin is a demanding yet rewarding one, requiring not only dedication and practice, but also a deep understanding of advanced techniques that unlock the instrument's full potential. This comprehensive guide delves into those crucial techniques, offering insights and strategies designed to elevate your playing to the next level. We will explore the nuances of advanced bowing, intricate left-hand techniques, and the essential components of developing a truly captivating musical performance.
Unveiling the Secrets of Advanced Bowing Techniques
Bowing forms the very heartbeat of violin playing; it's how we bring sound to life. Mastering advanced bowing techniques goes far beyond simply drawing the bow across the strings. It involves precise control over factors like bow speed, pressure, and placement.
Mastering Bow Control and Evenness Across the Bow
A cornerstone of advanced bowing is achieving perfect control over the bow, ensuring a consistent sound throughout its entire length. This means carefully calibrating the pressure applied to the string, adjusting it subtly to compensate for variations in bow position. Begin by practicing long, sustained notes, focusing on maintaining a steady volume and timbre from the frog to the tip. Experiment with varying bow speeds, noticing how this affects both the sound and the pressure required. Identify any areas of the bow where you tend to lose control or produce an uneven sound. Targeted exercises, such as practicing a small section of the bow repeatedly, can help improve control in challenging areas. Regular practice with a mirror, allowing you to observe your bow arm and ensure a straight and consistent bow, is invaluable.
Exploring Advanced Bow Strokes: Spiccato, Sautillé, and Détaché
Beyond sustained bowing styles, advanced techniques introduce a wide range of bow strokes for added musical complexity and expression. Spiccato, a bouncy off-the-string stroke, is achieved by allowing the bow to leave the string after each note, creating a crisp, articulated sound. This requires a precise combination of arm weight and controlled wrist movement. Start with short notes and gradually increase the speed, ensuring that each note is clear and distinct. Pay close attention to the angle of the bow and the points of contact with the string. Sautillé, another advanced articulation, involves bouncing the bow naturally on the string in the middle of the bow, often at a rapid tempo. This stroke is best mastered through relaxation and a flexible wrist. Détaché, a smooth, non-legato stroke, produces distinct notes with slight separation between each bow change. Experiment with variations in bow speed and pressure to achieve the desired sound, focusing on clarity and evenness.
Navigating the Complexities of Left-Hand Technique
The left hand, responsible for creating the notes, is equal to the bow in importance. Developing a strong and agile left hand is crucial for executing complex passages and achieving musical expressiveness.
Perfecting Intonation: The Foundation of Accurate Playing
Precise intonation, playing the notes in tune, is paramount. Developing a keen ear and a precise left-hand technique is essential. Spend time listening critically to your playing, comparing the notes you produce to a reference pitch. Practice slow scales and arpeggios, focusing on placing each finger accurately on the string. Utilize a tuner as a diagnostic tool, but strive to rely on your ear for independent adjustment. Pay attention to the subtle shifts of the fingers necessary to achieve accurate intonation, exploring the different positions on your fingerboard based on the music. Practice slowly and consciously, then gradually increase the tempo as your accuracy improves.
Mastering Shifting Techniques: Seamless Transitions Between Positions
Shifting, moving your left hand up and down the fingerboard to access different positions, is crucial for playing a wide range of notes. Mastering smooth and effortless shifts is a key skill for advanced violinists. Begin by practicing shifts between adjacent positions, focusing on clear, precise finger placement in the new position. Gradually increase the distance between positions, paying attention to the shape of your hand and arm during the shift. Practice shifting on different strings, and in various rhythms. Visualize the shift before you perform it, imagining the precise placement of your fingers. Work on slow, controlled shifts before attempting faster passages. Remember to maintain a relaxed hand and arm, avoiding unnecessary tension.
Vibrato: Adding Warmth and Expression
Vibrato, a subtle oscillation of pitch, is a powerful tool for adding warmth and emotion to your playing. Developing a natural and controlled vibrato takes time and practice. There are several methods for producing vibrato, including arm vibrato, wrist vibrato, and a combination of both. Experiment with each method to discover which feels most comfortable and produces the most pleasing sound. Begin by practicing slow, even vibrato, focusing on control of the speed and amplitude of the oscillation. Gradually increase the speed of the vibrato as your technique improves. Listen carefully to the sound you are producing, and adjust your vibrato to match the expression of the music. Remember to develop your vibrato slowly and avoid excessive vibrato.
Cultivating a Captivating Musical Performance
Violin playing is not merely about executing notes accurately; it’s about communicating musical ideas and emotions. Developing a captivating performance requires a comprehensive approach, integrating technical proficiency with a deep understanding of music.
Understanding Musical Phrasing and Interpretation
Phrasing, the art of shaping musical phrases to create coherence and expression, is at the heart of musical performance. Study the musical score carefully, identifying phrases and understanding the composer’s intentions. Consider the dynamics, articulation, and tempo markings, and how these elements work together to shape the overall phrase. Experiment with varied articulations, dynamics, and bowings to discover the subtleties of the music. Record yourself playing, and listen critically to your interpretation, identifying areas where you can improve the phrasing. Listen to recordings of great violinists and pay attention to their phrasing techniques, but strive to develop your own voice.
Developing Stage Presence and Performance Confidence
Stage presence, the ability to connect with your audience and communicate your musical ideas effectively, is essential for a compelling performance. Practice performing in front of others, starting with friends and family, and gradually moving on to more public settings. Dress appropriately, and take care of your appearance. Remember to project confidence and energy, making eye contact with the audience. Develop a pre-performance routine to help you relax and focus. Accept the nervousness before a performance and use this energy to enhance your playing.
The Importance of Consistent Practice and Mentorship
Mastering advanced violin techniques is a long-term endeavor that requires commitment and dedication. Consistent practice is essential for reinforcing skills and making progress.
Establishing a Disciplined Practice Routine
Establish a consistent practice routine, including daily practice sessions focused on technical exercises, etudes, and musical pieces. Allocate adequate time to developing each technical skill, such as scales, arpeggios, and bowing exercises. Alternate between technical work and musical pieces to keep your practice engaging. Incorporate regular practice sessions that focus on memorization. Make sure you use a metronome. Make time for active listening, where you hear your playing critically and make corrections.
Seeking Guidance from Experienced Mentors
Seeking guidance from a qualified teacher can accelerate your progress and help you avoid bad habits. Choose a teacher with a proven track record and a teaching style that suits your learning needs. Prepare thoroughly for your lessons, bringing specific questions and areas that you wish to address. Ask for feedback on your playing, and actively incorporate the teacher's suggestions into your practice. Embrace the opportunity to learn from other musicians, attending masterclasses, workshops, and concerts.
