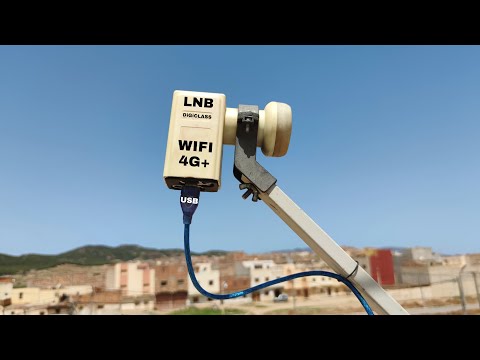
diy wifi antenna without laptop
Title: Convert LNB to a very powerful antenna to receive remote WiFi networks
Channel: Digital Sat Pro
Convert LNB to a very powerful antenna to receive remote WiFi networks by Digital Sat Pro
DIY WiFi Antenna: No Laptop Needed! Boost Your Signal NOW!
Supercharge Your WiFi: Crafting a Powerful Antenna Without a Laptop!
Are you tired of frustratingly weak WiFi signals? Do you want a stronger connection, but feel overwhelmed by technical jargon? Then, you're in the right place. We're going to embark on a fun and practical journey. We'll build a DIY WiFi antenna. The best part? You won't even need a laptop! Prepare for improved connectivity.
Unveiling the WiFi Signal Mystery
Before we start assembling, let’s grasp a bit of background. WiFi signals behave like waves. They're very similar to ripples in water. The strength of a signal fluctuates. It’s usually affected by distance and obstructions. Walls, furniture, and even the materials of your house all play a role. Standard router antennas often aren't optimized. Consequently, your signal can be weak. The antenna's job is to capture and broadcast these waves. It directly impacts your signal's reach and stability.
Gathering Your Essential Arsenal: The Supply List
Fear not. The materials are simple. You likely have some already! This project is budget-friendly. Here’s what you’ll need:
- A Pringles can (or similar cylindrical container). Empty and cleaned is ideal!
- A coaxial cable. It must have a male connector that fits your router. Check the back of your router.
- A utility knife or box cutter. Handle with caution, of course.
- Electrical tape. Black or any color works.
- Scissors.
- A drill (optional, but recommended for cleaner holes).
- A ruler or measuring tape.
Step-by-Step Antenna Construction: Bringing it to Life!
Okay, let's get started! First, thoroughly clean and dry your Pringles can. This ensures optimal performance. Next, measure and cut a hole. This will be near the bottom of your can. It's for the coaxial cable to pass through. The hole should be just large enough. You want a snug fit, so it's important to measure.
Now, prepare the coaxial cable. Carefully feed the connector end through the hole you made. After this, position the cable so the connector protrudes at the bottom. Secure the cable with electrical tape. Wrap the tape tightly. This helps to prevent the cable from moving. It also adds stability.
Next, you need to create a "reflector." This reflector helps concentrate the signal. Ideally, the reflector is made from aluminum foil. Cut a circle of foil. Make it fit snugly inside the can's base. You can secure it with tape, if needed.
Now, close the can's lid. You've essentially finished building your antenna. That was simple, wasn't it?
Connecting and Testing: The Moment of Truth
Now, connect your new antenna. This is the most exciting part. Attach the coaxial cable connector to your router. The specific location varies by router model. Locate the external antenna port. Usually, it's clearly labeled. If your router has multiple antennas, you can try replacing one at a time.
After connecting, position your homemade antenna. Experiment with placement. Place it in a slightly elevated position. Point the antenna in the direction where you need the most signal strength.
Finally, test your connection! Run a speed test. Measure your signal strength. Compare it with your previous results. You'll likely notice a significant improvement.
Troubleshooting & Optimizing: Fine-Tuning Your Signal
Not seeing the results you expected? Don't worry. Let's troubleshoot. First, double-check all connections. Ensure the coaxial cable is securely attached. Check for any obvious damage to the cable.
Next, experiment with antenna placement. Different positions can greatly impact performance. Try moving the antenna around. Try different locations in your home. Furthermore, be cautious of metal objects. They can sometimes interfere with the signal.
Another thing to keep in mind is interference. Try moving your router away from other electronic devices. These devices can generate interference. These include microwaves and Bluetooth devices. To enhance performance, you can try using more advanced antenna designs. However, the Pringles can provides a surprising boost.
Beyond the Pringles Can: Exploring Further Enhancements
You've successfully built a basic antenna! Now, what’s next? Well, you can explore more advanced designs. You'll find many online resources. These resources offer various antenna configurations. The resources also provide detailed instructions. You can also consider using a directional antenna. These antennas are designed to focus the signal in a specific direction. This is useful if your signal needs to reach a particular area.
The Takeaway: Embrace the DIY WiFi Revolution
By now, you've successfully built a WiFi antenna. You should have a stronger signal. You've gained valuable knowledge. Plus, you made it without a laptop! It's a testament to the power of simple ingenuity. You’ve taken control of your connection. So, celebrate your achievement. Keep experimenting with different designs. Happy surfing!
Laptop Refuses to Find WiFi? This SHOCKING Trick Fixes It!DIY WiFi Antenna: No Laptop Needed! Boost Your Signal NOW!
Hey there, fellow signal strugglers! Ever felt like your WiFi signal is hiding from you, playing a frustrating game of hide-and-seek? You’re not alone! We've all been there, staring at that blinking router, willing those internet waves to magically strengthen. But what if I told you that you don't need to spend a fortune on fancy tech or, heaven forbid, get tangled in complex software updates? What if you could build your own WiFi antenna, right at home, without even touching a laptop? Sounds too good to be true? Trust me, it's not. This is where the magic of DIY comes in, and we're about to embark on a fantastic journey to supercharge your WiFi, all with a few simple supplies and a dash of determination.
1. Introduction: Ditching the Weak Signal Blues
Imagine this: you're trying to stream your favorite show, but the dreaded buffering icon keeps popping up, mocking your viewing pleasure. Or, you’re in the middle of an important video call, and the connection keeps cutting out, causing you to miss vital information. These are the struggles of a weak WiFi signal, and they're the bane of our modern existence! But let's face it, we’re not all tech wizards, and shelling out big bucks for a new router or signal booster isn't always an option. That's where the DIY WiFi antenna comes to the rescue, a cost-effective and surprisingly effective solution that puts the power back in your hands. Think of it as giving your WiFi a serious shot of espresso – it's about to wake up!
2. The Why and the How: Understanding WiFi Antenna Basics
Before we dive into the building process, let's take a quick peek behind the curtain. A WiFi antenna, in its simplest form, is like a radio receiver. It's designed to pick up the radio waves that your router emits and, ideally, broadcast those waves to your devices. Your router's built-in antenna is often okay, but it doesn't always provide the best range or signal strength, especially if you have thick walls, multiple floors, or a lot of interference. A DIY antenna can, in essence, become a more powerful, focused antenna, extending your router’s reach and amplifying your signal. It's about focusing the signal where you need it most.
3. Gathering Your Supplies: Treasure Hunting for Your WiFi Upgrade
Okay, ready to gather your DIY loot? The best part is, you probably have most of the supplies already lying around! Here’s what you'll likely need:
- A Can or Bottle: A metal can or bottle (think soup can, Pringles can, or even a metal water bottle) will act as the reflector. The size doesn't have to be exact, but a larger surface area often translates to better signal strength.
- A WiFi Router Antenna: This is the most crucial part. You'll need one from an old router or you can buy one online.
- Coaxial Cable and Connector: This is the wire that will connect your antenna to your router. Ensure the connector matches your router’s type.
- Tools: A drill (or something to make a hole), scissors, a hot glue gun (or strong tape), and a screwdriver.
4. Constructing the Reflector: Shaping Your Signal's Destiny
This is where the fun begins! The reflector – the can or bottle – is the heart of our DIY antenna. First, we're going to create a hole in the can. Ensure the hole is large enough for the antenna connector to fit snugly through. Next, we will secure the antenna in place.
- Safety first: Be careful when using sharp tools!
- Alignment is Key: Make sure your antenna is straight and well-aligned.
5. Attaching the Antenna: The Nervous System of Your Creation
Now, it’s time to marry the can with the antenna! This is where the coaxial cable and connector come into play. At this point, you have to carefully attach the cable. This connection is vital; think of it like the nervous system of our antenna.
6. Testing Your Creation: Seeing is Believing!
Before we celebrate, we need to test our creation! Here’s what to do:
- Positioning: Place your DIY antenna near your router, strategically focusing it according to the direction you wish to maximize your signal output.
- Performance Check: Use a WiFi analyzer app on your phone or laptop (yes, you can use a laptop for this part!) to measure your signal strength before and after you've installed your DIY antenna.
7. Troubleshooting Common Issues: Conquering the WiFi Gremlins
Sometimes, even with the best intentions, things don't work perfectly the first time. Don't worry, we've all been there! Here are a few common troubleshooting tips:
- The antenna is the wrong size: Adjust the size of the reflector (the can).
- Poor connection: Double-check all your connections for tightness and secure fit.
- Obstacles: Move the antenna to a new location, away from the surrounding obstructions.
8. Beyond the Basics: Exploring More Advanced Designs
Feeling ambitious? Once you master the basic design, you can start experimenting! There are tons of ideas online, from the famous "Cantenna" (a can-based antenna) to more elaborate designs. You can tweak the size of the can, the length of the antenna and its position inside the can.
9. Safety First: Protecting Yourself and Your Gear
Let's be clear: working with electricity and antennas can present risks. However, by keeping the following safety tips in mind, you can proceed with confidence.
- Avoid the extremes: Do not use this near potential sources of overheating.
- Keep it away from other electrical components: Never place your antenna on a metal surface that could conduct electricity.
10. Cost-Effectiveness: Saving Money and Boosting Your Bank Account
The biggest advantage of a DIY antenna? It’s incredibly cost-effective! The materials are usually stuff you already have, or you can easily acquire them for a fraction of the price of a commercial signal booster. This means you can boost your signal without breaking the bank.
11. Environmental Impact: Reduce, Reuse, Recycle!
We're not just boosting signals; we're also giving new life to used materials! Recycling the cans we are using is an environmentally-friendly option. It’s a win-win: you get better WiFi, and you’re doing your bit for the planet.
12. The Learning Curve: It's Easier Than You Think
The beauty of this project is that it's highly accessible. Even if you're not a tech whiz, you can build a functional antenna. Don't overcomplicate things, follow the steps, and have fun! If you are struggling, there is a whole online community ready to help you out.
13. Maintenance and Upkeep: Keeping Your Antenna in Top Shape
Fortunately, DIY antennas are relatively low-maintenance. Just make sure all the connections are secure and inspect it periodically for any damage.
14. Personalization: Make it Yours!
Want to add some personality to your antenna? Go for it!. Paint it, decorate it, and make it uniquely yours.
15. The Future of Your Signal: Expanding and Experimenting
This is just the beginning! Once you’ve mastered the basics, you can research more complex antenna designs. The possibilities are endless! Perhaps you'll build an antenna farm to provide a truly exceptional signal.
Conclusion: Your WiFi Liberation Begins Now!
So, there you have it! A simple, cost-effective way to banish those WiFi woes and reclaim your internet connection without a laptop! We hope you found this article helpful, informative, and inspiring. Remember, the key to a successful DIY project is patience, a bit of ingenuity, and a willingness to learn. So, gather your supplies, fire up your creativity, and get ready to say goodbye to buffering and hello to a stronger, faster, and more reliable WiFi signal. You've got this! Now go forth and build!
1) Principal Keywords: DIY WiFi Signal Boost
2) SEO Headline: DIY WiFi Signal Boost: No Laptop Needed!
3) Pathway: DIY Signal
4) Meta Summary: Tired of weak WiFi? Boost your signal with this easy DIY project! No laptop needed! Build your own antenna and say goodbye to buffering. DIY WiFi Signal Boost!
5) Image Alt Text: DIY WiFi antenna being built from a can and a WiFi antenna that improves signal strength.
FAQs
Q1: Is it really possible to build a WiFi antenna without using a laptop?
Absolutely! The beauty of this project is that the building process is entirely hands-on. You'll use simple tools and household items, not software. You can use a laptop later to test the signal strength improvement, but that's a bonus.
Q2: How much does it cost to build a DIY WiFi antenna?
The cost is minimal! You’ll likely spend only a few dollars, if any, as you can usually use recycled or discarded materials, except for the antenna itself, which may need to be purchased. It’s a fraction of the
Laptop Refuses to Find WiFi? This SHOCKING Trick Fixes It!how to make an antenna wifi 10 km

By Digital Sat Pro how to make an antenna wifi 10 km by Digital Sat Pro
New Free internet 100 Work - New idea Free WiFi for Laptop 2020

By DiyHax New Free internet 100 Work - New idea Free WiFi for Laptop 2020 by DiyHax
Wi-Fi Gun DIY Powerful Antenna for Wi-Fi
By Kreosan English Wi-Fi Gun DIY Powerful Antenna for Wi-Fi by Kreosan English
Title: DIY ultra long range WiFi directional antenna using thin can and old router
Channel: FixitEasy
DIY ultra long range WiFi directional antenna using thin can and old router by FixitEasy
Wifi On Laptop
DIY WiFi Antenna: Unleash Your Signal Strength Without a Laptop!
Are you tired of buffering videos, frustratingly slow downloads, and dead zones that plague your home? Do you yearn for a robust, reliable WiFi signal that blankets your entire space? Then, you've stumbled upon the right place. We're going to walk you through a surprisingly simple, yet incredibly effective, method for building your own high-performance WiFi antenna, and the best part? You won't need a laptop, coding skills, or a degree in electrical engineering to achieve remarkable results. This project is about empowering you to take control of your connectivity, transforming your digital experience from frustrating to fantastic.
Demystifying WiFi Antennas: What Makes Them Tick?
Before we delve into the construction process, let's briefly understand what makes a WiFi antenna work. Essentially, a WiFi antenna is designed to both transmit and receive radio waves, acting as a bridge between your router and your devices. The strength and directionality of your antenna significantly impact the signal's range and performance. Commercial antennas often employ sophisticated designs. However, with a few readily available materials, we can replicate the core principles and significantly enhance your WiFi signal. We’re focusing on a directional antenna in this guide, as its ability to focus the signal in a targeted direction offers significant advantages in extending the reach and boosting the strength in a specific area where you need it most. This means instead of spreading the signal in all directions, we are going to aim the signal towards the area you need to give it a real boost.
Gathering Your Arsenal: Essential Supplies and Tools
The beauty of this DIY project lies in its simplicity and affordability. You likely have many of the necessary components already. Here’s your shopping list, ensuring you're prepared for a smooth construction process.
- A Metal Can: This is the heart of our antenna. A clean, empty can is essential. A soup can is ideal, but a coffee or soda can will also work. The can needs to be made of metal, such as aluminum or steel, and should have a diameter of approximately 3 inches. The shape is extremely important as it helps contain and focus the WiFi signal.
- A WiFi Router Antenna: This is the most crucial component, a vital piece needed for our build. Remove the antenna from your existing router. If you don't have a spare antenna on hand, you can typically find replacement antennas for routers at a local electronics store very easily.
- A Knife or Utility Knife: For making the necessary cuts. Be extremely careful when using a sharp knife.
- Drill and Drill Bit: A drill is needed to create a hole for the antenna connection. Ensure your drill bit size matches the diameter of your router's antenna connection.
- Screwdriver (Optional): Helpful for disassembling and reassembling the router antenna.
- Coaxial Cable Connector: This is the tricky part. Make sure you get a connector that’s compatible with your existing router antenna or the connection port on your router.
- Electrical Tape (Optional): For securing the connection point and providing additional stability.
- Ruler or Measuring Tape: Essential for accurate measurements.
- Marker: To mark the cutting and drilling points.
Step-by-Step Construction: Bringing Your Antenna to Life
Now, let's roll up our sleeves and build our WiFi signal powerhouse. Follow these steps meticulously.
Can Preparation: Begin by thoroughly cleaning the can. Ensure it’s completely dry and free of any residue. Next, carefully measure the exact center of the can's base. This is where you'll need to drill the hole for the connector or the feed line of the antenna. Use your marker and ruler to mark this spot precisely. If using a connector, make the hole just large enough for the connector's threads to pass through snugly.
Drilling the Hole: Using your drill and the appropriate drill bit size, carefully create the necessary hole at the marked center. If you are using the antenna’s feed line to wire it through the can, make the hole big enough for the wire to pass through. The goal is to create a snug fit. Take your time and avoid forcing the drill.
Antenna Connection: Now, we connect the router antenna to the can. Insert the antenna through the hole from the outside of the can. If you're using the connector, screw it in place, tightening gently but securely. If you're using the feed line, carefully guide the wire through the hole. Make sure the feed line extends into the can. It should not extend too far. This process can be tricky, so take your time.
Securing the Connection (Optional): For added stability and to prevent movement, use electrical tape to secure the connection point. Wrap the tape firmly around the connector and the base of the antenna, ensuring a snug and weatherproof seal.
Test and Placement: Once construction is complete, it’s time to test your creation. Unscrew the antenna from your router. Attach the newly built antenna to your router, carefully screwing it into place. Orient the can in the direction where you need the strongest signal. Position it strategically, considering potential obstructions like walls and furniture.
Optimizing Your Antenna: Fine-Tuning for Peak Performance
Building the antenna is just the first step. Now, let's optimize its performance.
- Directional Focus: One of the primary benefits of this antenna is its directional focus. When placing your antenna, consider the area you want to cover most effectively. Point the can towards that area. Experiment with slight adjustments to find the optimal angle for the best signal strength.
- Obstacle Assessment: Walls, furniture, and other objects can interfere with the WiFi signal. Try to position the antenna in a location that minimizes obstructions between your router and the devices you want to connect.
- Elevation Matters: Elevating your antenna can often improve signal propagation. Consider placing the antenna on a shelf, a table or mounting it to a wall to get it to a higher level.
- Trial and Error: Every home and environment is unique, so don't be afraid to experiment. Try different locations and angles. You may find that a slight adjustment dramatically improves your signal strength.
Troubleshooting Common Issues
While this antenna is generally quite effective, you might encounter some challenges. Here are some common issues and solutions.
- Weak Signal: If the signal isn't significantly improved, double-check your connections. Ensure the can is securely attached to the antenna. You may need to experiment with the antenna's position and orientation.
- Interference: If you experience occasional drops in the signal, it might be due to interference from other electronic devices. Try moving the antenna away from sources of interference, such as microwave ovens, cordless phones, and Bluetooth devices.
- Router Compatibility: Ensure that your router is compatible with external antennas. Most modern routers are, but it's always good to check the specifications.
Expanding Your WiFi Horizons: Further Enhancements
Once you've mastered the basics, you can experiment with further enhancements.
- Multiple Antennas: If you need to cover a larger area, consider building multiple antennas. You can then position them strategically around your home to minimize dead zones.
- Antenna Height and angle: Experiment with the height of your antenna. Sometimes, a slight adjustment in height can dramatically improve signal performance.
- Reflectors: Consider adding a reflector to the rear of the can to help redirect the signal further. A piece of aluminum foil, or a metal disk can be used.
Beyond the Build: Maximizing Your WiFi Experience
Building a better antenna is just one piece of the puzzle. To enjoy the best possible WiFi experience, also consider these additional tips.
- Router Placement: Place your router in a central location in your home.
- Router Firmware: Ensure your router's firmware is up to date. Firmware updates often include performance improvements and bug fixes.
- Channel Selection: Experiment with different WiFi channels. Some channels might be less congested than others.
- Consider Upgrading Your Router: While our DIY antenna boosts your range and signal, consider upgrading your router to a more modern model with advanced features, like the latest WiFi standards.
Conclusion: Take Control of Your Connectivity
Congratulations! You’ve successfully built your own WiFi antenna and enhanced your home network’s performance. By following these simple steps, you've taken control of your connectivity. Now enjoy a stronger, more reliable signal throughout your home, without relying on expensive equipment. It's a testament to the power of understanding the fundamentals, utilizing readily available materials, and a little bit of DIY ingenuity. Enjoy a faster, more seamless online experience.
