how to check wifi on apple laptop

Title: connecting to wifi on apple laptop laptop apple iphone macbook macbookpro wifi connectivity
Channel: Learn with me-lapy, desktop
connecting to wifi on apple laptop laptop apple iphone macbook macbookpro wifi connectivity by Learn with me-lapy, desktop
how to check wifi password on apple laptop, how to find wifi password on apple laptop, how to see wifi password on apple laptop, how to check wifi password on apple mac, how to see wifi password on apple mac, how to check wifi password in apple macbook, how can i see the wifi password on my macbook
Is Your Apple Laptop's Wi-Fi REALLY Working? (Secret Trick Inside!)
Is Your MacBook's Wi-Fi Actually Humming Along? Unveiling the Hidden Truth!
Ever felt like your internet is crawling, even though your Wi-Fi signal shows full bars? Frustrating, right? We've all been there. It's that digital equivalent of a slow walk in molasses. But before you chuck your laptop out the window, hang tight! There's likely a simple fix, and we're diving in. Let's troubleshoot your Apple laptop's Wi-Fi and see if we can kick it back into high gear.
The Phantom of the Wi-Fi: Decoding the Mystery
First off, let's get something straight: a strong Wi-Fi signal doesn't always equal blazing-fast internet. Think of it like having a fully stocked gas tank in a car. If your engine is sputtering, you won't get anywhere fast. In other words, the issue might not be your connection to the router. The slowdown could be elsewhere. Therefore, we'll explore the common culprits behind sluggish Wi-Fi performance.
Step 1: The Obvious Suspects - Your Router and ISP
Okay, let's start with the foundations. Is your router working properly? It might seem basic, but check the physical connections first. Ensure everything is plugged in tight. Power cycle your router – unplug it for about 30 seconds, plug it back in, and let it boot up. This process often resolves temporary glitches.
However, your internet service provider (ISP) could be the problem. If the above doesn't work, contact them. They can check for outages or throttling. They might also suggest troubleshooting on their end. After all, sometimes it’s just them.
Step 2: Digging Deeper: Interference and Congestion
Now, let's get a little more technical. Wi-Fi operates on radio frequencies. Therefore, other devices can interfere with your signal. Microwaves, Bluetooth devices, and even your neighbor's Wi-Fi can cause interference. Try moving your laptop closer to your router. Consider changing your Wi-Fi channel in the router's settings. This can help avoid congestion.
Step 3: The Secret Weapon: Network Diagnostics
This is where things get interesting. Your Mac has a built-in diagnostic tool you probably don't know about. It's amazingly useful. To access it, simply hold down the "Option" key while clicking the Wi-Fi icon in the menu bar. Then, select "Open Wireless Diagnostics."
That's it! This tool runs a comprehensive analysis of your Wi-Fi connection. It identifies potential issues. The tool can then offer suggestions for improvement. You can also use it to monitor your signal strength over time. This can help identify fluctuations.
Step 4: Cleaning Up the Clutter: The Cache Files
Over time, your computer stores temporary internet files in its cache. These files can sometimes become corrupted. These can slow down your browsing speeds. Fortunately, clearing your cache is simple. For example, in Safari, go to "Safari" > "Clear History…" Then select "All History." Similarly, in Chrome, go to "More tools" > "Clear browsing data." Don’t forget your other browsers!
Step 5: Software Updates and System Maintenance
Outdated software can also affect your Wi-Fi performance. Therefore, make sure your macOS is up to date. Apple regularly releases updates that include bug fixes and performance improvements. Also, run Disk Utility to repair any disk errors. An organized system is a happy system. So, keep your system tidy.
Step 6: Advanced Troubleshooting - Network Utility
For more advanced users, the Network Utility app offers even deeper insights. You can access it via Spotlight search. This tool allows you to ping websites. Check their response times. You can also trace network routes. This can help you pinpoint the source of any delays. It's a bit more technical. Yet, it can give you a clearer picture.
The Final Verdict: Keeping Your Wi-Fi Alive and Kicking
So there you have it! A range of ways to troubleshoot your MacBook's Wi-Fi. Following these steps will almost certainly improve your wireless experience. Remember, a bit of detective work can go a long way. Because of this, don't let slow Wi-Fi ruin your day. However, if all else fails, consider a wired connection. This could potentially offer a faster and more stable experience. You will have a faster internet. Troubleshooting Wi-Fi doesn't have to be a mystery.
Unlock Any WiFi: Secret Windows 10 Trick Revealed!Is Your Apple Laptop's Wi-Fi REALLY Working? (Secret Trick Inside!)
Hey there, fellow Apple enthusiasts! Ever feel like your Wi-Fi is playing a frustrating game of hide-and-seek on your MacBook or MacBook Air? One minute you're cruising, the next you're staring at the dreaded "No Internet Connection" message, feeling like you're trapped in digital purgatory. We've all been there, right? And, let’s be honest, it’s incredibly annoying, especially when you have a deadline looming or just crave a Netflix binge. Today, we're diving deep into the world of Apple Wi-Fi woes, troubleshooting tips, and a secret trick that might just save your sanity. Prepare to unlock the secrets to a truly connected experience!
Section 1: The Wi-Fi Whisperer: Understanding Apple's Wireless World
Before we unleash the magic trick, let's get a handle on the basics. Apple's operating systems, from macOS Monterey to the latest Ventura (and beyond!), are generally pretty slick when it comes to Wi-Fi. But even the most advanced tech can stumble. Think of your Wi-Fi connection as a highway: sometimes, there's a traffic jam, other times, the road is closed for construction. Understanding the potential culprits is the first step to becoming a Wi-Fi whisperer.
Subtitle 1: The Usual Suspects: Common Wi-Fi Problems
Let's face it, some issues are super common. We’re talking about:
- Weak Signal Strength: Distance from your router is a killer. Think of it like shouting across a football field – the further you are, the harder it is to be heard.
- Interference: Your microwave, your neighbor's Wi-Fi, even Bluetooth devices can all interfere with your signal. Imagine a noisy party where no one can hear each other!
- Router Overload: Too many devices connected to your router at once can bog things down. It’s like trying to squeeze everyone onto a single bus.
- Software Glitches: Sometimes, a simple software bug can be the problem. Your Mac’s Wi-Fi doesn't get along with the latest update? It can happen!
- Outdated Drivers: Older drivers can struggle with newer hardware. Imagine this as an outdated program that cannot speak to the latest phone model.
Subtitle 2: Check Your Connection Status (It's Easier Than You Think!)
Before you start panicking, the first thing to do is check your connection status. Look at the Wi-Fi icon (typically a set of curved lines) in the top right corner of your screen. Simple as that!
- Wi-Fi Icon with Full Bars: Excellent! Most likely you’re connected and things are smooth sailing.
- Wi-Fi Icon with Fewer Bars: You might have a weak signal. Try moving closer to your router!
- Wi-Fi Icon with an Exclamation Mark (!) or No Wi-Fi Icon: Uh oh! You've got a problem. This is where the fun begins!
Section 2: Troubleshooting Time: Your Wi-Fi Rescue Plan
Okay, so the initial check revealed a problem. Don't worry; we have a plan! Troubleshooting Wi-Fi issues on your Apple laptop isn't rocket science. It’s more like detective work.
Subtitle 3: The Quick Fixes: Reboot, Restart, Revive!
Sometimes, the solution is delightfully simple. Think of it as the digital equivalent of turning it off and on again.
- Restart Your MacBook: A classic for a reason. A simple restart can clear out temporary glitches that might be messing with your Wi-Fi connection. This is usually the first tactic you should try.
- Restart Your Router: Unplug it for 30 seconds, plug it back in, and let it reboot. Think of this as a digital reset button for your entire network. You would be surprised how effective this is.
- Check the Physical Connection (the Router’s Side): Sometimes, a loose Ethernet cable is the culprit. This step is often overlooked, but it's important.
Subtitle 4: Delving Deeper: Network Diagnostics and More
If the quick fixes fail, it’s time to get a little more technical. Apple has built-in tools to help you diagnose Wi-Fi issues.
- Use Network Diagnostics: Hold down the Option key and click the Wi-Fi icon in the menu bar. Select "Open Wireless Diagnostics.” This tool can scan your Wi-Fi environment and suggest solutions. It’s like having a Wi-Fi detective at your fingertips.
- Check Configuration Profile: Sometimes, a misconfigured profile can cause connection issues. Go to System Preferences > Profiles to see if any profiles are causing problems. It is very rare to see this problem, but is still worth it to check it.
- Forget and Rejoin the Network: In System Preferences > Network, select your Wi-Fi network and click the "–" button to delete it. Then, rejoin the network. This is basically a fresh start.
Section 3: The Secret Trick Revealed: The Power of the Preferred Networks List
Alright, buckle up, because here's the secret trick that many people overlook! This one can often fix persistent Wi-Fi headaches.
Subtitle 5: The Preferred Networks List: Your Wi-Fi's Roadmap
Your MacBook remembers all the Wi-Fi networks you've ever connected to. This information is stored in a "Preferred Networks" list. Sometimes, this list can get cluttered or have incorrect information, leading to connection issues. It's like a messy address book that's causing you to dial the wrong numbers.
Subtitle 6: Cleaning Up the Clutter: How to Tidy Your List
To refresh this list and potentially resolve your Wi-Fi problems, here's what you should do:
- Open System Preferences: Click the Apple menu () in the top-left corner of your screen and choose "System Preferences” (or "System Settings" in more recent macOS versions.)
- Navigate to Network: Click on "Network."
- Select Wi-Fi: In the left tab, select your Wi-Fi connection.
- Click "Advanced": This button is typically at the bottom right, or in the right-hand tab.
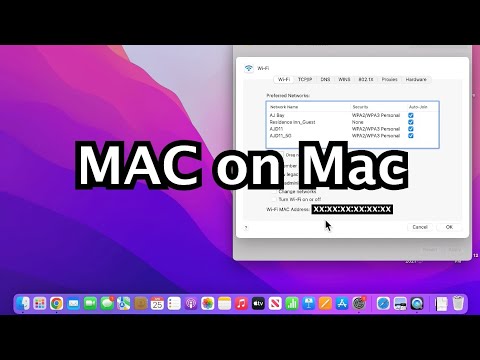
- The Preferred Networks Tab: Click on the "Preferred Networks" tab. This is where the magic happens!
- Rearrange Your List: Drag and drop your preferred networks to change their priority. The network at the top is what your Mac tries to connect to first. Your home network should be the first on the list!
- Delete Old or Problematic Networks: Carefully review this list and delete any networks you no longer use, or those that cause issues. This is like decluttering your digital life.
- Click “OK” then “Apply": Save your changes and test your Wi-Fi!
Subtitle 7: The Power of Order: Prioritizing Your Connections
The order of your preferred networks list matters. If you travel frequently and connect to multiple Wi-Fi networks, putting your home network or your most reliable network at the top increases the chances of a smooth and quick connection.
Section 4: Beyond the Basics: Advanced Wi-Fi Wisdom
We covered the basics and unveiled our secret trick. But let’s expand your Wi-Fi knowledge even further.
Subtitle 8: Upgrading Your Router: Investment that Pays Off
Your router is the heart of your home Wi-Fi network; if it is not keeping up with your internet speed, your connection will suffer. Is your router old? Think about upgrading to a modern router that supports the latest Wi-Fi standards (like Wi-Fi 6 or Wi-Fi 6E.) Invest in a router that can handle the speed and traffic of your devices to reduce the signal bottleneck.
Subtitle 9: Channel Surfing: Finding the Sweet Spot in Your Wi-Fi World
Routers broadcast on different channels. These are like radio stations. If your neighbors use the same channel as you, it can cause interference.
- Use a Wi-Fi analyzer: Use apps to scan your Wi-Fi environment and identify the least congested channel for your router.
- Consult your router's settings: Most routers allow you to change the Wi-Fi channel in their settings. This is a technique, but can potentially greatly improve performance!
Subtitle 10: Security First: Protecting Your Wireless Network
Always use strong passwords, and enable WPA3 encryption on your router. This protects your network from unwanted access. This keeps your privacy locked down.
Section 5: When All Else Fails: Seeking Professional Help
Sometimes, despite your best efforts, Wi-Fi problems persist. Don't fret!
Subtitle 11: Apple Support: Your Trusted Allies
Apple offers excellent support resources, including online documentation, troubleshooting guides, and direct phone or chat support. Don’t hesitate to contact them.
Subtitle 12: Professional IT Support: The Ultimate Backup
If your Wi-Fi issues are complex or persistent, consider contacting a professional IT support specialist. They can diagnose and resolve more challenging problems. It is better to get help rather than wasting time trying to fix the issue.
Section 6: Conclusion: Embrace the Connected World
Subtitle 13: Recap and Key Takeaways
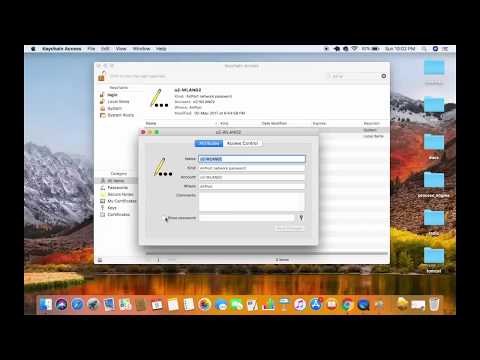
Laptop WiFi MIA? Emergency WiFi Fix!How to Show WiFi Password on MacBook

By Tech Tips How to Show WiFi Password on MacBook by Tech Tips
How to Find MAC Address on MacBook
By Tech Tips How to Find MAC Address on MacBook by Tech Tips
How to find a Wi-Fi password on Mac
By ProgrammingKnowledge2 How to find a Wi-Fi password on Mac by ProgrammingKnowledge2

Title: How to see wifi password on macbook
Channel: IT Magics
How to see wifi password on macbook by IT Magics
Laptop Working
Is Your Apple Laptop's Wi-Fi REALLY Working? (Secret Trick Inside!)
We understand the frustration. You're in the middle of an important presentation, attempting to stream a crucial webinar, or simply trying to browse the web, and your Apple laptop’s Wi-Fi is… well, it seems to be working. The Wi-Fi icon in the menu bar is cheerfully lit up. Yet, the pages load at a glacial pace, if they load at all. Or perhaps, your connection is dropping intermittently, leaving you stranded. We've all been there. But before you toss your MacBook across the room or blame your internet provider, let's delve deep into the often-overlooked nuances of Apple laptop Wi-Fi functionality. We aim to empower you with advanced troubleshooting techniques, many of which go beyond the typical “turn it off and on again” advice. We'll help you diagnose the true state of your connection and, crucially, share a secret trick that can significantly improve your Wi-Fi performance, unlocking the full potential of your Apple laptop.
Decoding the Wi-Fi Status Icon: Beyond the Green Bars
That seemingly innocuous Wi-Fi icon in the top-right corner of your screen tells a story far more detailed than a simple "connected/not connected" binary. The green bars can be misleading. They primarily represent the signal strength your laptop is receiving. They don't, however, reveal anything about the quality of that signal or the efficiency of your connection.
To gain a more comprehensive understanding, click on the Wi-Fi icon. You'll see the name of the network you’re connected to, along with a snapshot of the connection status. Pay attention to several key elements:
- Signal Strength: Again, represented by the bars, but consider it in conjunction with the other factors. Excellent signal strength doesn't guarantee a smooth experience.
- Channel: Your Wi-Fi router broadcasts on a specific channel. Overcrowded channels can lead to interference and slower speeds, particularly in densely populated areas like apartment complexes or office buildings. We'll address channel optimization later.
- Security Type: Ensure your connection is using a secure protocol, such as WPA2 or WPA3. Public networks utilizing outdated security protocols are inherently less secure and often less reliable.
- IP Address and DNS Server: These are the numeric addresses that allow your laptop to communicate with the internet. Problems here can severely impede browsing, even if your Wi-Fi seems connected. You can find the IP address and DNS server information by going to System Preferences > Network, selecting your Wi-Fi connection, and clicking Advanced.
Troubleshooting Common Wi-Fi Woes: A Step-by-Step Approach
When faced with problematic Wi-Fi on your Apple laptop, a systematic approach is crucial. Begin by methodically eliminating potential causes:
- The Obvious: Restarting and Resetting. While seemingly simplistic, restarting your laptop and your router (unplug it for 30 seconds) can often resolve temporary glitches. This resets the connection and clears any accumulated cache data that might be causing issues.
- Software Updates: Outdated operating systems and network drivers can contribute to Wi-Fi problems. Ensure your MacBook is running the latest version of macOS. Go to System Preferences > Software Update to check for and install any available updates.
- Check for Interference: Wi-Fi signals are susceptible to interference from other electronic devices operating on the same frequency. This includes microwave ovens, Bluetooth devices, cordless phones, and even certain types of lighting. Temporarily move your laptop closer to the router and away from potential sources of interference to see if performance improves.
- Network Diagnostics: Apple provides a built-in network diagnostic tool. Hold down the Option key and click on the Wi-Fi icon in the menu bar. Select “Open Wireless Diagnostics.” Follow the on-screen prompts to diagnose and potentially fix network issues. This tool can identify problems such as weak signal strength, channel interference, and DNS server errors.
- Forget and Rejoin the Network: Sometimes, a corrupted network profile can cause connectivity problems. Remove the network from your preferred networks list and then reconnect. In System Preferences > Network, click “Advanced,” select the Wi-Fi network you’re using, and select the minus (-) button to delete it. Then, rejoin the network by clicking the Wi-Fi icon and selecting the network from the list.
Beyond the Basics: Advanced Troubleshooting Tactics
If the steps above fail to solve the problem, it's time to dig deeper. Now, we begin to separate the casual user from the Wi-Fi aficionado:
- Channel Optimization: As mentioned earlier, channel congestion can cripple Wi-Fi performance. Most routers automatically select a channel, but often, they choose the same ones as neighboring routers. To optimize your Wi-Fi, use a Wi-Fi analyzer app (there are many free options available in the App Store or online) to scan for congested channels in your area. Then, access your router's settings (usually through a web browser by typing in your router's IP address) and manually set your router to a less crowded channel. Channels 1, 6, and 11 are generally good starting points.
- DNS Server Configuration: Your Domain Name System (DNS) server translates website addresses (like google.com) into IP addresses. Sometimes, your internet service provider’s DNS servers can be slow or unreliable. You can switch to a more reliable public DNS server, such as Google’s (8.8.8.8 and 8.8.4.4) or Cloudflare’s (1.1.1.1 and 1.0.0.1). Go to System Preferences > Network, select your Wi-Fi connection, click “Advanced,” and then the “DNS” tab. Add the preferred DNS server addresses.
- Resetting the Network Adapter: In some cases, the network adapter on your MacBook might have its configuration become corrupted. Resetting it can often resolve the issue. Open Terminal (found in Applications/Utilities) and type the following command, followed by pressing Return:
sudo networksetup -setairportpower airport offThen, type the command again, this time changing "off" to "on" to turn it back on. You will need your administrator password to run this command.
The Secret Trick: Optimizing Wireless Settings (Hidden Menu)
Now for the secret trick. This is where we truly elevate your Wi-Fi experience: Accessing the hidden diagnostic menu in your MacBook's Wi-Fi settings. This allows you to bypass the standard interface and delve into more sophisticated settings for optimizing your wireless connection, as well as gaining more diagnostic information. Here's how to uncover it:
Hold Down the Option Key: While holding down the Option key on your keyboard, click on the Wi-Fi icon in the menu bar.
Explore the Hidden Options: A plethora of new options will appear. Here are some of the most beneficial:
- Wireless Diagnostics: This is a more comprehensive version of the built-in diagnostics tool. Use it to continuously monitor your connection and identify any recurring issues.
- Open Wireless Diagnostics…: As before, this will open the Wireless Diagnostic tool.
- Channel Scan: A more in-depth look at the wireless channels around you.
- Transmission Rate: This displays the speed your computer is connecting to the network, along with details of the connection.
- Signal Quality: The signal quality gives more detail of the Wi-Fi connection.
Using the Hidden Menu: The specific settings will vary depending on your macOS version, but generally, these secret menus can help you fine-tune your connection. For instance, you might be able to adjust the roaming aggressiveness to improve performance when moving between different access points. You can also view detailed information about signal strength, noise levels, and the current connection rate.
Maintaining Optimal Wi-Fi Performance: Proactive Measures
Solving a Wi-Fi problem isn't a one-time fix. Proactive measures are key to maintaining a fast and reliable connection:
- Regularly Update Your Router's Firmware: Router manufacturers release firmware updates to fix bugs, improve security, and enhance performance. Check your router's manual for instructions on how to update the firmware.
- Position Your Router Strategically: The location of your router significantly impacts Wi-Fi range and signal strength. Place it in a central location, away from walls, metal objects, and potential sources of interference.
- Secure Your Network: Use a strong password and enable WPA2 or WPA3 encryption to protect your network from unauthorized access.
- Monitor Your Router's Performance: Occasionally, check your router's settings to ensure it's operating optimally. Look for any error messages or warnings.
- Consider a Wi-Fi Extender (If Needed): If you have a large home or office, a Wi-Fi extender can help to extend the range of your network. Place it in a location where it can receive a strong signal from your primary router and then rebroadcast the signal to areas with poor coverage.
By implementing these troubleshooting methods and, particularly, using this secret trick, you will become well-equipped to diagnose and resolve any Wi-Fi problems encountered on your Apple laptop. You'll be able to browse, stream, and work with confidence, knowing that your connection is operating at its best potential. Remember to be patient, methodical, and enjoy the faster
