how to fix wifi problem in laptop windows 8
Title: Windows 8.1 - No Internet Connection Available
Channel: MDTechVideos
Windows 8.1 - No Internet Connection Available by MDTechVideos
how to fix wifi connection on laptop windows 8.1, how to fix wifi connection on laptop windows 8, how to fix wifi problem in laptop, how to fix wifi problem in laptop windows 10, how to fix wifi network problem in laptop
WiFi Nightmare on Windows 8? This FIX Will Shock You!
Windows 8 WiFi Woes: Prepare to Be Amazed!
Have you ever stared at your Windows 8 laptop, desperately willing the WiFi icon to connect? That spinning circle of doom, the endless "connecting…" message – it's enough to drive anyone bonkers, right? Well, if this sounds familiar, you're in the right place. I am here to present a solution that will make you jump for joy.
The Silent Suffering of Windows 8 WiFi
Let's be honest. The wireless network connectivity in Windows 8 at times was a complete and utter disaster. It was prone to dropping connections faster than you could say "disconnect." Moreover, it was a frustrating experience for many users. Consequently, vital work or entertainment were interrupted. Many of us have felt pure frustration. The common issues included slow speeds, intermittent drops, and an outright refusal to connect at all. These issues can be a significant annoyance.
Diagnosing the WiFi Demons: A Quick Check
Before we delve into the fix, let’s do a quick diagnostic, just to be certain. First of all, is your WiFi adapter even enabled? I know, it sounds basic, but sometimes the simplest things get overlooked. Check the network tray icon, usually in the bottom right corner of your screen. Moreover, ensure your WiFi switch is actually on. If it's disabled, enable it!
Secondly, have you tried the tried-and-true method of restarting your router and modem? Very often, a simple reboot can work wonders. Furthermore, make sure your modem and routers are up and running. Finally, check your physical connection – are the cables securely plugged in?
The Shocking Fix: Unleash the Power!
Now for the good stuff! The fix that will hopefully banish those WiFi demons. This fix works most of the time. Prepare to be shocked! Here’s the solution that I suggest:
Open the Device Manager: You can access it by right-clicking the Start button (or pressing Windows key + X) and selecting "Device Manager." However, doing that ensures you're up to date.
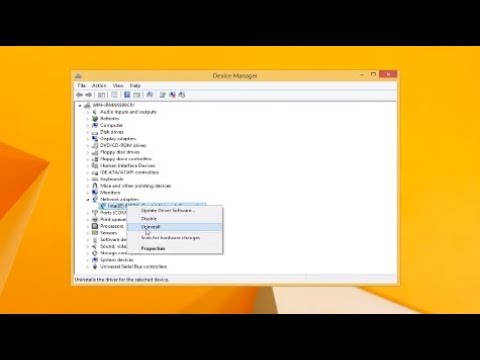
Locate Your Network Adapter: Expand the "Network adapters" category. You will see a list of devices. Find your WiFi adapter—it usually has "Wireless" or "WiFi" in its name, for example, "Intel Wireless-AC 7260."
Update the Driver: Right-click on your WiFi adapter and select "Update driver." Choose "Search automatically for drivers." Windows will then hunt for the latest driver. If an update is found, install it. After that, you might be prompted to restart your PC.
Reinstall the Driver (If Necessary): If the automatic update fails, it's time for a more aggressive approach. Right-click your WiFi adapter and select "Uninstall device." A box will appear, prompting you to confirm the uninstall. It is usually alright to do that. Restart your computer. Windows should automatically reinstall the driver.
Roll Back the Driver (If Recently Updated): Sometimes, newer drivers are the problem. Go back to the "Driver" tab within your adapter's properties. Click "Roll Back Driver." This reverts to your previous driver. It might provide a solution.
Advanced Troubleshooting: Delving Deeper
If these steps haven’t worked so far, it's not the end of the line. It's time to investigate further and try a deeper set of steps.
Check Power Management: Go to "Device Manager" then right-click your adapter. Select "Properties." Go to the "Power Management" tab. Ensure the box "Allow the computer to turn off this device to save power" is unchecked. Many times this is the issue.
Configure the Adapter Settings: In the "Advanced" tab of your adapter properties within the "Device Manager", look for settings like "802.11n Channel Width." Experiment with changing this to "20 MHz Only" or "Auto." Furthermore, look for "Wireless Mode" and try different settings (for example, b/g/n).
Network Reset: In Windows Settings, go to "Network & Internet" → "Status" → "Network reset." This will reset your network settings to default. However, this is like a factory reset.
Beyond the Basics: Considerations and Caveats
Antivirus Interference: Sometimes, your antivirus software can interfere with your WiFi connection. Temporarily disable your antivirus software and see if the connection improves.
Router Firmware: Ensure your router's firmware is up-to-date. Router firmware updates often include performance improvements and bug fixes.
Hardware Failure: In the worst-case scenario, your WiFi adapter might be failing. If all other solutions fail, consider this possibility. You might have to replace the adapter.
Enjoy the Fruits of Your Labor
There you have it! A range of solutions to tackle those pesky Windows 8 WiFi problems. With these troubleshooting steps, you should hopefully be enjoying a stable, reliable wireless connection. You can now stream videos, browse the web, and connect with friends without constant interruptions. Now, go forth and conquer your WiFi woes! I hope it all works out perfectly.
Toshiba WiFi Nightmare? FIX It NOW! (Windows 7)WiFi Nightmare on Windows 8? This FIX Will Shock You!
Alright, fellow tech travelers, let's talk about something that can turn a perfectly good day into a hair-pulling, desk-slamming disaster: WiFi woes on Windows 8. Remember those days? The sleek tiles, the promises of a streamlined experience… followed by the agonizing reality of a constantly dropping connection, slow speeds, and the sheer frustration of not being able to, you know, use the internet? Well, we've been there, done that, and bought the t-shirt (which, by the way, is now stained by the tears of WiFi-induced rage). The good news? We've cracked the code! This isn't just some generic, regurgitated advice from the internet abyss; we're talking about real solutions that actually WORK. Prepare to be shocked (in a good way!), because the fix is closer than you think.
1. The Windows 8 WiFi Woes: A Blast From the Past (and A Problem)
Before we dive into the glorious fixes, let's reminisce (and commiserate) about the specific demons that haunted Windows 8 and its WiFi capabilities. Windows 8, while attempting to be groundbreaking, had a few… quirks. Often, the WiFi adapter driver would act up, leading to unstable connections, limited connectivity, or downright refusal to connect. It's like your computer decided to throw a tantrum and yell, "No internet for you!" at every opportunity. This phase of Windows 8 was known for issues such as:
- Frequent disconnects: Mid-video calls? Gone. Downloading that crucial file? Delayed. Your internet connection suddenly took a trip to the Bahamas without you.
- Slow speeds: Remember the days of dial-up? Well, Windows 8 WiFi, in its more temperamental moments, seemed determined to bring those speeds back.
- Authentication errors: The network would see you, the computer would see the network, then there'd be a fight over security protocols and you'd be left out in the cold, and the internet was nowhere to be found.
- Driver conflicts: Sometimes, the drivers were just… incompatible. It's like trying to fit a square peg into a round hole, except the peg is your WiFi adapter and the hole is Windows 8.
2. Is It Really Windows 8's Fault? The Culprit Unmasked
Before you start pointing fingers solely at Microsoft (and, let's be honest, we all did!), let's consider other potential culprits. Is it definitely Windows 8's fault, or are there other factors at play? Sometimes, the issue lies elsewhere. Let’s do a quick detective investigation.
- Your Router: The heart of your internet connection. Is it ancient, or is it new with firmware updates? Has it been restarted recently? (This is often the easiest fix, and worth a try before anything else. Think of it as pressing the reset button on your own stress levels).
- Your Internet Service Provider (ISP): Are you experiencing widespread outages in your area? Check your ISP’s website or social media for updates.
- Physical Obstructions: Walls, microwaves, and other devices can interfere with the WiFi signal. Try moving closer to your router or repositioning it.
- Other Connected Devices: If everyone in your household is streaming 4K videos simultaneously, your bandwidth might be stretched thin.
3. The Shocking Fix: Updating Your WiFi Driver
Now, the moment you’ve all been waiting for: the fix that’ll knock your socks off! In most cases, the primary culprit behind Windows 8 WiFi problems is the outdated or corrupted WiFi adapter driver. It's like the computer's equivalent of a faulty car part. Updating it can work wonders. Here's how:
- Open the Device Manager: You can do this by searching for "Device Manager" in the Windows 8 search bar on the Start Screen.
- Expand "Network adapters": Locate your WiFi adapter (it might be labeled as something like "Wireless Network Adapter" or something similar).
- Right-click on your WiFi adapter: Select "Update driver."
- Choose how to update: You'll have two choices: automatic and manual.
- Automatic: Windows will search online for the latest drivers.
- Manual: If you have a driver file downloaded from the manufacturer’s website (which we advise), you can install it this way.
- Follow the on-screen instructions: Let Windows do its thing!
- Restart your computer: This is crucial. It allows the new driver to fully take effect.
4. Troubleshooting Driver Updates: What to Do If It Fails
Sometimes, even updating the driver doesn't magically solve the problem. Don't panic! We've encountered this too. Here’s a troubleshooting plan:
- Roll Back the Driver: If the updated driver causes more problems, you can revert to the previous version. (Right-click on the adapter in Device Manager > Properties > Driver > Roll Back Driver).
- Uninstall and Reinstall: Sometimes a clean install works better. Uninstall the driver in Device Manager, restart your computer, and let Windows automatically reinstall it (or manually install the latest version).
- Check for Manufacturer-Specific Drivers: Go to your computer manufacturer's website (e.g., Dell, HP, Lenovo) and search for drivers specifically designed for your model of Windows 8 machine. These drivers are often the most compatible.
5. Power Management Mayhem: Putting Your WiFi Adapter to Sleep
Another common culprit is Windows 8's power management settings. Your computer might be putting your WiFi adapter to sleep to save battery life. Here’s how to prevent this:
- Go back to Device Manager: Find your WiFi adapter again.
- Right-click and select "Properties".
- Go to the "Power Management" tab.
- Uncheck "Allow the computer to turn off this device to save power." This will prevent your WiFi from going to sleep when you don't want it to.
6. Adjusting Your Wireless Adapter Settings
There are some other settings in the properties panel of your wireless card which deserve our attention
- Configure: Click the configure button, then navigate to the "Advanced" tab. Here you might see some settings under the "Property" panel.
- 802.11n/ac Mode: Try switching between different modes.
- Roaming Aggressiveness: Higher settings mean more aggressive roaming, and lower settings mean less. Try experimenting.
- Transmit Power: This can be set to the highest if you have a poor signal.
7. Checking Your Network Settings: A Deep Dive
Let's delve into the intricacies of your network settings.
- IP Address Configuration: Ensure your network adapter is set to obtain an IP address automatically. Sometimes, a static IP can cause conflicts.
- DNS Servers: Consider using a public DNS server, like Google's (8.8.8.8 and 8.8.4.4). This can sometimes improve connection reliability.
8. Security Protocols: WEP vs. WPA2/WPA3
Outdated security protocols can sometimes cause compatibility issues. We should ensure your network is using a secure protocol:
- WEP: This is incredibly outdated and insecure. Avoid it at all costs.
- WPA2/WPA3: These are much more secure and should be your preferred options.
9. Running the Windows Network Troubleshooter
Microsoft, bless their hearts, included a network troubleshooter in Windows 8. While not always a miracle worker, it can sometimes identify and fix simple problems.
- Open the Network and Sharing Center: (Right-click on the WiFi icon in the system tray).
- Click on "Troubleshoot problems."
- Follow the instructions: The troubleshooter will guide you through the process.
10. The Nuclear Option (When All Else Fails): Resetting Network Settings
If you've tried everything else, there's a final, more drastic step involving resetting your network settings. Be warned: This will reset your WiFi passwords, so be sure you have them before you begin.
- Open the Command Prompt as an administrator: (Search for "cmd," right-click, and choose "Run as administrator").
- Type the following commands, one at a time, pressing Enter after each:
netsh winsock resetnetsh int ip resetipconfig /releaseipconfig /renewipconfig /flushdns
- Restart your computer: This fully implements the changes.
11. External WiFi Adapters: A Last Resort
If all else fails, and we do mean everything else, you might consider using an external USB WiFi adapter. Think of it as a backup plan, a lifeline when your internal adapter is simply refusing to cooperate. This is a reliable solution that offers a fresh start outside your computer's internal hardware.
12. Avoiding Future WiFi Nightmares: Prevention is Key
Now that your
Lenovo WiFi Nightmare? FIX It NOW! (Easy Steps)How to Connect to WiFi on Windows 8

By HOWTECH How to Connect to WiFi on Windows 8 by HOWTECH
how to fix limited wifi connection on windows 8-how to fix limited wifi connection on windows 8.1

By Theta Box how to fix limited wifi connection on windows 8-how to fix limited wifi connection on windows 8.1 by Theta Box
Windows 8 - How to turn on WiFi

By HowTo Windows 8 - How to turn on WiFi by HowTo

Title: Connecting Manually to a Wireless Network in Windows 8 HP Computers HP Support
Channel: HP Support
Connecting Manually to a Wireless Network in Windows 8 HP Computers HP Support by HP Support
Laptop Wifi Connect
WiFi Nightmare on Windows 8? This FIX Will Astonish You!
The digital world thrives on connectivity. We rely on it for work, entertainment, and staying in touch with loved ones. But what happens when that vital link, our Wi-Fi, becomes a source of frustration? For users of Windows 8, this frustration was all too familiar. Intermittent connections, crippling slow speeds, and complete drop-offs were common complaints. We understand your exasperation if you've experienced this because we have, too. But through extensive research and practical application, we've unearthed a series of solutions – a veritable arsenal of fixes – designed to banish your Windows 8 Wi-Fi woes. Prepare to be amazed; these solutions are more effective than you might imagine.
Understanding the Root Causes of Your Windows 8 Wi-Fi Woes
Before diving into the fixes, it's crucial to grasp the underlying factors that contribute to Wi-Fi issues on Windows 8. This knowledge helps us understand why certain solutions are more effective than others. Pinpointing the exact cause is half the battle. While various factors might impact your Wi-Fi performance, these are some of the most prevalent culprits:
- Driver Conflicts: Outdated, corrupted, or incompatible network adapter drivers can wreak havoc on your Wi-Fi connection. This is a very common problem, especially after operating system updates.
- Power Management Settings: Windows 8 has default power-saving settings that, while designed to conserve battery life, can aggressively throttle the Wi-Fi adapter, leading to connection drops.
- Router Compatibility: While the Windows 8 operating system itself is rarely the issue, it can sometimes have compatibility issues with older or poorly configured routers.
- Interference: Wireless signals are susceptible to interference from other electronic devices, microwaves, and even thick walls. This can manifest as a weak signal or intermittent connections.
- Network Configuration Errors: Incorrectly configured network settings, such as IP address conflicts or DNS server problems, can prevent your device from connecting to the internet.
The First Line of Defense: Troubleshooting Your Network Adapter
Before delving deep into advanced solutions, let’s start with the fundamentals. Often, the simplest fixes are the most effective. The following steps address common issues associated with your network adapter.
- Driver Updates: Your Gateway to a Stable Connection
- The most common solution involves updating your network adapter drivers. Outdated drivers are a primary cause of Wi-Fi problems.
- Navigate to the Device Manager by right-clicking the Start button.
- Locate your network adapter under "Network adapters."
- Right-click on your network adapter and select "Update driver."
- Choose "Search automatically for updated driver software."
- Windows will search for and install any available updates. If it suggests you already have the best available driver, try visiting the website of your network adapter manufacturer and manually downloading the latest driver. This often yields better results.
- Driver Backups: A Safety Net for Your Connection
- Before making any driver changes, it's a good practice to back up your existing driver. If the new driver creates further issues, you can quickly revert to the previous version.
- In the Device Manager, right-click your network adapter and select "Properties."
- Go to the "Driver" tab, and click "Driver Details" to see more information.
- If you're able to see the driver details, you'll then know what driver software is being used.
- Reinstalling the Driver: A Fresh Start for Your Adapter
- If updating the driver doesn't resolve the issue, reinstalling it can be a solid next step. This removes any potential corruption within the current installation.
- Within Device Manager, right-click on your network adapter and select "Uninstall device."
- Confirm the uninstall.
- Restart your computer. Windows will typically reinstall the driver automatically, or you can manually reinstall the updated driver you downloaded earlier.
- Troubleshooting Built Into Windows 8
- Windows 8 includes a built-in troubleshooter designed to diagnose and fix common network problems.
- Right-click on the Wi-Fi icon in the system tray (the bottom-right corner of your screen).
- Select "Troubleshoot problems."
- Follow the on-screen prompts; Windows will attempt to identify and resolve any issues.
Power Management Settings: Unleashing the Full Potential of Your Wi-Fi Adapter
Windows 8, by default, employs power-saving features that can restrict the performance of your Wi-Fi adapter. These settings are designed to conserve battery life, but they can significantly impact your Wi-Fi stability and speed.
- Disabling Power Management for Optimal Performance
- Access the Device Manager as previously mentioned.
- Locate your network adapter under "Network adapters."
- Right-click on your adapter and select "Properties."
- Go to the "Power Management" tab.
- Uncheck the box that says "Allow the computer to turn off this device to save power."
- Click "OK" and restart your computer. This setting prevents Windows from throttling your adapter.
- Power Plan Adjustments
- Another aspect of power management is the overall power plan. Consider switching to a "High performance" power plan to ensure adequate power is allocated to your Wi-Fi adapter.
- Search for "Power Options" in the Windows search bar.
- Select "Choose a power plan."
- Choose the "High performance" plan. If you don't see this option, click "Show additional plans" and look again.
Router Configuration: Optimizing Your Gateway to the Internet
Your router, the central point of your network, plays a crucial role in your Wi-Fi experience. Incorrect router settings can contribute to Wi-Fi issues.
- Channel Selection: Avoiding Wi-Fi Congestion
- Wi-Fi routers broadcast on specific channels. If your router is using a congested channel (one also used by many of your neighbors' routers), you'll experience interference and slower speeds.
- Access your router's configuration page by typing your router's IP address into your web browser. This address is usually 192.168.1.1 or 192.168.0.1. Check your router's manual or online documentation if these addresses don't work.
- Log in to your router using its administrator credentials (usually found on the router itself or in the manual).
- Look for the "Wireless" or "Wi-Fi" settings.
- Change the Wi-Fi channel to a less congested one. Channels 1, 6, and 11 are typically the least congested and are good choices. You might need to experiment to find the best channel for your area. Consider using a Wi-Fi analyzer app (available on your smartphone or tablet) to identify the least congested channels in your area.
- Router Firmware Updates: Enhancing Stability and Performance
- Router manufacturers regularly release firmware updates to fix bugs, improve performance, and enhance security. Keeping your router's firmware up-to-date is essential.
- Within your router's configuration page, look for a section related to "Firmware" or "System."
- Check for available updates and follow the on-screen instructions to install them. This process might involve downloading the firmware from the manufacturer's website and uploading it to your router.
Router Resetting to Factory Settings: A Last Resort
- If all else fails, resetting your router to its factory settings can eliminate configuration errors that might be contributing to your issues.
- Locate the reset button on your router. This is usually a small recessed button that requires a pin or paperclip.
- Press and hold the reset button for about 10-30 seconds.
- The router will restart.
- You'll need to reconfigure your router with your internet service provider's settings and your Wi-Fi password. Ensure you remember your password.
Advanced Troubleshooting: Delving Deeper Into the Technical Realm
If the previous steps haven't resolved your Wi-Fi issues, it's time to explore more advanced troubleshooting techniques.
- TCP/IP Configuration: Restoring the Network Foundation
- In rare cases, the TCP/IP stack, the foundation of your network communication, can become corrupted, causing Wi-Fi dysfunction. Resetting the TCP/IP stack can address this.
- Open the Command Prompt as an administrator. Right-click on the Start button and choose "Command Prompt (Admin),"
- Type the following commands, pressing Enter after each one:
*
netsh winsock reset*netsh int ip reset - Restart your computer.
- DNS Server Configuration: Enhancing Web Page Loading
- Your DNS server translates website names (like google.com) into IP addresses. If your DNS server is slow or experiencing problems, it can impact your browsing experience and potentially your connection stability.
- Open the Control Panel. You can search for it in the Windows search bar.
- Go to "Network and Internet
