how to create wifi from laptop cmd
Title: How to Create a WiFi Hotspot Using CMD
Channel: Tricknology
How to Create a WiFi Hotspot Using CMD by Tricknology
how to create hotspot from laptop using command prompt, how to get wifi password from laptop using cmd, how to get wifi password from laptop windows 10 cmd
Unlock Secret WiFi Power: CMD Laptop Hotspot Hack!
Unleash the WiFi Wizard Within: Your Laptop's Secret Hotspot Revealed!
Ever dreamt of sharing your internet magic, turning your laptop into a WiFi portal to the digital realm? Let's embark on an adventure! Prepare for a journey beyond the mundane, where your Command Prompt becomes a key, unlocking hidden WiFi potential. You will soon be able to transform your laptop into a powerhouse of connectivity. This is not just tech talk; it's a story of empowerment!
The WiFi Whisperer's Guide: Summoning Your Hotspot
First things first: picture your laptop, ready to become a WiFi transmitter. Before we begin unraveling this secret, ensure you have the right tools. Therefore, the most crucial element is a Windows-based laptop. Also, you'll need a working internet connection, either through Ethernet or existing WiFi. Now, we will unleash the hidden potential of the Command Prompt. This may sound daunting. However, trust me; the rewards are worth the effort.
Step 1: The Command Prompt's Genesis
So, locate your Windows search bar – that unassuming portal to digital possibilities. Type "cmd" into the search field. Right-click on "Command Prompt" and select "Run as administrator." This is vital! Without administrator privileges, our spells will fail. See, even tech requires a little magic to work. Then, a black window emerges, the digital stage for our WiFi transformation.
Step 2: The WiFi Incantation: Creating the Virtual Network
Here comes the fun part. It's the equivalent of a magical incantation! You'll need to type a specific command into the Command Prompt. It's like whispering a secret to the system. Before you get started, prepare this:
netsh wlan set hostednetwork mode=allow ssid="YourHotspotName" key="YourPassword"
Replace "YourHotspotName" with your desired hotspot name. Next, change "YourPassword" with a password of your choosing. Make sure it's strong! This is your digital shield. For example, you could use: netsh wlan set hostednetwork mode=allow ssid="MyAwesomeWiFi" key="SuperSecretPassword123" Then, press Enter. Now, our WiFi portal is taking shape.
Step 3: Activating the WiFi Conduit: The Hosting Begins
Next, we need to activate our hosted network. We shall use another command, much like a finishing flourish. Now, type:
netsh wlan start hostednetwork
Go ahead, press Enter again. You've just lit up your WiFi beacon! Consequently, at this stage, your laptop is almost ready to share its connection. You're closer than you think!
Step 4: Internet Sharing: Bridging the Digital Divide
Here comes the grand finale. Now, we'll let other devices connect to the internet. Consequently, you're the orchestrator of this digital dance! First, open the "Network Connections." You can access this by searching for "View network connections" in the Windows search bar. Or, you can use the Windows key + R, type ncpa.cpl, and press Enter.
Step 5: Sharing the Magic: Connecting the Dots
Now, focus on your active internet connection in the Network Connections window. Right-click on your active internet connection (e.g., Ethernet or WiFi). Then, select "Properties." Click on the "Sharing" tab. Check the box that says, “Allow other network users to connect through this computer’s Internet connection." Select the name of your hosted network. This is the hotspot you created earlier. Finally, click "OK."
Troubleshooting Troubles: When Spells Fail
Sometimes, even the best spells need a little adjustment. Your hotspot might not show up on other devices. First, double-check the password. Also, verify that your firewall isn't blocking the connection. Ensure that your drivers are up-to-date. Restarting your laptop can also resolve certain problems. If everything remains uncooperative, revisit the steps. It is possible you may have missed something small. Don't give up!
The Joy of WiFi Freedom: Reaping the Rewards
You've done it! You have turned your laptop into a WiFi hotspot. Consequently, you have unlocked a whole new world of connectivity. Now, share your internet with friends, family, or multiple devices. Enjoy the freedom of an on-the-go network. Moreover, you can share your internet connection on the go.
Beyond the Basics: WiFi Wizardry Unleashed
You can customize your hosted network further. Explore other Command Prompt commands. For instance, you could learn how to manage network settings further. WiFi is always evolving. Therefore, stay curious, keep experimenting, and enjoy the magic. So, go forth and connect!
Unlock Your PS4's Internet: Lightning-Fast Laptop WiFi Sharing!Let's dive in!
Unlock Secret WiFi Power: CMD Laptop Hotspot Hack!
Alright, tech adventurers, gadget gurus, and Wi-Fi warriors! Ever been in a situation where you desperately needed internet, but the nearest available connection was a tantalizing mirage in the desert? We've all been there. That’s where your trusty laptop, armed with a secret weapon, comes into play. Forget fumbling with expensive mobile hotspots or battling for bandwidth. Today, we're going to arm you with the knowledge to transform your laptop into a powerful, secret Wi-Fi hotspot using the Command Prompt (CMD). Sounds daunting? Trust me, after this, setting up a hotspot will feel as easy as ordering pizza! Let's get started, shall we?
1. The WiFi Wilderness: Why Conquer the Hotspot Frontier?
Think about it. Imagine being stranded in a coffee shop with a dead phone and a crucial email to send. Or maybe you're on a road trip, and your kids are starting to resemble caged animals without their tablets. These are the moments where a personal hotspot shines like a beacon. This CMD hack gives you the control, the power, and the freedom to connect your devices wherever there's a laptop and a Wi-Fi signal. It's like having a personal Wi-Fi genie in your pocket, ready to grant your internet wishes.
2. Prepare Your Arsenal: What You'll Need Before the Battle
Before we jump into the nitty-gritty, let's gather our digital gear. You don't need fancy software or expensive gadgets. Just a few essentials:
- A Laptop: Running Windows (this method is currently focused on Windows, but we'll explore alternatives later).
- A Working Wi-Fi Adapter: Ensure your laptop can connect to a Wi-Fi network. (This is often built in, so you are good to go).
- Administrator Privileges: You'll need to run the Command Prompt as an administrator. (More about this in a bit).
- Patience: This process is straightforward but requires following steps precisely. Think of it as baking a cake. Follow the recipe; you get a delicious result.
3. Command Prompt: Your Secret Agent Headquarters
The Command Prompt (CMD) is like the secret back door to your laptop's operating system. It's where you give direct instructions, bypassing the graphical user interface (that friendly face you see everyday). Think of it as the control panel of the Starship Enterprise, filled with cryptic lines of code. We're going to learn how to understand a few basic commands to create our hotspot.
To open the Command Prompt as an administrator, simply:
- Type "cmd" in the Windows search bar.
- Right-click on "Command Prompt" and select "Run as administrator".
- A black window will appear. You're ready to roll.
4. The First Command: Identify Your Interfaces
This is where the magic begins We need to figure out the name of your Wi-Fi interface, which is like knowing your weapon's name before you wield it. Type in the following command and hit Enter:
netsh wlan show drivers
This command reveals information about your wireless network adapter. Look for "Interface name." That’s the name you'll need for the next step. Make a mental note or write it down. Mine, for example, is "Wi-Fi." Yours might be different, so pay attention!
5. Creating the Virtual Hotspot: The Power is Yours!
Now it's time to create the virtual hotspot using the following command, replacing "Your Hotspot Name" and "YourPassword" with the desired details. Note: Remember that the password needs to be at least 8 characters long.
netsh wlan set hostednetwork mode=allow ssid="Your Hotspot Name" key="YourPassword"
This command is the spell that brings our hotspot to life. It tells your laptop to become a Wi-Fi access point, and it also sets the SSID (the name of your Wi-Fi network) and the password.
6. Start Your Engines: Activate the Hotspot
Next, we need to start the hosted network. Here's the command:
netsh wlan start hostednetwork
This will officially enable your Wi-Fi hotspot. If all goes well, you'll see a success message.
7. Sharing Your Internet Connection: Connect the Dots
The hotspot is created, but it's not sharing the internet yet. That’s like having a car with a full tank of gas but not starting the engine. Here's how to share your internet connection with other devices:
- Go to the "Network and Sharing Center" (you can right-click on the Wi-Fi icon in your system tray and select it, or search for it in the Windows search bar).
- Click on “Change adapter settings”
- Right click on your active Internet connection (e.g., your Wi-Fi network).
- Select “Properties.”
- Go to the "Sharing" tab.
- Check the box that says "Allow other network users to connect through this computer's Internet connection."
- In the "Home networking connection" dropdown menu, select the "Microsoft Hosted Network Virtual Adapter" or the network adapter you created with netsh using the "wlan show drivers" command.
- Click "OK."
Now your hotspot will share its internet connection with the other devices.
8. Connecting Your Devices: The First Connection
Grab your phone, tablet, or another laptop. Scan for available Wi-Fi networks. You should see the network name ("Your Hotspot Name") you created. Enter your password; and bingo, you're connected!
9. Troubleshooting: When the Wi-Fi Goes AWOL
Sometimes, things don’t go as planned. Don't panic! Here are a few common roadblocks and how to overcome them:
- "The hosted network couldn't be started." This usually means there's a problem with your Wi-Fi drivers. Try updating them by going to Device Manager (search for it in the Windows search bar), checking your Wi-Fi adapter, and clicking “Update driver.”
- "Limited connectivity." This often means your hotspot is created, but it's not sharing the internet connection correctly. Double-check steps 7 and 8 in section 7 "Sharing Your Internet Connection: Connect the Dots".
- Password Issues: Double-check that you entered the correct password. The case matters!
10. Turning Off Your Hotspot: Shutting Down the Party
When you're done using your hotspot, you can either stop the hosted network to preserve battery life or shut it down completely. To stop it:
netsh wlan stop hostednetwork
To shut down (which disables it completely until you re-enable it):
netsh wlan set hostednetwork mode=disallow
11. Beyond the Basics: Customization and Advanced Tricks
Once you've mastered the core steps, you can get fancy. Some advanced possibilities include:
- Changing the SSID and password: Use the commands in section 5 "Creating the Virtual Hotspot: The Power is Yours!" to change your network name or password any time.
- Checking User Counts: You can't see who's connected directly.
- Automating the Process: You could even create a batch (.bat) file to automate the process of setting up and sharing your Wi-Fi hotspot. (This is advanced, but fun!).
12. Security First: Protecting Your Digital Fortress
Always remember that your Wi-Fi hotspot shares your internet connection. This means you need to take security seriously.
- Strong Passwords: Use a strong, unique password for your hotspot. The longer and more complex, the better.
- Monitor Connections: If you notice suspicious activity, disconnect and change your password.
- Keep Your Software Updated: Make sure your operating system and antivirus software are up to date.
13. The Ethical Angle: A Duty to Share (Responsibly)
Creating a hotspot gives you fantastic freedom. But it also comes with a responsibility. Always respect the terms of service of your internet provider. Avoid sharing your connection with people you don't trust. Think of it as sharing your pizza - you can share it, but you have to be careful about who gets a slice.
14. Alternative Methods: Exploring the Landscape Beyond CMD
While the CMD method is reliable, you could also use third-party software to do the same thing. Some alternatives include:
- Mobile hotspot features in Windows: Windows also has a built-in hotspot feature, which you can activate through the settings menu.
- Hotspot software: There are several applications available in the market that make this process even easier, such as Connectify and Virtual Router.
15. The Power Unleashed: Your Newfound Freedom
Congratulations! You made it. You’ve not only learned how to create a secret Wi-Fi hotspot with the CMD, but also you've gained a skill that can empower you in various situations. Now, you're equipped to connect your devices, share your internet, and unlock true digital freedom. Go forth and conquer the Wi-Fi wilderness!
Final Thoughts:
This journey through the Command Prompt
Laptop WiFi Connection: The SHOCKINGLY Easy Trick!How to Setup a WiFi Hot-spot in Windows using CMD Command Prompt

By SASI How to Setup a WiFi Hot-spot in Windows using CMD Command Prompt by SASI
How To Connect WiFi Network Using CMDCommand Prompt in Windows 10

By Tricknology How To Connect WiFi Network Using CMDCommand Prompt in Windows 10 by Tricknology
How To create WIFI Hotspot in windows 1011 USING CMD
By How To with Jeff How To create WIFI Hotspot in windows 1011 USING CMD by How To with Jeff
Title: Create Wi Fi Hotspot Using Command Prompt 9
Channel: Vukon Media
Create Wi Fi Hotspot Using Command Prompt 9 by Vukon Media
Wifi Not Found
Unlock Secret WiFi Power: CMD Laptop Hotspot Hack!
Are you tired of restrictive internet access? Do you find yourself yearning for a simple way to share your laptop's internet connection with your other devices? Perhaps you're traveling and need to create a hotspot, or maybe you’re in a situation where a standard WiFi router is unavailable. Whatever the context, learning how to configure and manage a WiFi hotspot directly from your laptop using the Command Prompt is a powerful and incredibly useful skill. This guide will walk you through the precise steps to unlock the hidden WiFi potential within your Windows laptop, transforming it into a robust and accessible hotspot. This method offers unparalleled flexibility and control, allowing you to share your internet connection with ease. Let’s dive in.
Preparing Your Arsenal: Checking Network Adapter Compatibility
The initial groundwork lays the foundation for success. Before delving into the technical steps, ensure your laptop's network adapter is up to the task. Most modern laptops come equipped with the necessary hardware, but verification is crucial. A simple check will confirm compatibility and prevent unforeseen issues later.
Launch the Command Prompt as Administrator: Press the Windows key, type “cmd,” and right-click on “Command Prompt.” Select "Run as administrator". This elevated access is essential for making network configuration changes.
Execute the
netsh wlan show driversCommand: Within the Command Prompt window, typenetsh wlan show driversand press Enter. This command displays information about your wireless adapter, including its capabilities.Scrutinize the "Hosted network supported" Line: Examine the output closely. Locate the line labeled "Hosted network supported." If it displays "Yes," congratulations! Your wireless adapter is ready. If it says "No," unfortunately, this method won’t work on your current hardware. You might explore using a USB WiFi adapter, depending on your needs.
This crucial preliminary step ensures you’re on the right track before proceeding. A "Yes" confirmation is your green light to continue; a "No" signals the need for alternative solutions. Proceeding without this step would be futile, as it checks compatibility.
Taking Control: Setting Up Your Hosted Network
Once you've verified your adapter's prowess, it's time to forge your personal hotspot. This process involves several critical commands within the Command Prompt, each designed to configure and customize your network.
The Foundation: Setting Up the Virtual Adapter: In the Command Prompt (still running as administrator), type the following command, replacing the placeholder values with your desired network name (SSID) and a strong password:
netsh wlan set hostednetwork mode=allow ssid="YourWiFiName" key="YourPassword123"- Replace
"YourWiFiName"with the network name you want to use. Think of a memorable but secure identifier. Avoid personally identifiable information. - Replace
"YourPassword123"with a robust password (at least eight characters, ideally including a mix of upper and lowercase letters, numbers, and symbols). This password is your gatekeeper. Keep it safe.
Press Enter to execute the command. This initiates the virtual adapter and lays the groundwork for your hotspot.
- Replace
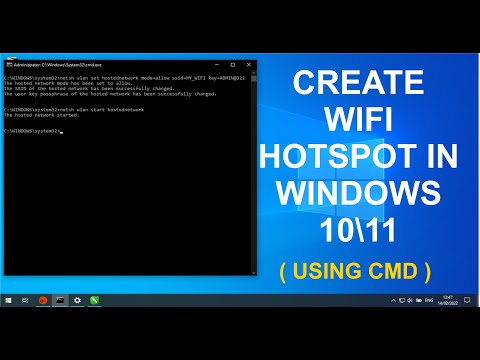
Activating the Network: Now that the foundation is set, it’s time to activate the hosted network. This is the command to activate it:
netsh wlan start hostednetworkPress Enter. You should receive a confirmation message indicating that your hosted network has started successfully.
Sharing Your Internet Connection: The final step involves sharing your laptop's existing internet connection with the newly created hotspot. This crucial step tells Windows where to pull the internet connection, so it can provide internet to your other devices.
Open Network Connections: Press the Windows key, type "network connections," and select "View network connections."
Locate Your Active Internet Connection: Identify the network adapter currently providing your laptop's internet access (e.g., Ethernet or Wi-Fi).
Access Sharing Settings: Right-click on your active internet connection and select "Properties".
Enable Internet Connection Sharing: Navigate to the "Sharing" tab. Check the box labeled "Allow other network users to connect through this computer's Internet connection." In the "Home networking connection" dropdown menu, select the virtual Wi-Fi network adapter you created earlier. It will typically be named something like "Microsoft Hosted Network Virtual Adapter" or similar, with a name slightly different from the physical adapter.
Confirm and Apply: Click "OK" to save the changes. This action configures your laptop to share its internet connection through the newly created hotspot.
Now you've successfully configured your hotspot. Your devices can now connect to the WiFi network you set a name and password for.
Troubleshooting: Common Challenges and Solutions
Even with the most precise instructions, things can sometimes go awry. Several common problems can impede your hotspot setup. Recognizing these potential pitfalls and their solutions is key to a smooth experience.
"The hosted network couldn't be started." Error: This often indicates a problem with your network adapter driver or configuration. Try the following:
- Update Your Driver: Right-click the Start button and select "Device Manager." Expand “Network adapters.” Right-click your wireless adapter and select "Update driver." Choose "Search automatically for drivers."
- Check Network Adapter Settings: Open Network Connections (as described above). Ensure your wireless adapter is enabled.
- Restart Your Laptop: Sometimes, a simple restart can resolve underlying issues.
Devices Cannot Connect to the Hotspot:
- Double-Check the Password: Carefully verify that you're entering the correct password on your connecting devices. Remember that passwords are case-sensitive.
- Verify Network Sharing: Revisit the internet connection sharing instructions (described above) to ensure the correct adapter is selected and that sharing is enabled.
- Firewall Interference: Your firewall settings could be blocking connections. Temporarily disable your firewall or create an exception for the "Microsoft Hosted Network Virtual Adapter" to test if this is the problem.
- Hidden Network Issue: Your network could be hidden. Try making your network visible:
- Open Command Prompt.
- Type
netsh wlan set hostednetwork show settingsand press Enter to show settings - Check the value of "Advertisement" if it is set to "Disabled", set it to "Enabled"
- To Enable:
netsh wlan set hostednetwork advertisement=enable. - To Disable:
netsh wlan set hostednetwork advertisement=disable.
Limited Connectivity: This suggests your laptop is connected to the internet, but the connected devices aren’t.
- Check Internet Connection: Verify that your laptop has an active internet connection. If your laptop doesn't, shared internet access is impossible.
- Restart the Hotspot: Open Command Prompt, type
netsh wlan stop hostednetwork, press Enter, and then restart the hotspot. - IP Address Conflicts: Ensure there are no IP address conflicts between your devices and the hotspot. To avoid conflicts, restart the client devices or consider using a static IP configuration.
Command Prompt Errors:
- Incorrect Syntax: Double-check the exact commands you're entering for any typographical errors.
- Administrator Privileges: Always ensure you're running Command Prompt as an administrator.
Managing and Optimizing Your Hosted Network
Once your hotspot is up and running, you can manage and optimize it for a better experience.
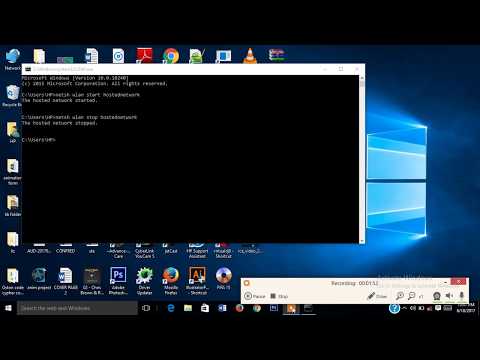
- Stopping the Hotspot: To disable the hotspot, type
netsh wlan stop hostednetworkin the Command Prompt and press Enter. - Changing the SSID or Password: To modify the network name or password, rerun the command
netsh wlan set hostednetwork mode=allow ssid="YourNewWiFiName" key="YourNewPassword"with your desired values. Afterward, you need to stop and start your network. - Monitoring Connected Devices: Unfortunately, the Command Prompt doesn't offer a direct way to see connected devices. You can use third-party software or look at the information inside of your Router.
- Security Best Practices: Always create a strong password. Avoid using easily guessable words or personal information in your SSID. Regularly update your network adapter drivers.
- Power Management: Consider your laptop's power settings. Sharing an internet connection consumes battery power. Adjust your power plan accordingly to balance performance and battery life. Make sure your laptop doesn't turn off the Wi-Fi adapter when the laptop is working and you are not using it.
Advanced Customization: Exploring Additional Command-line Options
For those who want more control, the netsh wlan command offers advanced customization options.
- Setting Authentication and Encryption: While the basic setup uses WPA2-Personal (the default), you can specify other authentication methods and encryption types for enhanced security. This is not always recommendable.
- Configuring the Maximum Number of Clients: You can set the maximum number of devices that can connect to your hotspot. Open Command Prompt and type
netsh wlan set hostednetwork maxnumbersallowed=Xwhere X is the maximum number of devices allowed. - Using a Static IP Address (Alternative): If you experience IP address conflicts or have specific network requirements, you can set
