how to install external wifi antenna on dell laptop
Title: How to remove and reattach WiFi antenna cables
Channel: James Has Answers
How to remove and reattach WiFi antenna cables by James Has Answers
Dell Laptop Wi-Fi Upgrade: Insane Speed Boost! (Antenna Installation Guide)
Unleash the Kraken: Supercharging Your Dell Laptop's Wi-Fi
Alright, tech adventurers! Ever feel like your Dell laptop's Wi-Fi is stuck in the slow lane? You're not alone. We've all been there, staring at that buffering wheel of doom. But fear not! Today, we're diving headfirst into the electrifying world of Wi-Fi upgrades. I'm here to show you how to give your Dell a serious speed boost. Get ready to say goodbye to lag and hello to blazing-fast internet!
Why Your Dell's Wi-Fi Needs a Speed Injection
Let's be honest. Modern life demands speed. Streaming, gaming, video calls – they all eat up bandwidth like nobody's business. Your stock Wi-Fi setup, unfortunately, might be holding you back. It's time to unleash the beast within.
The Antenna Advantage: A Secret Weapon
Now, the key to unlocking warp-speed Wi-Fi? It's often the antenna, or the lack thereof. Many Dell laptops, particularly older models, come with subpar antennas. Therefore, upgrading these can make a massive difference. Think of it like swapping out those tiny tires for a set of performance radials. It's a game-changer!
Step-by-Step: The Antenna Installation Odyssey
Ready to embark on this thrilling journey? Here's your battle plan. However, before we begin, always remember to back up your data. Safety first!
Step 1: The Prep Phase - Gather Your Arsenal
First and foremost, you'll need a few essential tools. You'll need a small Phillips head screwdriver. Similarly, grab a set of plastic spudgers or prying tools. A small, clean workspace is also crucial. Finally, you'll need the replacement Wi-Fi antennas. These are generally available online.
Step 2: Power Down and Disconnect - Safety First!
Before you touch anything inside your Dell, shut it down completely. Unplug the power cable, and remove the battery. This prevents any accidental electrical mishaps. So, let's be cautious.
Step 3: Opening the Gates: Locate the Access Panel
The location of the Wi-Fi card and antennas varies by model. Your Dell's service manual is your best friend at this stage. Search for it online by typing your specific Dell model number. It is usually a small access panel on the bottom. Carefully unscrew it. Put the screws somewhere safe.
Step 4: Exposing the Wi-Fi Card - The Heart of the Beast
Inside, you'll find the Wi-Fi card. It's typically held in place by a screw or two. Consequently, carefully remove the screw(s). Gently detach the antenna wires from the card. They usually snap on. Make a mental note of their placement.
Step 5: Unveiling the Old Antennas - Removing the Old Guard
The antennas themselves are often attached to the laptop's screen bezel. They may be glued or taped in place. Take your time here. Carefully peel them away using your plastic tools, not metal for protection purposes.
Step 6: Mounting the New Antennas - Installing the New Champions
Now, attach the new antennas. You'll typically find adhesive pads that allow them to stick to the inside of your screen. In this case, make sure to route the antenna wires carefully. They should not interfere with any other components.
Step 7: Reconnecting the Wires - Making the Vital Connections
Reconnect the antenna wires to your Wi-Fi card. Double-check that everything is secure. Ensure the connections are snug. Ensure the antenna placement is appropriate.
Step 8: Reassembly: Returning to Glory
Carefully replace the Wi-Fi card. Screw it back down. Reattach the access panel. Replace the screw(s). Reinstall the battery. Plug in your laptop.
Step 9: The Moment of Truth: Testing the Waters
Power up your Dell. Connect to your Wi-Fi network. Run a speed test. Prepare for the unbelievable! Did you do it? If you did, celebrate!
Troubleshooting: When Things Get a Little Tricky
Sometimes, things don't go as planned. Here are a few quick troubleshooting tips:
- No Wi-Fi connection: Double-check your antenna connections.
- Slow speeds: Ensure your router is functioning correctly.
- Signal drops: Experiment with antenna placement. Make sure you are in the optimal location.
The Grand Finale: Faster Wi-Fi, Happier You
Congratulations! You've successfully upgraded your Dell's Wi-Fi. You now know how to unleash its full potential. You should be experiencing a noticeable speed increase. Now, go forth and enjoy your boosted internet life. You've earned it! The world of online fun awaits.
Laptop WiFi Dying? This ONE Trick Fixes It INSTANTLY!Dell Laptop Wi-Fi Upgrade: Insane Speed Boost! (Antenna Installation Guide)
Hey there, tech enthusiasts! Ever felt like your Dell laptop's Wi-Fi connection is slower than a snail in molasses? You're not alone! We've all been there, staring at the buffering wheel while our patience dwindles faster than our battery life during a Netflix binge. But what if I told you there's a relatively easy way to kick that internet speed into hyperdrive? Buckle up, because we're about to embark on a journey to unlock insane speed boosts for your Dell laptop – and it all starts with upgrading your Wi-Fi, specifically by upgrading your antenna!
1. Why Your Dell Laptop's Wi-Fi is a Little… Slow (and How to Fix It!)
Let's be honest, the Wi-Fi antennas that come standard in many laptops are, well, a bit basic. Think of them as the tiny, anemic arms of a Wi-Fi signal. They're doing their best, but they're not exactly built for a high-performance internet experience. This can lead to frustrating lag, dropped connections, and speeds that make you want to throw your laptop out the window (don't do that, please!). This guide is your lifeline.
2. What You’ll Need: The Antenna Upgrade Arsenal
Before we dive in, let's gather our supplies. Think of this like preparing for a culinary masterpiece – you can't cook a gourmet meal without the right ingredients! Here's what you'll need for this Wi-Fi wizardry:
- A Compatible Wi-Fi Card: This is the heart of the upgrade. Make sure it's compatible with your Dell model. Research is key here!
- High-Gain Antennas: These are the secret weapons! Look for antennas with a higher dBi rating (decibel isotropic). The higher the dBi, the more signal they can grab.
- Small Phillips Head Screwdriver: For opening your laptop.
- Plastic Opening Tools (optional): These prevent scratches.
- Anti-Static Wrist Strap (Highly Recommended): Protects your laptop's sensitive components from static electricity. Think of it as your electrical shield!
- Patience: Let's be honest, the journey can be a bit tedious, but we'll get through it together!
3. Choosing the Right Wi-Fi Card and Antenna: A Deep Dive
Okay, let's get into the crucial parts. Choosing the correct Wi-Fi card and antennas is like picking the right tires for your race car. Wrong choices can lead to zero boost. Research is paramount here.
- Wi-Fi Card Compatibility: Check your Dell's service manual or online resources to determine the supported Wi-Fi card specifications.
- Antenna Types: There are various antenna types, including internal and external. Internal antennas are more convenient.
- dBi Ratings: Higher dBi ratings generally mean better signal strength, particularly for receiving weak signals.
- Frequency Bands: Ensure the antennas support the 2.4 GHz and 5 GHz bands for optimal performance.
4. The Great Laptop Surgery: Prepping Your Dell
Before we get our hands dirty, let's prepare our patient (i.e., your laptop). This involves powering it down, disconnecting the power adapter, and removing the battery. Safety first! We want to avoid any electrical shocks that may corrupt the system. Then, locate those screws.
5. Cracking Open the Case: A Step-by-Step Guide
Every Dell model is different, so your specific steps might vary. But the general process is similar:
- Remove the Battery: Turn off your laptop and remove the battery. Ensure the power adapter is unplugged.
- Locate and Remove Screws: Carefully remove the screws on the bottom of your laptop. Keep them organized – you'll need them later!
- Prying the Case Apart: Use plastic opening tools to gently pry open the bottom case.
- Internal Component Access: Once the bottom case is removed, you will notice the internal components.
- Be gentle: Don't force anything.
- Refer to Documentation: Consult your Dell model's service manual for specific instructions.
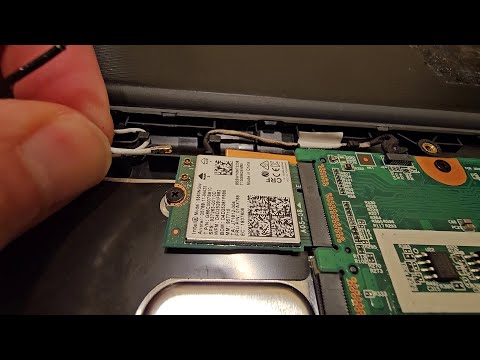
6. Identifying the Existing Wi-Fi Card and Antenna Cables
Now, for the delicate part. Locate the existing Wi-Fi card, usually in a slot near the middle of the laptop. Disconnect the antenna cables.
7. Replacing the Wi-Fi Card: The Heart Transplant
Carefully remove the old Wi-Fi card. Then, install the new Wi-Fi card, ensuring it's securely seated in the slot.
8. Antenna Connection: The Delicate Jigsaw Puzzle
Connect the new antenna cables to the Wi-Fi card. Make sure they are securely attached. If you have external antennas, position them for optimal signal reception.
9. Reassembling Your Dell: Putting Humpty Dumpty Back Together
Carefully reassemble your laptop, following the reverse steps of the disassembly process. Make sure all screws are tightened securely.
10. Powering Up and Testing: Is It Alive?
Once everything is back together, power on your laptop. Hope for the best! Check your Wi-Fi connection and run a speed test to see if you've achieved the magic.
11. Troubleshooting Tips: When Things Don't Go Smoothly
Don't panic if things don't work perfectly at first. Here are some common troubleshooting tips:
- Ensure Compatibility: Double-check that the Wi-Fi card and antennas are compatible with your Dell model.
- Check Connections: Make sure all antenna cables are securely connected.
- Driver Issues: Install or update the Wi-Fi card drivers.
- Antenna Placement: Experiment with different antenna positions for optimal signal strength.
12. Maximizing Your Wi-Fi Performance: Beyond the Upgrade
Once you've upgraded your antennas, there are other things you can do to maximize your Wi-Fi performance:
- Router Placement: Place your router in a central location, away from walls and obstructions.
- Channel Selection: Experiment with different Wi-Fi channels to avoid interference.
- Router Firmware Updates: Keep your router's firmware up to date.
- Security Settings: Ensure your Wi-Fi network is secure with a strong password.
13. The Sweet Taste of Speed: Experiencing the Difference
Once you've successfully upgraded your antenna, you'll notice a significant difference in your Wi-Fi speed. Pages will load faster, downloads will complete much more quickly, and your online gaming experience will be smoother than ever.
14. Common Mistakes to Avoid: Learn From Our Blunders
We've all made mistakes. Here are some common errors to steer clear of:
- Forgetting Anti-Static Precautions: Always use an anti-static wrist strap.
- Forcing Connections: Don't force any components.
- Not Backing Up Data: Always back up your important data before making hardware changes.
- Ignoring Compatibility: Double and triple-check the compatibility of the Wi-Fi card and antennas.
15. Unleash the Beast: Conclusion and the Road Ahead
Upgrading your Dell laptop's Wi-Fi antenna is a rewarding process that can significantly improve your internet experience. It's like giving your laptop a turbocharger – suddenly, you're zooming past those loading screens! This guide provides the basic steps; however, always conduct advanced research prior to starting the project.
We've covered the essentials, from choosing the right components to safely disassembling and reassembling your Dell laptop. Now, go forth and conquer those Wi-Fi woes! You've got this!
FAQs: Your Burning Questions Answered
1. Will this upgrade void my Dell laptop's warranty?
Potentially, yes. Modifying the hardware can sometimes void the warranty. Check your Dell's warranty policy before proceeding. It's generally a good idea to perform the upgrade after the warranty expires!
2. What if I'm not comfortable opening my laptop?
That's perfectly okay! If you're not comfortable with the technical aspects, consider taking your laptop to a qualified technician for the upgrade.
3. Can I use any antennas?
No, unfortunately, you can't use just any antennas. You need antennas that are compatible with your Wi-Fi card and frequency bands. Research is key!
4. How much does this upgrade cost?
The cost varies depending on the Wi-Fi card and antennas you choose. Expect to spend anywhere from \$20 to \$100 or more.
5. Is this upgrade worth the effort?
Absolutely! If you're struggling with slow Wi-Fi, this upgrade can be a game-changer. It's a relatively inexpensive way to dramatically improve your laptop's internet performance.
- Principal Keywords: Dell Wi-Fi Upgrade, Antenna Installation
- SEO Headline: Dell Wi-Fi Speed Boost Guide: Antenna Upgrade Steps
- Pathway: Dell-Wifi-Upgrade
- Meta Summary: Upgrade your Dell laptop's Wi-Fi with this guide! Learn to install antennas for insane speed boosts. Get faster internet today! #DellWifi #Ant
Dell Optiplex WiFi Wireless Network Antenna Cable Adapter Kit

By ReviewOhHope Dell Optiplex WiFi Wireless Network Antenna Cable Adapter Kit by ReviewOhHope
Replace the Wireless Antenna Cables HP Pavilion Gaming Notebook HP Support

By HP Support Replace the Wireless Antenna Cables HP Pavilion Gaming Notebook HP Support by HP Support
GJRH7 DIGITAL WIRELESS ANTENNA AERIAL FOR OPTIPLEX SYSTEMS
By SYNERGY TELECOM PVT. LTD. GJRH7 DIGITAL WIRELESS ANTENNA AERIAL FOR OPTIPLEX SYSTEMS by SYNERGY TELECOM PVT. LTD.

Title: WiFi & Bluetooth Installation Tutorial Dell Optiplex Micro 3000 5000 7000 7010 and 7010 Plus
Channel: MH Tech UK
WiFi & Bluetooth Installation Tutorial Dell Optiplex Micro 3000 5000 7000 7010 and 7010 Plus by MH Tech UK
My Laptop Work
Dell Laptop Wi-Fi Upgrade: Unleash Blazing-Fast Speeds! (Antenna Installation Guide)
Tired of sluggish Wi-Fi hindering your productivity and entertainment? Is your Dell laptop struggling to keep pace with the demands of modern online life, leaving you frustrated with buffering videos and laggy online gaming? You're not alone. Many Dell laptop users experience suboptimal Wi-Fi performance due to internal antenna limitations. Fortunately, a dramatic speed boost is within reach. This comprehensive guide will walk you through the process of upgrading your Dell laptop's Wi-Fi antenna, transforming your online experience from frustratingly slow to blisteringly fast. Prepare to witness a remarkable difference in speed, range, and overall reliability.
Understanding the Wi-Fi Bottleneck: Why Your Dell Laptop Might Be Slow
Before diving into the upgrade, let's understand the underlying reasons for potential Wi-Fi performance issues. Your Dell laptop's factory-installed Wi-Fi antenna, while functional, might not be optimized for peak performance. Several factors contribute to this:
- Antenna Design: The internal antennas in many laptops are compact and designed to fit within the limited space of the device. This can restrict their ability to effectively receive and transmit Wi-Fi signals.
- Material Quality: The materials used in the antenna construction can affect signal sensitivity. Higher-quality antennas often boast superior materials that improve signal clarity and strength.
- Antenna Placement: The location of the antennas within the laptop is crucial. Their proximity to metal components or other electronic devices can lead to interference and signal degradation.
- Wireless Router Compatibility: If your router uses an older Wi-Fi standard or if it is placed too far from your laptop, the signal can be significantly weaker.
- Environmental Factors: Walls, furniture, and other electronic devices can also interfere with the signal.
By addressing these potential bottlenecks, you can significantly enhance your Dell laptop's Wi-Fi capabilities.
Pre-Upgrade Preparations: Gathering Your Tools and Materials
Success hinges on proper preparation. Before opening your laptop, ensure you have the following items readily available:
- High-Performance Wi-Fi Antenna Kit: This is the heart of the upgrade. Opt for a kit designed specifically for laptops, with antennas that support the latest Wi-Fi standards (Wi-Fi 6 or Wi-Fi 6E are ideal). Consider antennas with multiple bands (2.4 GHz, 5 GHz, and 6 GHz, if supported by your laptop and router). Research reputable brands renowned for quality and performance.
- Small Phillips Head Screwdriver Set: A precision screwdriver set with various sizes is crucial for removing and reinstalling the laptop's screws.
- Plastic Pry Tools or Spudger: These tools are indispensable for safely prying open the laptop's casing without causing damage. Avoid using metal tools that could scratch the surface or damage internal components.
- Anti-Static Wrist Strap: Protecting your laptop's sensitive electronics from electrostatic discharge is vital. An anti-static wrist strap will ground you and prevent potential damage.
- Work Surface: A clean, well-lit workspace is essential. Use a soft, non-abrasive surface to protect your laptop from scratches.
- Small Containers or Ziploc Bags: These will help you organize the screws as you remove them. Label each container to remember where each screw belongs.
- Laptop Model-Specific Service Manual: Download the service manual for your specific Dell laptop model. This manual provides detailed instructions and diagrams for disassembly and reassembly. It's an invaluable resource during the upgrade process.
- Clean Microfiber cloth: To clean the laptop screen and cover any debris during the process.
Opening Your Dell Laptop: A Step-by-Step Guide
Carefully following these steps is essential for a smooth and successful upgrade.
- Power Down and Disconnect: Shut down your Dell laptop completely and unplug the power adapter. It's critical to remove all power sources before working inside the device.
- Ground Yourself: Attach the anti-static wrist strap to your wrist and connect the other end to a grounded metal object (like a radiator or a metal desktop case) to prevent electrical discharge.
- Locate the Screws: Consult your Dell laptop's service manual to identify the screws securing the bottom panel. The number and location of these screws vary depending on your model.
- Remove the Screws: Use the appropriate-sized Phillips head screwdriver to gently remove all the screws. Place each screw in its labeled container. Note the screw length as they may be of different lengths.
- Detach the Bottom Panel: Using a plastic pry tool or spudger, carefully pry open the bottom panel. Start at a seam or edge, gently working your way around the perimeter. Avoid forcing the panel; if it resists, double-check for any hidden screws or clips.
- Internal Inspection: With the bottom panel removed, take a moment to familiarize yourself with the internal layout of your Dell laptop. Locate the Wi-Fi card and its associated antenna connections. This is crucial for the next steps. Locate the existing antenna wires. The antennas are usually connected to the Wi-Fi card with small connectors.
Replacing the Wi-Fi Antenna: The Upgrade Process
Now comes the core of the upgrade: replacing the existing Wi-Fi antenna with your new, high-performance kit.
- Locate the Wi-Fi Card: The Wi-Fi card is a small circuit board, generally located in the center. It is usually held in place by a small screw or bracket.
- Disconnect the Old Antenna Cables: Carefully detach the existing antenna cables from the Wi-Fi card. These cables are typically connected via small, snap-on connectors. Gently pull up on the connector to release it. Take a picture beforehand to remember where each cable was connected.
- Remove the Wi-Fi Card: Unscrew the screw or remove the bracket securing the Wi-Fi card. Now, gently slide the Wi-Fi card out of its slot or compartment.
- Install the New Antenna (If Applicable): Some Wi-Fi antenna kits come with separate antenna modules that you'll need to install. The installation process will vary depending on the kit, so follow the instructions provided.
- Attach the New Antenna Cables: Connect the new antenna cables to the Wi-Fi card. Ensure they are securely attached. Refer to the picture you took earlier to ensure you plug the antennas in the correct color-coded ports on your Wi-Fi card.
- Reinstall the Wi-Fi Card: Carefully slide the Wi-Fi card back into its slot and secure it with the screw or bracket.
- Route the New Antenna Cables: Route the new antenna cables, ensuring they do not interfere with other components or moving parts. It may involve some creative cable management.
- Reassemble the Laptop: Carefully replace the bottom panel and screw it back into place. Ensure the panel fits flush and that all screws are properly tightened.
- Testing the Upgrade: After reassembling the laptop, power it up and connect to your Wi-Fi network. Verify the enhanced speeds by checking your Wi-Fi connection. Run a speed test to measure the improvement.
Advanced Considerations: Optimizing Your Wi-Fi Performance
Beyond the antenna upgrade, consider these additional steps to further optimize your Wi-Fi performance:
- Update Your Wireless Drivers: Ensure you have the latest drivers for your Wi-Fi card. Check the Dell support website for updates specific to your laptop model.
- Router Placement: Position your router in a central location, away from obstructions, and at an elevated position for optimal signal coverage.
- Router Configuration: Access your router's settings and configure it for the latest Wi-Fi standards. Enable features like MU-MIMO and beamforming for improved performance.
- Check for Interference: Identify and minimize potential sources of interference, such as microwaves, cordless phones, and other electronic devices.
- Optimize Your Wi-Fi Channel: Use a Wi-Fi analyzer app to identify the least congested Wi-Fi channel in your area and configure your router accordingly.
Troubleshooting Common Issues
- No Wi-Fi Connection: Double-check that the antenna cables are securely connected to the Wi-Fi card. Verify that the Wi-Fi card is properly seated in its slot.
- Poor Signal Strength: Ensure the antennas are properly placed and positioned for optimal signal reception. Test the signal strength with a Wi-Fi analyzer app.
- Slow Speeds: Ensure your router supports the latest Wi-Fi standards and that your internet service is delivering the expected speeds.
- Laptop Not Booting: Double check that all the internal components are secured, and that no cables were damaged during the replacement process.
Maximizing Your Investment: Long-Term Maintenance
To ensure your upgraded Wi-Fi system continues to deliver peak performance, practice the following maintenance tips:
- Regular Driver Updates: Keep your Wi-Fi drivers up-to-date to benefit from performance improvements and bug fixes.
- Periodic Cleaning: Clean the laptop's vents and fans regularly to prevent overheating, which can affect Wi-Fi performance.
- Antenna Inspection: Occasionally inspect the antenna cables for any damage or wear and tear. Replace damaged cables promptly.
Enjoy Blazing-Fast Wi-Fi!
By following this comprehensive guide, you've successfully upgraded your Dell laptop's Wi-Fi antenna, unlocking a whole new level of online performance.
