how to add wifi to asus laptop

Title: How to Fix WIFI not Connecting Not Showing in Windows 10 Asus Laptops
Channel: FIXsage
How to Fix WIFI not Connecting Not Showing in Windows 10 Asus Laptops by FIXsage
how to add wifi to asus laptop, how to connect wifi to asus laptop, how to connect wifi in asus laptop windows 7, how to connect wifi in asus laptop windows 10, how to connect wifi in asus laptop windows 11, how to connect to wifi network on asus laptop, how to install wifi driver in asus laptop, how to add a wifi connection to your laptop, how add wifi in laptop, how to find wifi in asus laptop
Asus Laptop WiFi: The SHOCKINGLY Easy Fix (No Tech Skills Needed!)
Asus Laptop WiFi Woes: Unmasking the Surprisingly Simple Solution!
Have you ever wrestled with an Asus laptop that stubbornly refuses to connect to WiFi? It's incredibly frustrating, isn't it? You’re not alone. Millions of users experience this digital hiccup. But, what if I told you the solution is often simpler than you imagine? Prepare to be amazed. This isn't rocket science. Here's a breakdown of how to troubleshoot your Asus WiFi issues. I'll guide you through a few easy steps. You'll be back online in no time.
The Dreaded WiFi Dropout: Identifying the Culprit
First, let’s pinpoint the source of the problem. Is your laptop simply refusing to see any WiFi networks? Or, is it connecting but experiencing slow speeds or frequent disconnections? Furthermore, consider when the problem started. Did it happen after a Windows update? Or, perhaps after installing new software? Identifying these clues provides valuable context. It will make the troubleshooting process more efficient.
Step 1: The Obvious (But Often Overlooked) Checks
Before diving into complex solutions, start with the basics. It's easy to miss these simple steps. Firstly, ensure your WiFi is enabled. Look for the physical WiFi switch on your Asus laptop. Many models have a dedicated button. You might need to press the Fn key along with another key. They usually have an icon representing a WiFi antenna. Secondly, check your router. Is it powered on? Are other devices connecting to it without issue? Rebooting your router can often work wonders. Moreover, if the router has been sitting for a long time, try to restart it. Finally, is your laptop in airplane mode? Double-check these fundamental points. They’re surprising culprits surprisingly often.
Step 2: Driver Drama: Keeping Your Network Drivers Up-to-Date
Outdated or corrupted network drivers are a common cause of WiFi woes. Think of drivers as translators. They allow your laptop's hardware to communicate with your operating system. In order to update your drivers, you will need to go to the Device Manager. You can access it through the Windows search bar. Then, locate "Network adapters." Right-click on your WiFi adapter (it will usually be something like "Realtek" or "Intel"). Choose "Update driver." Windows will then search for the latest available drivers. Alternatively, you can visit the Asus support website. Search for your laptop model. Download the latest drivers there. Doing so can drastically improve your connection.
Step 3: The Windows Troubleshooter: Your Digital Detective
Windows includes a built-in network troubleshooter. This is a handy tool. It can automatically detect and fix a variety of WiFi problems. Access it by right-clicking on the WiFi icon in your system tray. Select "Troubleshoot problems." The troubleshooter will then analyze your connection. It will provide potential solutions and fixes. It's certainly worth a try. This step could potentially fix the issues.
Step 4: Resetting Your Network Settings: A Fresh Start
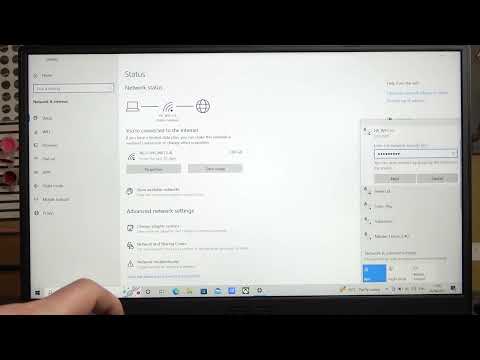
Sometimes, a reset is all you need. Windows allows you to reset your network settings. This clears any configurations that might be causing issues. However, this action will remove any saved WiFi passwords. You'll need to reconnect to your networks afterward. To do this, go to Settings > Network & Internet > Network reset. Then, click "Reset now." Afterwards, restart your computer.
Step 5: Consider Interference: Navigating the Wireless Wilderness
WiFi signals can be easily disrupted. Interference from other devices or physical obstructions can disrupt the signal. Microwaves, Bluetooth devices, and even thick walls can hinder your WiFi connection. Try moving your laptop closer to the router. Consider moving the router to a more central and unobstructed location. Experimenting with different WiFi channels on your router can also help. This ensures you're not competing with other networks.
Step 6: Advanced Troubleshooting: Delving Deeper (If Necessary)
If the above steps don't work, more advanced troubleshooting steps may be necessary. You could try reinstalling your network adapter. You can also look for potential conflicts with security software. This is where a little technical knowledge can be helpful. However, don't feel intimidated. Plenty of online resources and tutorials are available. You can usually find solutions with a quick search.
A Final Word of Encouragement
Dealing with WiFi problems can be a headache. But, often the solutions are surprisingly straightforward. Don’t give up. Try the simple steps first. Most issues resolve quickly. Remember to stay patient. If the problem persists, don't hesitate to seek further help. You can visit the Asus support website. You can also consult a qualified tech professional. Now, go forth and conquer those WiFi woes! You've got this.
Turn Your Laptop into a WiFi Hotspot: The Ultimate Guide (Secret Trick Inside!)Asus Laptop WiFi: The SHOCKINGLY Easy Fix (No Tech Skills Needed!)
Ever felt that wave of frustration wash over you when your Asus laptop's WiFi decides to stage a walkout? You're staring at a blank screen, the world of the internet tantalizingly out of reach. We've all been there! And let's be honest, some tech issues feel as daunting as climbing Mount Everest. But here's the good news: fixing your Asus laptop's WiFi is often a piece of cake, easier than baking a batch of cookies (and way less messy!). We're going to debunk the myth that you need a degree in computer science. We're going to get you back online, fast.
1. The WiFi Woes: You're Not Alone!
First off, breathe. You're not the only one experiencing WiFi issues on your Asus laptop. It's a common problem, and it can stem from a surprising number of culprits. Think of your laptop's connection as a delicate web of interconnected things. A tiny snag in one thread can unravel the whole network. But the good news is, identifying the snag is usually the hardest part. We're in this together, and we'll get to the bottom of it.
2. The Usual Suspects: What Could Be Blocking Your Connection?
Before we dive into the fixes, let's quickly consider the usual suspects. Sometimes, the problem isn't your Asus at all.
- The Router's Napping: Is your router on? Sounds obvious, but a quick reboot of your router can be a magic wand. Unplug it, wait 30 seconds, plug it back in. Think of it as a digital power nap.
- Distance Dilemmas: Are you too far from your router? The further you get, the weaker the signal gets. Imagine trying to whisper secrets in a crowded room; the farther you are, the harder it is to be heard.
- Interference Invasion: Other devices emitting radio waves (microwaves, cordless phones) can interfere with your WiFi signal. Try moving your laptop to a different spot.
3. The Quickest Fix: The Airplane Mode Tango
This is our first line of defense, the equivalent of a digital reset button. It’s shockingly simple.
- Turn on Airplane Mode: Click on the WiFi icon in your system tray (usually near the clock) and look for the "Airplane Mode" setting. Click it to turn it ON.
- Wait a Few Seconds: Give it a moment to disconnect everything.
- Turn off Airplane Mode: Click Airplane Mode again to turn it OFF. Your WiFi should automatically reconnect.
Think of it as a quick "kill switch" followed by a fresh start. This often jolts the WiFi adapter back into action.
4. The Driver Dance: Updating or Reinstalling Your WiFi Driver
Sometimes, outdated or corrupted drivers are to blame. Drivers are like the translators that let your laptop's hardware "speak" to the operating system. So, let's check them out.
- Access Device Manager: Right-click the Start menu (Windows icon, usually in the bottom left corner) and select "Device Manager."
- Find Network Adapters: In the Device Manager window, find "Network adapters" and click the little arrow to expand it. You'll see a list of your network-related devices. Look for something like "Wi-Fi Adapter" or "Wireless Network Adapter."
- Update the Driver: Right-click on your WiFi adapter and select "Update driver." Choose "Search automatically for drivers." Windows will try to find the latest version. If it succeeds, great!
- Reinstall the Driver (If Updating Fails): If updating doesn't work, right-click on your WiFi adapter again and select "Uninstall device." Follow the prompts. Then, restart your laptop. Windows often automatically reinstalls the correct driver during startup.
5. The Network Troubleshooter: Your Built-in Detective
Windows has a built-in tool designed to diagnose and (sometimes) fix network problems. It's like having a tech support expert on call!
- Access Network Settings: Click the WiFi icon in your system tray again.
- Run the Troubleshooter: You'll see an option like "Troubleshoot problems" or "Troubleshoot." Click it, and let Windows work its magic. It will automatically scan for common issues and try to fix them.
6. Check Your WiFi Password (Yes, Really!)
We’ve all been there: entering the password incorrectly multiple times and wondering why the internet is playing hide-and-seek. Double-check that you are entering the correct password for your WiFi network. It's happened to the best of us!
7. The "Forget Network" and Reconnect Strategy
Sometimes, your laptop gets a little confused. This is like clearing the cache to let your laptop "forget" the settings and re-establish a fresh relationship with your WiFi network.
- Open Network Settings: Click your WiFi icon.
- Forget the Network: Right-click on the name of your WiFi network and choose "Forget."
- Reconnect: Click on the network name again and re-enter your password.
8. Checking the Physical Switch (If your Laptop Has One)
Some older Asus models (and some modern ones too) have a physical WiFi switch on the side or front of the laptop. Make sure it's switched ON. It can be a small slider.
9. Resetting Your Network Settings (The Nuclear Option)
If everything else fails, you can reset your network settings. Think of this as a fresh start for your internet configuration. This will remove all your saved WiFi passwords, so make sure you know them!
- Open Network Settings: Click the Start button, then the Settings icon (gear icon).
- Network & Internet: Click on "Network & Internet."
- Reset Network: Click on "Network reset."
- Confirm and Restart: Follow the prompts to confirm and restart your laptop.
10. Avoiding Future WiFi Headaches: Some Pro Tips
Prevention is always better than cure, right? Here are some tips to keep your WiFi strong.
- Regular Updates: Keep your Windows and drivers updated.
- Router Placement: Position your router in a central location, away from walls and obstructions.
- Security Upgrade: Secure your WiFi with a strong password.
- Reduce Interference: Keep your laptop away from potential sources of radio frequency waves.
11. When to Call in the Cavalry: Recognizing the Limits
There are times when the problem might be more complex. Don't be afraid to ask for professional help.
- Hardware Issues: If you've tried everything and still can't connect, there could be a problem with your laptop's WiFi adapter.
- ISP Troubles: Sometimes, the issue lies with the internet service provider (ISP).
- Tech Support Time: Contact Asus tech support or a local computer repair shop when you're stuck.
12. Recap: The Quick Fixes in a Nutshell
Let's quickly recap those quick fixes. The order listed in the section has been carefully chosen for expediency.
- Airplane mode toggle (on and then off)
- Router Reboot
- Driver Updates
- Network Troubleshooter
- Forget network and reconnect
13. From Frustration to Freedom: You've Got This!
Remember, tech problems are solvable. With a little patience and these simple steps, you can get your Asus laptop's WiFi back in working order. Don't be intimidated!
14. Breaking Down the Barriers: Dispelling the Tech Fear
The beauty of these fixes is that they are simple enough to overcome. We're often more capable of fixing problems than we think.
15. The Takeaway: Stay Connected and Enjoy!
You've got the knowledge, the power, and the strategies to tackle your Asus laptop's WiFi issues. Now go forth and conquer the digital world!
Wrapping Up: A Word of Encouragement
We've covered a lot, haven't we? From the basics of Airplane Mode magic to the more advanced driver-focused steps. Fixing tech problems might feel like a Herculean task, but trust me, with a little bit of patience, it's often just a matter of following the right steps.
Remember, the goal is to get you back online. If you have any troubles, keep in mind that you can always seek outside help from the many resources out there. Be confident in your ability to solve the problem and the internet will soon be at your fingertips once more. Keep exploring, and keep learning!
Let's face it, the internet is a wonderful tool! Keep connected, keep learning, and keep exploring.
Frequently Asked Questions (FAQs)
1. My WiFi was working fine, and now it's not. What happened?
A sudden loss of WiFi can have several causes. Consider the recent changes. Has your router been rebooted? Have you updated your Windows? Have you recently installed software? These are some possible triggers. Check the usual suspects mentioned earlier (router, distance, interference) and then try the easy fixes like Airplane Mode.
**2. My WiFi adapter isn't showing up in Device
Dell Laptop WiFi Nightmare? This FIX Will SHOCK You!Wifi option not showing in windows 11 asus laptop

By IT Magics Wifi option not showing in windows 11 asus laptop by IT Magics
Cara Mengaktifkan Wifi di Laptop Windows ASUS LENOVO HP ACER AXIO TOSHIBA

By Multi Talenta Tutorial Cara Mengaktifkan Wifi di Laptop Windows ASUS LENOVO HP ACER AXIO TOSHIBA by Multi Talenta Tutorial
Cara atasi WiFi tidak bisa connect di laptop not connected

By ijal tutorial Cara atasi WiFi tidak bisa connect di laptop not connected by ijal tutorial
Title: How To Connect Wifi Network With Asus Tuf Gaming Laptop
Channel: HardReset.Info
How To Connect Wifi Network With Asus Tuf Gaming Laptop by HardReset.Info
Wifi Not Found
Here is the title: The Ultimate Guide to Choosing the Perfect Mountain Bike for Every Trail
The Ultimate Guide to Choosing the Perfect Mountain Bike for Every Trail
Embarking on the exhilarating world of mountain biking is akin to stepping into a realm of boundless thrills and unparalleled adventures. But before you can conquer rugged terrains, traverse winding singletracks, and experience the sheer joy of rolling down a mountainside, you must make a critical decision: selecting the ideal mountain bike. The market overflows with diverse models, specialized features, and compelling technologies, making the process seem daunting. Fear not, intrepid adventurer; this comprehensive guide serves as your compass, leading you toward the perfect two-wheeled companion for your mountain biking aspirations. We delve into the essential factors to consider, providing expert insights to ensure your journey up the mountains is as seamless as your exhilarating descent.
Understanding the Core Categories of Mountain Bikes
The initial step in finding your ideal mountain bike lies in understanding the landscape of available categories. These are not mere classifications; each represents a distinct riding style and purpose, influencing the bike's geometry, suspension travel, and overall design.
Cross-Country (XC) Bikes: Designed for efficiency and speed, XC bikes excel on rolling terrain, moderate climbs, and smoother trails. They typically feature lightweight frames, shorter suspension travel (around 100-120mm), and aggressive pedaling geometry. These bikes are your go-to choice for covering substantial distances, tackling climbs, and participating in cross-country races. Their focus is on minimizing weight whilst ensuring enough travel to absorb impacts.
Trail Bikes: Representing a versatile option, trail bikes offer a balanced approach to climbing and descending. They feature more suspension travel (120-150mm) than XC bikes, providing increased comfort and control on technical trails. Trail bikes often come with adjustable seatposts, dropper posts, which allow the rider to instantly lower or raise their seat. Trail bikes are often considered the perfect "do it all" mountain bike.
Enduro Bikes: Engineered for aggressive riding and challenging descents, enduro bikes prioritize downhill performance. These bikes boast significant suspension travel (150-180mm) and robust components to absorb harsh impacts. Enduro bikes prioritize downhill performance and usually feature slacker head tube angles, contributing to greater stability at higher speeds. They are perfect for tackling demanding, technical trails and enduro races.
Downhill (DH) Bikes: Exclusively built for maximum speed and gravity-fed thrills, downhill bikes are the kings of the mountain. They feature substantial suspension travel (typically 200mm), downhill specific geometry, and burly components to endure the most extreme terrain. These bikes are designed for racing downhill and are rarely found on flat or climbing trails.
Fat Bikes: Characterized by their oversized tires, fat bikes are built to conquer sand, snow, and loose surfaces. Their wide tires (3.8 inches or wider) offer exceptional traction and floatation, enabling riders to navigate challenging terrains that would be impassable on conventional bikes. Fat bikes are often ridden on snow.
Assessing Your Riding Style and Terrain
Before zeroing in on specific bike models, honestly evaluate your riding style and the typical trails you'll encounter. This self-assessment is the cornerstone of selecting the right bike.
Consider Your Fitness Level: Are you a seasoned athlete seeking challenging climbs and long rides, or a casual rider prioritizing leisurely explorations? Your fitness level influences the type of bike that will feel most rewarding. A lighter XC bike is ideal for climbing, while trail or enduro bikes are great for aggressive riders. Fat bikes are great for riding on loose terrain, sand, or snow.
Analyze Your Local Trails: Assess the predominant terrain in your region. Are the trails primarily smooth fire roads and moderate singletracks, or are they riddled with technical features like rocks, roots, and steep descents? The terrain dictates the necessary suspension travel, geometry, and componentry of your bike.
Envision Your Riding Goals: Do you aspire to compete in races, explore diverse landscapes, or simply enjoy the sheer thrill of mountain biking? Your long-term goals will shape your bike selection.
Decoding Bike Geometry: A Critical Component
Understanding bike geometry is paramount to acquiring a bike that feels comfortable and responsive. The geometry is the specific measurements of the frame. These measurements significantly impact the bike's handling, stability, and overall riding experience.
Head Tube Angle: The angle of the head tube affects steering responsiveness and stability. A steeper head tube angle (around 70 degrees or more) results in quicker steering and maneuverability. A slacker head tube angle (65 degrees or less) enhances stability at higher speeds and on technical descents.
Top Tube Length: Top tube length influences rider fit and reach. A longer top tube, with the rider in a more stretched out position, is designed for a more aggressive riding style. A shorter top tube will give a more upright riding position.
Seat Tube Angle: The seat tube angle affects pedaling efficiency and rider positioning. A steeper seat tube angle positions the rider closer to the pedals, optimizing power transfer.
Wheelbase: The wheelbase (the distance between the front and rear axles) influences stability and maneuverability. A longer wheelbase typically provides increased stability, while a shorter wheelbase allows for quicker handling.
Chainstay Length: Chainstay length affects the bike's climbing ability and rear-wheel traction. Shorter chainstays promote agility and responsiveness, while longer chainstays often enhance stability.
Suspension Systems: The Art of Absorbing Terrain
Suspension systems are the heart and soul of a mountain bike's ability to conquer challenging terrains. They absorb impacts, enhancing both comfort and control.
Front Suspension (Fork): The front suspension, or fork, absorbs impacts from the front wheel. Forks typically feature air or coil springs and adjustable damping to control the suspension's compression and rebound. The travel (the amount the fork can compress) is directly related to the type of bike and terrain it is designed for.
Rear Suspension (Shock): Rear suspension, or shock, absorbs impacts from the rear wheel. Again, the travel amount is critical to the type of mountain biking. The rear shock is often air or coil springs, similar to the fork.
Suspension Design: Different suspension designs influence the bike's pedaling efficiency, sensitivity to small bumps, and overall performance. Popular designs include single-pivot, four-bar linkage, and virtual pivot point systems.
Essential Components: A Deeper Dive
Beyond frame geometry and suspension, several other key components influence your bike's performance and durability.
Wheels and Tires: The wheels and tires are critical for traction, rolling efficiency, and overall ride quality. Wider rims and tires provide increased grip and stability.
Drivetrain: The drivetrain, including the crankset, cassette, derailleur, and chain, transfers power from your legs to the wheels. The number of gears, for example 1x or 2x, determines the range of gears available for climbing and descending.
Brakes: Mountain bike brakes, typically hydraulic disc brakes, provide stopping power. The size of the brake rotors influences braking capacity and heat dissipation.
Dropper Post: Adjustable seat posts, often called dropper posts, allow you to raise or lower your seat on the fly, enhancing maneuverability on technical trails.
Making the Final Decision: Considerations and Recommendations
With a solid understanding of categories, geometry, suspension, and components, you're ready to make informed decisions.
Budget: Set a realistic budget, and recognize that your money directly impacts the quality of the components and overall performance.
Test Rides: Whenever possible, test ride different bikes to experience their handling and fit. This step is critical to determine which bike feels most comfortable and responsive.
Seek Expert Advice: Consult with experienced mountain bikers and bike shop professionals for personalized recommendations. They can offer invaluable insights to help you make a suitable choice.
Consider Future Upgrades: Think about the potential for future upgrades, such as swapping out components or adding accessories.
Caring for Your Investment: Maintenance and Upkeep
Once you've found your perfect mountain bike, proper maintenance is essential to ensure its longevity and optimal performance.
Regular Cleaning: Thoroughly clean your bike after each ride, especially after encountering muddy or dusty conditions.
Lubrication: Regularly lubricate your chain, derailleur, and other moving parts.
Suspension Maintenance: Service your suspension system according to the manufacturer's recommendations.
Component Inspection: Regularly inspect your components for wear and tear and replace them as needed.
Conclusion: Unleash Your Inner Trailblazer
Choosing the perfect mountain bike is a journey in itself, but now equipped with knowledge and insights, you're well-prepared to navigate the process with confidence. Embrace the challenge, and remember that the ideal bike is the one that best fits your riding style, the terrain you enjoy, and your personal preferences. So, choose wisely, maintain your steed with care, and get ready to experience the incomparable joy of mountain biking. The trails await, and the adventures are limitless.
