how to replace wifi antenna on laptop

Title: Replace the Wireless Antenna Cables HP Pavilion Gaming Notebook HP Support
Channel: HP Support
Replace the Wireless Antenna Cables HP Pavilion Gaming Notebook HP Support by HP Support
how to replace wifi antenna on laptop, how to fix wifi antenna on laptop, how to install wifi antenna on laptop, repair laptop wifi antenna
Laptop WiFi Antenna Upgrade: Shockingly Easy DIY Fix!
Boost Your Laptop's Wi-Fi: A Surprisingly Simple DIY Adventure!
Ever felt your laptop's Wi-Fi was a sluggish snail in a digital race? Do frustrating connection drops and agonizingly slow download speeds make you want to chuck your device out the window? Then listen up! You're not alone. Because, with a few simple steps, you can dramatically improve your laptop's Wi-Fi performance. Prepare to unlock a faster, more reliable internet experience. Ultimately, you can enjoy seamless streaming, faster downloads, and lag-free gaming. Recognizing the Wi-Fi Weak Signal Demons
First, let's diagnose the problem. Are you constantly battling buffering videos or agonizingly slow webpage loading? Moreover, is your signal strength icon stubbornly stuck on a measly bar or two? These are clear signs of a weak Wi-Fi signal. Also, this can stem from various culprits. From outdated drivers to physical obstructions, the source can be anywhere. However, one of the most common offenders? The laptop’s built-in Wi-Fi antenna. Therefore, upgrading this component is often the easiest and most impactful solution.
Unveiling the Hidden Weakness: Laptop Antenna Anatomy
Now, let’s dive a little deeper. Because, where is this Wi-Fi antenna located? Usually, on laptops, it resides within the lid. Typically, it's a small, often inconspicuous component. It directly influences your laptop's ability to send and receive Wi-Fi signals. Understandably, a weak or poorly positioned antenna can significantly limit your range and connection speed. Therefore, enhancing this crucial element could make a big difference.
Embarking on the DIY Upgrade: What You'll Need
The good news is that upgrading your laptop's Wi-Fi antenna is surprisingly straightforward. To start, let's gather our supplies:
- A New Wi-Fi Antenna: Research and purchase a compatible antenna. Make sure it's designed for laptops and fits your model.
- Small Phillips Head Screwdriver: You'll need this for opening your laptop.
- Plastic Opening Tools or Spudger: These are essential for safely prying open the laptop casing.
- Optional: Anti-Static Wrist Strap: This protects your sensitive components from static discharge.
- Patience & Precision: This is a DIY project.
Step-by-Step: Your Wi-Fi Renaissance
Are you ready to begin? Here’s how to start the upgrade process:
- Power Down and Unplug: Completely shut down your laptop and disconnect the power adapter. Safety first!
- Unleash the Screws: Locate and remove all screws on the laptop's bottom panel. Consult online guides or your laptop's manual to identify them. Carefully store them in a safe place.
- Gentle Opening: Using a plastic opening tool, gently pry around the edges of the laptop's bottom panel. Be patient and go slowly to avoid damaging the casing.
- Antenna Access: Once the panel is open, locate your existing Wi-Fi antenna. It's usually attached to the Wi-Fi card itself.
- Disconnect with Care: Carefully detach the antenna wires from the Wi-Fi card. Usually, there are only a few tiny snaps.
- Install the New Antenna: Connect the new antenna wires. The connections usually snap in place. Make sure they are secure.
- Reassemble with Precision: Carefully close the bottom panel, ensuring that everything is aligned and secure. Then, replace all the screws.
- Testing Time: Power up your laptop and connect to your Wi-Fi network. Check your signal strength. Celebrate your success!
Troubleshooting and Fine-Tuning
If you experience any issues, don't panic! The initial setup might not be optimal immediately. First, double-check all connections. Then, ensure the antenna wires are securely attached. Next, try restarting your laptop. Additionally, you can also consider repositioning your laptop for improved signal reception. Finally, experiment with antenna placement for the best results. If problems persist, and only if needed, consult online resources or seek professional assistance.
Reaping the Rewards: A Faster Future
You did it! You've successfully upgraded your laptop's Wi-Fi antenna. Now, expect a tangible improvement in your online experience. Consequently, enjoy faster download speeds, a more stable connection, and a wider Wi-Fi range. Because of your efforts, streaming videos will buffer less often. Also, your online gaming sessions should be smoother and more enjoyable. Ultimately, you've conquered the Wi-Fi woes.
Final Thoughts: Empowerment Through DIY
This simple DIY project highlights the power of taking control. Because, you’ve successfully enhanced your laptop's performance. You didn't need an expensive new device. Moreover, you didn't require advanced technical skills. You’ve learned something new and saved money. So, embrace the satisfaction of a job well done! Now, go forth and enjoy your significantly improved Wi-Fi experience!
Laptop WiFi Nightmare? SOLVED! (No Password Needed!)Laptop WiFi Antenna Upgrade: Shockingly Easy DIY Fix!
Hey tech enthusiasts, frustrated WiFi warriors, and anyone who's ever stared longingly at their laptop's anemic signal bars? We've all been there. That agonizing feeling of buffering videos, dropped Zoom calls, and the overall digital drag that comes with a weak WiFi connection. But before you throw your laptop out the window (or at least contemplate it), let's talk about a shockingly simple secret weapon: upgrading your laptop's WiFi antenna! Trust me, it's easier than you think, and the results can be amazing.
1. The WiFi Woes: Why Your Laptop's Signal Sucks
Think of your laptop's built-in WiFi antenna like a tiny, overworked radio receiver. It's tasked with pulling signals from your router, which, depending on your home layout and the age of your laptop, can be a Herculean task. Walls, furniture, other electronic devices – they all gang up on that poor antenna, weakening the signal and leading to those dreaded lags and dropouts. Sometimes, it's just a case of the original antenna being…well, not great.
2. Unmasking the Culprit: Diagnosing Your Weak WiFi
Before we dive into the upgrade, let's figure out if it's actually the antenna causing the problem.
- Signal Strength Check: Most operating systems (Windows, macOS, etc.) have a built-in WiFi signal strength indicator. If you're consistently seeing low bars, or if the signal strength fluctuates wildly, that's a red flag!
- Speed Test: Run a speed test (plenty available online!) while sitting right next to your router. Then, move a distance away. A significant drop in speed suggests an antenna issue.
- Router Reset: Sometimes, a simple router reboot can fix things. Give it a try – it's the tech equivalent of turning it off and on again.
- Driver Update: Outdated WiFi drivers can also cause problems. Make sure your laptop's WiFi drivers are up-to-date.
If you've tried these and are still experiencing poor performance, chances are, your antenna is the culprit!
3. The DIY Revelation: Why You Can Absolutely Do This!
Here's the best part: upgrading your laptop's WiFi antenna is not brain surgery. Seriously! It's akin to changing a lightbulb. The internal components are surprisingly accessible, and with a few basic tools and a bit of patience, you can significantly boost your WiFi performance. We’re not talking about voiding your warranty, either. This is often a reversible modification.
4. Gathering Your Arsenal: The Tools You'll Need
Fortunately, you don't need a workshop full of specialized equipment. Here's what you'll need:
- A new WiFi antenna: This is the star of the show! We'll discuss choosing the right one in a moment.
- Small Phillips head screwdriver: Most laptops use tiny screws. A magnetic screwdriver helps prevent losing them.
- Plastic spudger or pry tool: For gently opening the laptop case without scratching it (a guitar pick works in a pinch!).
- Anti-static wrist strap: To protect your laptop components from static electricity. This is crucial!
- Possibly, a magnifying glass: If your eyes are like mine, a little extra help seeing those tiny screws is always welcome.
5. Choosing Your Champion: Selecting the Right Antenna
This is where things get a little exciting. You have a few options.
- Dedicated Laptop Antennas: These are specifically designed for laptops and come in various configurations. Look for ones that boast higher gain (measured in dBi). A higher gain antenna can capture more signal.
- Upgrade Kits: Some kits include a new antenna and all the necessary cables for easy installation. A good option for beginners.
- External Antennas: If you're feeling extra adventurous, you could explore external antennas. These are usually more powerful but require more modifications and may not look as sleek.
Before you buy, check your laptop model's service manual online to see what types of antennas it uses and what's compatible.
6. The Grand Unveiling: Opening Your Laptop's Case
This is the moment of truth! This step varies slightly depending on your laptop model. Always, always, always consult your laptop's service manual or search for a video tutorial specific to your model before you begin.
- Power Down and Unplug: Completely shut down your laptop and unplug it from the power outlet. Remove the battery (if possible).
- Find the Screws: Carefully examine the bottom of your laptop. You'll likely find several screws holding the case together.
- Unscrew and Organize: Unscrew all the indicated screws. Keep them organized (a small container works well!) so you don't lose them.
- Pry it Open: Using your plastic pry tool, gently work around the edges of the laptop case to separate the top and bottom halves. This can take a little patience. Don't force it! Go slowly and check for hidden screws.
7. Locating the WiFi Antenna: Finding the Beast!
Once you've opened the case, you'll need to identify the WiFi antenna. It’s usually located near the top of the screen hinge or the sides. It'll be connected to the WiFi card by two or three thin wires with small connectors. It’s usually a small rectangular or square piece.
8. Unplugging the Old: Removing the Existing Antenna
This is usually the easiest part.
- Disconnect the Wires: Carefully detach the antenna wires from the WiFi card. They often snap on, so you may need gentle upward pressure. Take pictures before unplugging to help you remember the configuration.
- Remove the Antenna: The antenna itself might be held in place by a few screws or adhesive. Carefully remove them.
9. Installing the New: The Upgrade Begins
- Position the New Antenna: Place the new antenna in the same location as the old one.
- Connect the Wires: Connect the antenna wires to your WiFi card. Refer to the pictures you took earlier to ensure they are in the correct ports.
- Secure the Antenna: Secure the new antenna with screws or adhesive (if applicable).
10. Reassembling the Beast: Putting it All Back Together
This step is essentially the reverse of the disassembly.
- Close the Case: Carefully align the two halves of the laptop case and snap them back together.
- Screw it All Back: Replace all the screws you removed earlier.
- Replace Battery: If you removed the battery, put it back in.
11. Power On and Test: Fingers Crossed!
Plug in your laptop and power it on. Let's hope for a good showing!
- Check WiFi: Check your WiFi connection. Does it connect more quickly?
- Run a Speed Test: Run a speed test to see if your internet speed has improved.
- Test the Range: Walk around your house and see if the signal strength remains consistent.
12. Troubleshooting: When Things Go Sideways
Even with the best of intentions, things can sometimes go wrong. If you don’t see the expected improvements, don’t panic!
- Incorrect Connections: Double-check all connections, especially the antenna wires.
- Antenna Compatibility: Make sure you purchased an antenna compatible with your laptop model.
- Driver Issues: Try updating or reinstalling your WiFi drivers.
- Re-check Case: Make sure the case is attached firmly, and no interference blocks the signal.
13. Beyond the Upgrade: Optimizing Your WiFi Experience
While a new antenna can work wonders, there are other things you can do to maximize your WiFi performance.
- Router Placement: Place your router in a central, elevated location, away from obstacles like walls and metal objects.
- Router Upgrades: Consider upgrading your router to a newer model with advanced features like dual-band or mesh WiFi.
- Channel Optimization: Use a WiFi analyzer app to find the best channel for your router to avoid interference.
14. The Triumphant Return: Enjoying Stronger WiFi
Congratulations! You've successfully upgraded your laptop's WiFi antenna.
15. The Final Verdict: Was it Worth It?
Absolutely! The difference in WiFi performance can be night and day.
Closing Section
So, there you have it! A seemingly complex task demystified into a manageable DIY project. Think of it as giving your laptop a much-needed shot of digital caffeine. With a little time, a few readily available tools, and the courage to delve inside your machine, you too can banish those frustrating WiFi woes and embrace the smooth, uninterrupted internet experience you deserve. Now, go forth and conquer those dead zones! Remember, if I can do it, you can too!
FAQs
1. Is this upgrade safe for my laptop?
Generally, yes. However, always consult your laptop's service manual or look for model-specific tutorials. The main risk is physical damage if you're too rough. Always use an anti-static wrist strap.
**2. What if I'm not comfortable opening my laptop?
HP Laptop WiFi Nightmare? This FIX Works Every Time!How to remove and reattach WiFi antenna cables
By James Has Answers How to remove and reattach WiFi antenna cables by James Has Answers
Laptop wifi antenna repair Perth

By cirrus Link Repair Laptop wifi antenna repair Perth by cirrus Link Repair
How To Install M.2 E Key WiFi & Bluetooth Card In Desktop PC

By Mike's unboxing, reviews and how to How To Install M.2 E Key WiFi & Bluetooth Card In Desktop PC by Mike's unboxing, reviews and how to

Title: Wifi antenna cable connector repair Kablosuz anten kablosu konnektr onarm
Channel: Merakl Bilgisayarc
Wifi antenna cable connector repair Kablosuz anten kablosu konnektr onarm by Merakl Bilgisayarc
Wifi Not Found
Laptop WiFi Antenna Upgrade: Shockingly Easy DIY Fix!
We’ve all been there: staring at the dreaded low-signal bars, the frustratingly slow download speeds, and the intermittent connection drops that plague our wireless internet experience. For laptop users, this problem can be particularly acute. Unlike desktop computers, laptops often skimp on the quality of their built-in antennas, leading to compromised performance. What if we told you that a significant improvement in your laptop's WiFi performance is within reach, and the solution is surprisingly simple to implement? Welcome to the world of DIY WiFi antenna upgrades!
Understanding the WiFi Antenna's Crucial Role
Before we delve into the upgrade process, let's briefly examine the unsung hero of your wireless connectivity: the WiFi antenna. This seemingly innocuous component is responsible for receiving and transmitting radio waves, effectively translating the digital data of your internet connection into a format your laptop can understand. Think of it as the gatekeeper, allowing information to flow in and out of your device. A weak or poorly positioned antenna acts as a bottleneck, restricting the flow of data and leading to sluggish performance. This is why a proper antenna upgrade can be a game-changer.
Identifying the Problem: Signs Your Laptop's WiFi Needs Help
The symptoms of a weak WiFi antenna are often subtle yet persistent. Recognizing these telltale signs is the first step toward an effective upgrade.
- Weak Signal Strength: This is perhaps the most obvious indicator. If your laptop consistently displays a low number of signal bars, especially in areas where other devices have a strong connection, your antenna is likely the culprit.
- Slow Download and Upload Speeds: Noticeably sluggish data transfers, even with a seemingly adequate internet plan, can point to antenna limitations. Websites load slowly, videos buffer frequently, and large files take an eternity to download.
- Intermittent Connection Drops: Frequent disconnections from your WiFi network are a major red flag. This issue often stems from the antenna's inability to maintain a stable connection with the router, especially at longer distances.
- Difficulty Connecting in Specific Locations: If your laptop struggles to connect to your WiFi network in certain rooms or areas of your home, but other devices have no trouble, the antenna's reach is likely restricted.
- Inability to Maintain a Stable Connection: Even at close range, a weak antenna can struggle to maintain a consistent link, leading to dropped packets and overall instability.
The Upgrade Journey: Gathering Your Supplies
Fortunately, upgrading your laptop’s WiFi antenna doesn’t require a specialized skillset or expensive tools. The beauty of this DIY fix lies in its accessibility. Here’s what you'll need:
- Replacement Antenna(s): This is the core component of the upgrade. Choose an antenna designed for your laptop’s WiFi frequency (typically 2.4 GHz and/or 5 GHz). A good directional antenna with a higher gain will significantly improve the signal. Search for laptop WiFi antennas specifically designed for your laptop brand and model.
- Small Phillips Head Screwdriver Set: A set with various sizes is essential for opening your laptop's casing. Some laptops may require specialized Torx screwdrivers, so check the model of your laptop.
- Plastic Opening Tools or Spudger: These are designed for gently prying open electronic devices without causing damage. These are usually found in basic electronic repair kits.
- Anti-Static Wrist Strap: Protect your laptop’s sensitive components from electrostatic discharge. This is crucial to prevent damage during the process.
- Optional: Soldering Iron and Solder: In some advanced cases, you might need to solder the antenna cable to the WiFi card; however, this is not a common requirement and will depend on the type of the replacement antennas.
- Flat, Clean Workspace: Avoid working on a carpet or any surface that can generate static electricity.
- Patience and Attention to Detail: This is crucial for a successful and safe upgrade.
Step-by-Step Guide: Unveiling Your Laptop's WiFi Potential
Now, let’s walk through the actual upgrade process. Remember to take your time and proceed with caution.
- Power Down and Unplug: Completely shut down your laptop and unplug the power adapter. Remove the battery if easily accessible. This is a critical safety measure.
- Prepare Your Workspace: Place your laptop on a clean, flat surface. Put on your anti-static wrist strap and attach it to a grounded object (like a metal part of your computer).
- Identify the Access Panel: Locate the access panel on the bottom of your laptop. This panel typically covers the RAM, hard drive, and WiFi card. Sometimes, the WiFi card is hidden under the keyboard or within another compartment.
- Remove the Access Panel: Unscrew the screws holding the access panel in place. Store the screws safely in a small container or magnetic tray to avoid losing them.
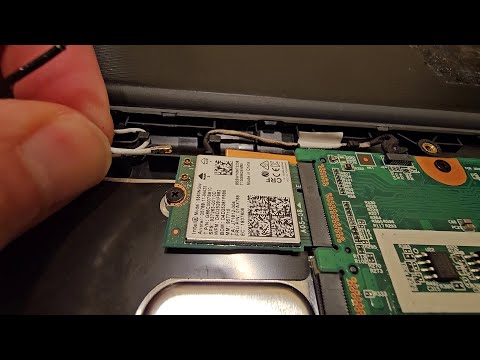
- Locate the WiFi Card: The WiFi card is a small circuit board, usually about the size of a postage stamp. It will have two or three antenna connectors at its end.
- Disconnect the Existing Antenna Cables: Carefully detach the antenna cables from the WiFi card. Use a small plastic tool or spudger to gently pry the connectors off the card. Note the colour coding or any markings indicating which connector goes where, as they are typically different.
- Remove the WiFi Card (if necessary): In some laptops, you'll need to remove the WiFi card to access the antenna connectors or to install the new antenna. Unscrew the screw holding the WiFi card – this is often a single screw.
- Install the New Antenna: Connect the new antenna cables to the WiFi card, matching the colours or markings. If you are using an external antenna, carefully route the antenna cable through the laptop case (usually through an existing vent or opening)
- Re-assemble the Laptop: Replace the WiFi card, if you removed it. Reinstall the access panel, ensuring that all the screws are securely fastened.
- Power On And Test: Plug in your laptop and power it on. Check the signal strength and download speeds to confirm the upgrade's effectiveness.
Optimizing Antenna Placement for Maximum Performance
The physical placement of your new or upgraded antenna can significantly impact its effectiveness. Here are some crucial factors to consider:
- Directional Antennas: If you're using a directional antenna, point it in the direction of your router. This maximizes the signal strength and reduces interference.
- Height: Elevate your antenna as much as possible. Raise your laptop or position the external antenna at a higher point to improve signal reception.
- Obstacles: Place the antenna away from obstacles like walls, furniture, and electronic devices, which can interfere with the signal.
- External Antennas: If you've installed an external antenna, consider mounting it on a window or high wall to maximize its reach.
Troubleshooting Common Issues
While the upgrade process is usually straightforward, you may encounter some challenges. Here's how to address common issues:
- No WiFi Connection: Make sure that you correctly reconnected the WiFi ribbon cable with all the correct connections.
- Weak Signal: Verify that the antenna cables are securely connected to the WiFi card and the new antenna. Try repositioning the antenna.
- Slow Speeds: Test the connection with other devices to rule out a general internet problem. Check your router's settings to see if you're on the most appropriate channel for the 2.4 GHz or 5 GHz band.
- Hardware Issues: If the new antenna doesn't seem to improve the signal, it could be defective. It is also possible that the Wireless Card is already malfunctioning.
Beyond the Upgrade: Additional Tips for Improved WiFi Performance
While upgrading your antenna is a significant step, there are other steps you can take to optimize your laptop’s WiFi performance:
- Update Your Router Firmware: Ensure your router’s firmware is up-to-date to benefit from bug fixes and performance improvements.
- Optimize Router Placement: Place your router in a central, elevated location, free from obstacles.
- Limit Wireless Interference: Minimize the use of devices that generate radio interference, such as microwave ovens and Bluetooth devices.
- Upgrade Your Router: If your router is outdated, consider upgrading to a newer model with advanced features like dual-band support and MU-MIMO technology.
The Verdict: A Worthwhile Upgrade
Upgrading your laptop’s WiFi antenna is a relatively simple, cost-effective way to significantly improve your wireless experience. By following the steps outlined in this guide, you can reclaim your WiFi speed, reduce frustrating connection drops, and enjoy a more seamless online experience. So, take the plunge, gather your supplies, and embark on this straightforward DIY fix. We are confident that the results will be remarkably satisfying.
