how to make wifi hotspot in laptop windows 8

Title: Turn Windows 8 Laptop into WiFi HotSpot How To
Channel:
Turn Windows 8 Laptop into WiFi HotSpot How To by
Unlock Your Laptop's Hidden Hotspot: Windows 8 WiFi Trick!
Unleash Your Laptop's Inner Power: Turning Windows 8 into a WiFi Maestro!
Remember those times you needed a hotspot, but your phone wasn't cooperating? Frustrating, right? Well, prepare to bid farewell to those connectivity struggles. Because your Windows 8 laptop already holds the key to a personal WiFi haven! Today, we're going to uncover this hidden gem. We'll turn your laptop into a wireless access point. It's easier than you think. Get ready to share your internet connection.
The Secret Weapon: Hosted Network
The magic lies within a feature called the "Hosted Network." This is the core of our operation. It lets your laptop act as a WiFi router. It's a powerful tool. So, before we proceed, let's clarify the requirements. You'll need a Windows 8 laptop with a wireless network adapter. And, of course, you need an internet connection to share. If you have those, you're ready to roll.
Setting the Stage: The Command Prompt Symphony
First, open the Command Prompt. You need administrator privileges. Search for "cmd" in the Windows search bar. Right-click on "Command Prompt" and select "Run as administrator." Now, we’ll orchestrate some commands. This is the moment to unleash your inner tech wizard.
Step 1: Activating the Hosted Network
Type the following command and press enter: netsh wlan set hostednetwork mode=allow ssid="YourNetworkName" key="YourPassword" Replace "YourNetworkName" with your desired network name. Use a name you'll recognize. Also, replace "YourPassword" with a strong password. Make it secure to protect yourself. This configures your virtual hotspot.
Step 2: Starting the Connection
Next, start the hosted network. Enter this command and hit enter: netsh wlan start hostednetwork This command activates your newly created hotspot. You should see a confirmation message. Congratulations, your hotspot is now technically live!
Step 3: Sharing the Internet
This step is essential. Your hotspot is active, but it's not sharing the internet yet. Let's fix that immediately.
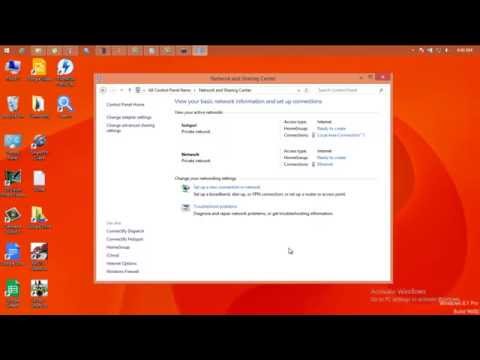
- Open the Network and Sharing Center. You can find it in the Control Panel. Alternatively, right-click the WiFi icon in your system tray. Choose "Open Network and Sharing Center."
- Click on "Change adapter settings" on the left side. You'll see your network connections listed.
- Identify your active internet connection (e.g., your Ethernet or WiFi connection). Right click on it, and select "Properties."
- Go to the "Sharing" tab.
- Check the box that says, "Allow other network users to connect through this computer's internet connection."
- Choose your "Hosted Network" from the dropdown menu. Then, click "OK." Your laptop is now sharing its internet!
Addressing Potential Hiccups: Troubleshooting and Tweaks
Sometimes things don't go perfectly. Don't worry, it's common. Consider these troubleshooting tips. If you run into problems, here's what to check.
- "The hosted network couldn't be started" error: Ensure your wireless adapter drivers are up to date. Update them through Device Manager.
- No internet connection on connected devices: Double-check your sharing settings. Ensure you've selected the correct "Hosted Network." Restart your laptop.
- Slow connection: The performance might be impacted by various factors. Distance from your laptop is one. The number of connected devices and the speed of your internet plan are also important. Consider moving closer to the laptop. Limit the number of devices connected.
Beyond the Basics: Customization and Considerations
You can tweak the hosted network further. Consider these options:
- Changing the Network Name and Password: Repeat the first step with your desired new settings. Run the commands to update your network details.
- Stopping the Hosted Network: To disable the hotspot, run the command
netsh wlan stop hostednetwork. This will turn off the shared connection. - Security Best Practices: Always choose a strong password. This safeguards your connection from unauthorized access. Regularly change it.
The Benefits of Wireless Freedom
Now that you have a working hotspot, think of the possibilities! Share your internet with friends. Connect your tablet when away from your home WiFi. It is a convenient solution.
Wrapping Up: Your Laptop’s Superpower
You've successfully transformed your Windows 8 laptop. You've unlocked its hidden hotspot capabilities. You're now equipped to share your internet connection on the go. This newfound freedom is at your fingertips. So, go ahead, explore and embrace the power of a portable WiFi hub! Enjoy your upgraded online experience.
HP Windows 8 WiFi Driver: The SHOCKINGLY Easy Fix!Let's dive in!
Unlock Your Laptop's Hidden Hotspot: Windows 8 WiFi Trick!
Alright, tech adventurers! Remember those days when sharing your internet was a total hassle? Juggling cables, begging for passwords, and generally feeling like you were living in the dark ages of connectivity? Well, those days are almost gone, especially if you're still rocking a Windows 8 laptop. We're about to unlock a secret weapon, your very own mobile hotspot, hidden right under your nose. Prepare to transform your laptop into a WiFi broadcasting superhero!
1. The Unassuming Powerhouse: Why Windows 8 Still Matters
Before we jump in, let's acknowledge the elephant in the room. Yes, Windows 8 might feel a bit… dated. But guess what? It's still perfectly capable, particularly for everyday tasks, and it holds a secret that even the latest Windows versions sometimes overlook – the simplicity and effectiveness of its built-in hotspot feature. Think of it as your trusty, reliable friend who quietly gets the job done.
2. The Great Divide: Understanding the Hotspot Landscape
Before we start, let’s clarify what a hotspot even is. Imagine your laptop acting like a mini-router, taking your existing internet connection (from your home WiFi, an Ethernet cable, or even a mobile data connection) and sharing it with other devices. Pretty nifty, right? Think of it as a digital buffet – you’re providing the feast, and your friends, family, or even just your other devices (like a tablet or phone) are the hungry guests.
3. Unveiling the Magic: The Netsh Command – Your Key to Freedom
Alright, buckle up, because here's where the magic happens. We're going to use a command-line tool called Netsh. Don't let the techy name scare you. It's simply a powerful tool that allows us to configure network settings. Think of it as the wizard's spellbook – a collection of incantations to make things happen. We'll be using a few specific commands to set up our hotspot.
4. Setting the Stage: Preparing Your Windows 8 for Hotspot Glory
Before wielding the Netsh power, you need to check a few things:
- Do you have an internet connection? Duh, but it's worth mentioning! Make sure you're connected to the internet via WiFi, Ethernet, or even mobile data.
- Do you have admin privileges? You'll likely need to run the command prompt as an administrator, which is the key to unlocking many advanced system features.
5. The First Incantation: Creating the Virtual Network
Now, open the Command Prompt. You can find it by searching for "cmd" in the Start menu. Right-click on "Command Prompt" and select "Run as administrator." Here's the first spell:
netsh wlan set hostednetwork mode=allow ssid="Your Hotspot Name" key="YourPassword123"
Replace "Your Hotspot Name" with whatever you want to call your new WiFi network (e.g., "MyAwesomeHotspot") and "YourPassword123" with a strong, unique password. Make it something you'll remember but that others won't easily guess. Think of it as your private portal to the internet.
6. Activating the Broadcast: Starting the Hosted Network
Next, type and execute this command:
netsh wlan start hostednetwork
This command activates the virtual network, turning your laptop into a WiFi hotspot. It's like flipping the switch and turning on the lights!
7. Sharing the Wealth: Enabling Internet Connection Sharing
The hotspot is now live, but your devices still can't connect to the internet. We need to tell the system to share your existing connection. Here's how:
- Open the Network and Sharing Center (search for it in the Start menu).
- Click on "Change adapter settings."
- Right-click on the connection you use to access the internet (your WiFi adapter or Ethernet adapter).
- Click on "Properties."
- Go to the "Sharing" tab.
- Check the box that says "Allow other network users to connect through this computer's Internet connection."
- Select your newly created virtual network from the dropdown menu (it will likely be named something like "Microsoft Hosted Network Virtual Adapter").
- Click "OK."
This process is like giving the hotspot permission to be a generous host, allowing all connected devices access to your internet.
8. Troubleshooting Tango: What to Do When Things Go Wrong
Sometimes, like any spell, Netsh might not work perfectly the first time. Here are a few quick fixes:
- Check your spelling: Double-check that you've typed the commands correctly. Even a single typo can throw the whole thing off.
- Restart your computer: Sometimes, a simple reboot is all it takes to get things running smoothly.
- Update your network drivers: Outdated driver files can cause issues. Go to Device Manager (search for it in the Start menu), expand "Network adapters," and right-click on your network adapter. Select "Update driver."
- Firewall Interference: Your firewall might be blocking the connection. Check to make sure the necessary ports are open.
9. The Grand Finale: Connecting Your Devices
Now, grab your phone, tablet, or any other WiFi-enabled device. Scan for available WiFi networks, and you should see your "Your Hotspot Name" listed. Enter the password you set earlier, and voila! You're connected. It's like having a personal WiFi network wherever you go.
10. Security First: Keeping Your Hotspot Safe
Just like you lock your front door, secure your hotspot. Use a strong password (we can't stress this enough!), and consider enabling WPA2 encryption – a robust security protocol. Think of it as the digital equivalent of a security system.
11. Optimize Your Connection: Improving Performance
A few tips for maximizing your hotspot's performance:
- Stay close: The closer your devices are to your laptop, the better the signal strength will be.
- Limit connected devices: The more devices connected, the slower the speed for everyone.
- Close bandwidth-heavy applications: Close any applications using the internet (like video streaming or large downloads) on your laptop.
- Consider your internet plan: Your hotspot's speed is only as fast as your internet connection.
12. Beyond the Basics: Advanced Settings
Want to take your hotspot game to the next level? Explore these options:
- Set a time limit: Use
Netshto automatically shut down the hotspot after a specific period of inactivity. - Change the channel: If you experience interference, try switching to a different WiFi channel.
- Monitor data usage: Keep track of how much data your connected devices are consuming.
13. Wrapping Up the Night: Deactivating Your Hotspot
When you're done using your hotspot, it's important to turn it off to preserve your battery and prevent unauthorized access. Simply type the following command in the Command Prompt (run as administrator):
netsh wlan stop hostednetwork
This command will gracefully shut down your virtual network, and you've done the task successfully.
14. Windows 8's Hotspot Legacy: Why It's Still Relevant
Even with the rise of fancy new features in later versions of Windows, the simplicity and reliability of the Windows 8 hotspot feature make it a champion for its users. It's a testament to elegant engineering – functionality that persists, even to this day.
15. The Final Verdict: Unleash Your Laptop's Potential
We've walked through the steps and tricks necessary to unlock your laptop’s hidden hotspot. Now, armed with this knowledge, you're ready to transform your Windows 8 laptop into a powerful WiFi-sharing device. Go forth and connect! Consider it your secret power move, ready whenever you are.
Closing Thoughts
So there you have it! You've turned an ordinary laptop into an extraordinary connectivity hub. I hope you've gained a new skill and have a better perspective on the power held by your Windows 8 machine. Now get out there and share the WiFi love. Don't hesitate to share this article with others, and let's keep the connected spirit alive!
FAQs
1. Will this work on other versions of Windows?
While this specific method is tailored for Windows 8, similar principles apply. Later Windows versions have built-in hotspot options, but the Netsh method often is a reliable solution, especially if the built-in feature isn't working correctly.
2. My hotspot is slow. What can I do?
Ensure you're not too far from your laptop, limit the number of connected devices, and close bandwidth-intensive apps on your laptop. Check your internet speed to make sure it's not the bottleneck.
3. Can I change the hotspot name and password later?
Yes! Just repeat the first command (netsh wlan set hostednetwork) changing the ssid and key values to your preferred settings. Then, restart the hostednetwork.
4. Is using a hotspot safe?
Yes, it is safe
Mac Wi-Fi Nightmare? This 1 Trick Fixes It INSTANTLY!Make a Wi fi Hotspot Using your Windows 8 Laptop

By Syed Shah Zahurullah Hussaini Make a Wi fi Hotspot Using your Windows 8 Laptop by Syed Shah Zahurullah Hussaini
How To Make a Wifi Hotspot in Windows 7,8,8.1,10 WITHOUT any Software

By Safaa Al-Hayali Safaa Alaa How To Make a Wifi Hotspot in Windows 7,8,8.1,10 WITHOUT any Software by Safaa Al-Hayali Safaa Alaa
Create WiFi Hotspot in windows 8.1, 8, 7 LaptopPC
By ANDREW CRUZ Create WiFi Hotspot in windows 8.1, 8, 7 LaptopPC by ANDREW CRUZ

Title: Turn Windows 8 Laptop into WiFi HotSpot How To
Channel: TechEmpty
Turn Windows 8 Laptop into WiFi HotSpot How To by TechEmpty
Wifi On Laptop
Unlock Your Laptop's Hidden Hotspot: Windows 8 WiFi Trick!
The digital landscape often demands seamless connectivity, especially when you're on the go. Imagine needing to share your internet connection with other devices, but you're without a dedicated router. What if your Windows 8 laptop held the key to unlocking a secret WiFi hotspot, allowing you to share your internet connection with smartphones, tablets, and other gadgets? Let's delve into this often-overlooked functionality and illuminate the path to creating your own mobile WiFi hub.
Unveiling the Power of Hosted Networks in Windows 8
Windows 8, while perhaps not the most remembered of Microsoft's operating systems, packed a punch in terms of capabilities, including a powerful, yet often hidden, feature: the ability to create a hosted network. This isn't just about sharing an existing WiFi connection. Instead, it leverages your laptop's wireless adapter as the access point, enabling other devices to connect directly to it, effectively turning your laptop into a miniature router. This is a feature worth mastering for anyone who frequently deals with multiple devices or finds themselves in situations where a dedicated router isn't available.
Prerequisites: Ensuring Compatibility and Readiness
Before we dive into the configuration, it's vital to verify that your laptop is up to the task. The most important aspect is your wireless network adapter. Not all adapters support hosted networks, so a quick check is in order. Here's how to determine compatibility:
- Open the Command Prompt: Press the Windows key, type "cmd," and then right-click on "Command Prompt" and select "Run as administrator." Administrator privileges are crucial for this to work.
- Execute the "netsh wlan show drivers" Command: Type the command and press Enter. This command reveals details about your wireless adapter.
- Look for "Hosted network supported": In the output, look for the line that says "Hosted network supported: Yes." If you see "Yes," you're good to go! If it says "No," unfortunately, your adapter doesn't support this feature.
Assuming you have the necessary hardware, you're ready for the next step: ensuring your internet connection is active. This typically means connecting to a WiFi network or, if you're using a wired connection, ensuring your ethernet cable is plugged in and providing internet access.
Step-by-Step Guide: Configuring Your Windows 8 WiFi Hotspot
Now, let's transform your laptop into a WiFi hotspot. Please follow these steps precisely to ensure a smooth setup.
Open Command Prompt (Administrator): As before, open the Command Prompt as an administrator. This is essential because the configuration commands require elevated privileges.
Set Up the Hosted Network: Use the "netsh wlan set hostednetwork" command. This is the engine of the whole operation. At the prompt, enter the following command, adapting the network name (SSID) and password to your preferences:
netsh wlan set hostednetwork mode=allow ssid="YourWiFiNetworkName" key="YourSecurePassword"- Replace "YourWiFiNetworkName" with the name you want to give your WiFi hotspot. This is the name that will appear when other devices search for available WiFi networks.
- Replace "YourSecurePassword" with a strong password of at least eight characters. It is highly recommended that your password includes a combination of uppercase and lowercase letters, numbers, and special characters to ensure the security of your network. This password protects your network from unauthorized access.
- Example:
netsh wlan set hostednetwork mode=allow ssid="MyLaptopHotspot" key="MyPassword123!" - After entering the command, press Enter. You should see a confirmation message indicating that the hosted network has been successfully configured. Take note of the message, and keep it for reference.
Start the Hosted Network: Use the "netsh wlan start hostednetwork" command. Now that the network is configured, you need to start it. Type and execute the following command:
netsh wlan start hostednetwork- Press Enter. You should receive a confirmation that the hosted network has started successfully. If the network fails to start, double-check your settings, especially the password, and ensure you've run Command Prompt as an administrator.
Share Your Internet Connection: The Heart of the Matter! The hosted network is now active, but it isn't yet sharing your internet connection. This is a critical step.
- Open the Network Connections settings. You can do this by right-clicking the network icon in your system tray (the area in the bottom-right corner of your screen) and selecting "Open Network and Sharing Center," then "Change adapter settings."
- Identify your active internet connection (the one you are currently using to access the internet). It will likely be labeled "Wi-Fi" (if you're connected wirelessly) or "Ethernet" (if you're using a wired connection).
- Right-click the icon for your active internet connection and select "Properties."
- Navigate to the "Sharing" tab.
- Check the box that says "Allow other network users to connect through this computer's internet connection."
- In the "Home networking connection" dropdown menu, select your newly created hosted network adapter. This specific adapter will usually be named "Microsoft Hosted Network Virtual Adapter #2" or a similar name, depending on your system configuration.
- Click "OK" to save the settings.
Troubleshooting Common Issues
Even with the best instructions, things don't always go perfectly. Here are some common problems and their solutions:
- "The hosted network couldn't be started": This may be due to a few reasons. First, double-check that you ran the Command Prompt as an administrator. Second, verify that the correct drivers for your wireless adapter are installed and up to date. Third, make sure that no third-party firewall software is blocking the connection. Fourth, remove any spaces from the network name and password.
- Devices Can Connect, But No Internet: This is usually an issue with connection sharing. Go back and re-examine the network connection properties, making sure you've correctly selected the hosted network adapter in the "Sharing" tab. Ensure your primary internet connection itself is active. Restart your computer.
- Slow Speeds: The hotspot's speed relies on your primary internet connection's speed and the capabilities of the wireless adapter. Distance from your laptop might also impact the speed.
- "The wireless network adapter is not enabled properly": This indicates a problem with your wireless network adapter. Ensure your wireless adapter is enabled in the Device Manager. Search for "Device Manager" in the Windows search bar and then expand "Network adapters" to find your wireless adapter. If there is a yellow triangle next to it, you may need to update or reinstall drivers.
Boosting Your Hotspot Experience: Optimizations and Best Practices
Once your hotspot is up and running, consider these tips to enhance its performance and security.
- Strong Password Protection: Always use a robust password and avoid using weak passwords. A strong password is crucial for protecting your data.
- Choose the Correct Wireless Channel: If you experience interference from other WiFi networks, experiment with different wireless channels in your router's settings. This can reduce congestion and improve transfer speeds.
- Update Wireless Drivers: Make sure your wireless network adapter drivers are up to date. Outdated drivers can sometimes cause connectivity issues, lowered speeds, or instability.
- Keep Your Laptop Secure: Your laptop's security directly impacts the security of your hotspot. Install and maintain reliable antivirus software and use a firewall to protect your system.
- Monitor Connected Devices: Periodically examine the devices connected to your hotspot. If you notice any unfamiliar devices, immediately change your password.
- Disable the Hotspot When Not in Use: For better security, switch off the hosted network when you don't need it. Not only does this conserve battery life, but it also reduces the potential attack surface.
Extending the Reach: Practical Applications
The ability to create a WiFi hotspot on the fly has a variety of real-world applications:
- Sharing Internet on the Go: When you're at a hotel, a conference, or a coffee shop, and you only have one available internet connection, your laptop can share it with multiple devices.
- Bridging the Gap: You can connect a device without built-in WiFi (such as an older game console or a smart TV) to your laptop's wireless connection.
- Network Backup: In times of an outage, this feature can be a useful backup internet option when you have a smartphone with a data plan.
- Testing and Debugging: Developers can use the hosted network to test mobile apps or web applications on real devices.
Windows 8's hidden WiFi hotspot feature is a powerful, convenient utility. With a few simple steps, you can transform your laptop into a mobile WiFi hub, providing internet access to all your devices when you need it most. With a little knowledge and the right setup, you can take your connectivity to a whole new level and enjoy the convenience of staying connected, no matter where you are.
