laptop as a wifi router windows 7

Title: Cara Atasi Wifi Mati, Wifi Tidak Mau Konek Not Connected Wifi Pada Windows 7
Channel: asal ngelik
Cara Atasi Wifi Mati, Wifi Tidak Mau Konek Not Connected Wifi Pada Windows 7 by asal ngelik
Laptop WiFi Hotspot: Windows 7's Secret Router Trick!
Unlocking Silent Wi-Fi Power: Your Windows 7 Laptop, Now a Router!
Remember those days of scrambling for internet access? You probably do. Well, it doesn't have to be a struggle anymore. Instead, your Windows 7 laptop silently held a secret. It could become a Wi-Fi hotspot. Yes, really! Prepare to be amazed.
Turning Your Laptop Into a Wireless Gateway:
Before the age of readily available mobile hotspots, this trick was golden. It was a simple, yet effective solution. It allowed you to share your laptop's internet connection. Think about it. Your laptop, a powerhouse of connectivity. It was waiting to unleash its hidden potential. Consequently, you are about to become a hero.
The Magic: How to Conjure a Hotspot:
The process itself is surprisingly straightforward. So, let's dive in. First, ensure your laptop has an active internet connection. Then, fire up the “Network and Sharing Center.” You can find it in the Control Panel. Next, you'll need to create the "Hosted Network". Thus, open Command Prompt as an administrator. Therefore, type the following command and press Enter: netsh wlan set hostednetwork mode=allow ssid=[your_network_name] key=[your_network_password]. Replace [your_network_name] and [your_network_password] with your desired network name and password. It's crucial to remember these details.
Activating the Wireless Network:
Following the command above, you haven't finished yet. You need to start the hosted network. Hence, in the Command Prompt, type: netsh wlan start hostednetwork. Now, your laptop is ready! It’s broadcasting a Wi-Fi signal.
Sharing the Internet:
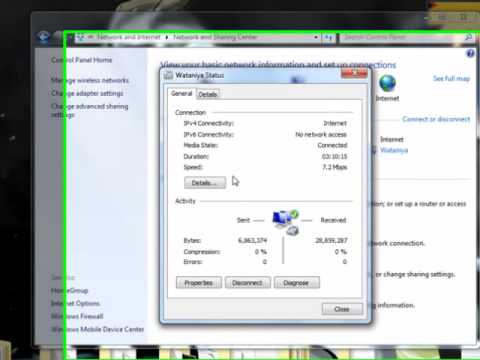
The final, vital step. You now need to share your internet connection. Go back to the "Network and Sharing Center." Click "Change adapter settings." Right-click on your primary internet connection. Select "Properties." Navigate to the "Sharing" tab. Check the box that says, "Allow other network users to connect through this computer's internet connection." Then, in the "Home networking connection" dropdown, choose the "Microsoft Hosted Network Virtual Adapter." Click "OK." Now, everything must work!
Troubleshooting and Fine-Tuning Your Hotspot:
It's possible that things don't go perfectly smoothly. However, let's cover some common issues.
Connection Issues: The primary reason could be an incorrect password. Double-check the password you set in the command prompt.
"Hosted network mode is not supported": It means your wireless adapter might not support the hosted network feature. Update your drivers.
Interference: Other sources, such as microwaves, can disrupt your signal. Move closer to your laptop.
Enhancing Your Wireless Experience:
Beyond the basic setup, you can do more. You may wish to customize and optimize. Consequently, let’s explore some opportunities.
- Security: For many, WPA2 encryption is the standard. Make sure your connection uses a strong password.
- Bandwidth Limitations: Consider limiting the bandwidth usage. This is especially important if you are on a limited data plan.
- Coverage: The range of your laptop's Wi-Fi is limited. Therefore, position your laptop in a central location.
The Enduring Legacy of Windows 7 Hotspots:
The Windows 7 hotspot feature was revolutionary. It was a simple, elegant solution. Many people were able to create their own wireless network. Even though Windows 7 is outdated, the core concepts remain relevant. Also, the techniques can be adapted for newer operating systems. Truly, understanding shows the power.
Beyond Windows 7: Modern Hotspot Solutions:
Technology has advanced. Therefore, Windows 10 and 11 simplify the process. You can create a hotspot directly through the settings menu. However, Windows 7's method paved the way. This shows the evolving landscape of wireless connectivity.
Conclusion: Your Laptop's Hidden Power Unveiled!
There you have it! Your Windows 7 laptop turned into a Wi-Fi hotspot. It's a testament to the power of readily available tools. Furthermore, it highlights the adaptability of technology. So, next time you need Wi-Fi, remember the secret. Your laptop has hidden potential. Now, go forth and connect!
Laptop WiFi Nightmare? 5 Secret Tricks to Blast Your Signal!Laptop WiFi Hotspot: Windows 7's Secret Router Trick!
Hey there, fellow tech enthusiasts! Remember those days when you were tethered to a physical cable just to get online? Well, thankfully, those dark ages are behind us. Today, we’re diving headfirst into a nifty trick that transforms your trusty Windows 7 laptop into a personal WiFi hotspot. Think of it as your own pocket-sized router, allowing you to share your internet connection with other devices, such as your phone, tablet, or even another laptop. It's a lifesaver when you're on the go, stuck in a hotel with dodgy Wi-Fi, or simply want to extend your home network. Let’s get started!
1. Unleashing the Power: Why Windows 7 Still Rocks!
Before we jump into the how-to, let’s celebrate Windows 7. While it might be considered 'old school' nowadays, it's still a reliable operating system for millions. We’re talking about a solid platform, capable of some seriously cool tricks. And creating a Wi-Fi hotspot is definitely one of them. It's a testament to the ingenuity built into its core. Think of it like a vintage car – still able to turn heads and get you where you need to go! The beauty of this comes from its ease of use.
2. The Hidden Gem: Windows 7's Built-in Hotspot Feature
Did you know that Windows 7 actually has a built-in feature for creating a Wi-Fi hotspot? Yep, it's like a secret, well-kept by Microsoft. It's a simple, yet powerful capability that’s often overlooked. Forget about complicated third-party software; you’ve got everything you need right at your fingertips. This feature works by using your laptop's Wi-Fi adapter to broadcast a wireless signal, allowing other devices to connect and share your internet connection. Genius, right?
3. Check Your Arsenal: Prerequisites for Success
Before we begin, let’s make sure you have what you need. This isn't a magic trick; it requires a few basic ingredients.
- A Windows 7 Laptop: Obviously!
- A Working Internet Connection: This is your lifeline. It could be an Ethernet connection, a mobile broadband connection (like a USB dongle), or even another Wi-Fi network you're already connected to.
- A Wireless Network Adapter: This is the heart of the operation. Most laptops come with one already built in.
- Patience: Sometimes it can be a bit finicky.
4. Step-by-Step Guide: Your Windows 7 Hotspot Recipe
Now, let's get cooking! Here's how to transform your Windows 7 laptop into a Wi-Fi hotspot, broken down into easy-to-follow steps:
- Open Command Prompt as Administrator: This is the key. Search for "cmd" in your Start Menu. Right-click on "Command Prompt" and select "Run as administrator." This gives you the necessary permissions to tinker with the network settings.
- The Magic Command: Type the following command into the Command Prompt and hit Enter:
netsh wlan set hostednetwork mode=allow ssid="YourHotspotName" key="YourPassword". Replace"YourHotspotName"with the name you want to give your hotspot (like "MyAwesomeHotspot") and"YourPassword"with a strong password. Think of it as the secret passphrase to your own personal internet sanctuary. - Activate the Network: Type
netsh wlan start hostednetworkand press Enter. This actually starts the hotspot. - Share Your Internet Connection: Go to the "Network and Sharing Center" (search for it in the Start Menu). Click on "Change adapter settings." Identify the connection you are using to connect to the internet (e.g., Ethernet, Wi-Fi, etc.). Right-click on that connection and select "Properties."
- Go to the Sharing tab: Check the box that says "Allow other network users to connect through this computer's Internet connection." Select your hosted network name in selection
Home network connectiondrop-down menu. - Enjoy! Now, on your other devices, search for available Wi-Fi networks. You should see your created hotspot name. Connect to it using the password you created.
5. Troubleshooting Time: When Things Go Wrong
Sometimes, things don’t go perfectly. It is the Law of Internet, isn't it? If your devices can't connect, don’t panic. Here are a few things to check:
- Double-check your password: It’s easy to make a typo!
- Restart your laptop: Sometimes, a simple reboot fixes everything.
- Check your firewall settings: Your firewall might be blocking the hotspot. Temporarily disable it (for testing purposes) and see if that helps. If it does, you will need to configure exceptions.
- Update your Wi-Fi adapter drivers: Outdated drivers can cause issues. Head to the Device Manager (search for it in the Start Menu) and check for updates.
6. Security First: Protecting Your Hotspot
Just like any network, your hotspot needs protection.
- Use a strong password: Don't use something easily guessable, like your birthday or name.
- Consider WPA2 or WPA3 encryption: (if supported) for the strongest security. These encryption protocols will give you peace of mind.
- Keep your Windows 7 system updated: Although it is an older operating system, make sure it has installed the latest updates (if any are available.)
7. The Power of Naming: Choosing Your Hotspot Name
Your hotspot name is more than just a label. It’s your online identity.
- Keep it short and memorable: Easy to type on your phone.
- Avoid personal information: No need to broadcast your email address or full name.
- Get Creative: Have fun with it!
8. Bandwith Boundaries: Managing Your Data Usage
Be mindful of your data usage, particularly if you have a limited data plan.
- Monitor your data: Keep an eye on how much data each connected device is using.
- Limit streaming and downloads: These can eat up data quickly.
- Discuss limits with connected users: Make sure everyone is on the same page regarding data consumption.
9. Going Mobile: Using Your Hotspot on the Go
This trick is a lifesaver when your travelling.
- Consider battery life: Running a hotspot drains your laptop's battery, so keep an eye on the power level.
- Public Wi-Fi alternative: If the Wi-Fi in your hotel is unreliable, you might be better off using your own hotspot.
- Remote work essential: The convenience of creating a hotspot is essential for those working remotely.
10. Network Bridge Magic: Sharing the Internet from Ethernet
What if your laptop is connected to the internet via an Ethernet cable? No problem!
- Follow steps 1-3: The Command Prompt commands still work.
- Share the Ethernet connection: Enable the sharing as described in Step 5 and go to the Sharing tab and select the appropriate connection.
- Connect without a hitch: Your other devices can now enjoy internet from your laptop.
11. Wi-Fi Adapters: Understanding Your Hardware
Understanding your device's built-in hardware is important.
- Built-in or external: Most laptops already have one, but you can use an external USB adapter.
- Check compatibility: Make sure your adapter is compatible with Windows 7.
- Driver updates: Keep those drivers updated for your hardware's best performance.
12. Power Saving Prowess: Optimizing Battery Life
Running a hotspot consumes energy. Here are some tips:
- Dim your screen: Reduce brightness to save battery.
- Close unnecessary applications: Minimize background activity.
- Plug in when possible: Even better, plug in during extended hotspot use.
13. The "Off" Switch: Disabling Your Hotspot
When you’re done, you want to turn it off.
- Stop the hosted network: Use the command
netsh wlan stop hostednetworkin an elevated Command Prompt. - Disable sharing: Go back to the "Network and Sharing Center" and disable the sharing for your internet connection.
14. Advanced Configuration: Tweaking the Settings
For more tech-savvy users, there’s more to configure.
- Change the channel: Reduce interference from other Wi-Fi networks.
- Set a maximum number of clients: Manage how many devices can connect.
- Explore the limitations: Take a dive into the customization.
15. Beyond Windows 7: Alternatives and Future-Proofing
This trick works, but times are changing.
- Software alternatives: There are third-party software solutions for hotspot creation.
- Stay up-to-date: Windows updates can change things, so keep an eye on updates.
- Consider newer operating systems: Windows 10 and 11 have built-in hotspot features too.
In Conclusion: Your Personal Portable Router Unleashed!
So there you have it! We’ve covered
**Gateway NE56R WiFi Driver: Download the Fix NOW!**Tutorial - How to make your laptop as a wireless router.. Windows 7 and Vista
By q8ieng Tutorial - How to make your laptop as a wireless router.. Windows 7 and Vista by q8ieng
Cara Cepat Mengaktifkan Wifi di Windows 7

By HandleCustom Cara Cepat Mengaktifkan Wifi di Windows 7 by HandleCustom
Cara Memperbaiki WiFi Tidak Muncul di Windows 10 - Bagaimana cara mengatasinya

By Howtosolveit Cara Memperbaiki WiFi Tidak Muncul di Windows 10 - Bagaimana cara mengatasinya by Howtosolveit

Title: Cara Membuat Hotspot WiFi dengan Windows 7
Channel: 1stepatatime
Cara Membuat Hotspot WiFi dengan Windows 7 by 1stepatatime
My Laptop Work
Here is the title: The Ultimate Guide to Planning Your Dream European Vacation
The Ultimate Guide to Planning Your Dream European Vacation
Embarking on a European adventure is a rite of passage, a chance to immerse oneself in history, culture, and breathtaking scenery. However, the prospect of planning such a trip can feel overwhelming. We've all seen the perfectly curated Instagram feeds, the effortless travel bloggers, and wondered, "How do they do it?" Fear not. This comprehensive guide is designed to transform your dream European vacation from a faraway fantasy into a tangible, meticulously planned reality. We'll delve into every facet, from preliminary research to the final, exhilarating moments of your journey.
Phase 1: Cultivating the Vision – Initial Research and Destination Selection
The foundation of any successful European escapade lies in thoughtful research and destination selection. Before you even book a flight, invest quality time in envisioning your ideal travel experience.
- Identify Your Interests and Preferences: Begin by reflecting on what truly excites you. Are you drawn to historical landmarks and ancient ruins, or do you prefer the vibrant energy of modern cities? Do you crave the serenity of the countryside or the thrill of outdoor adventures? Pinpointing your preferences will serve as your guiding compass, anchoring your itinerary around activities you'll genuinely enjoy.
- Brainstorm Potential Destinations: Once you've clarified your interests, it's time to brainstorm potential destinations. Consider the classic choices: Paris, Rome, Barcelona. But don't limit yourself. Research less-traveled gems like Prague, Lisbon, or even the Scottish Highlands. Utilize online resources such as travel blogs, tourism websites, and destination guides. Scour stunning photography, videos, and stories to stimulate your imagination and inspire you to embrace the magic of the locales.
- Assess Your Budget and Time Constraints: Realistically evaluate your budget and the amount of time you can dedicate to your trip. This is crucial for narrowing down your options. Some destinations are inherently more expensive than others. A luxury trip to Switzerland, for example, will require a significantly larger financial investment than a backpacking adventure through Eastern Europe. Similarly, your time availability will dictate the scope of your itinerary. A two-week trip allows for a broader exploration than a week-long getaway.
- Research the Best Time to Visit: Consider the season. Peak season (summer) offers long daylight hours and numerous festivals, but also higher prices and crowds. Shoulder seasons (spring and fall) provide a balance of pleasant weather, fewer tourists, and potentially lower costs. Winter offers unique experiences like Christmas markets and skiing, but some attractions may have restricted hours or be closed.
Phase 2: Crafting Your Itinerary – The Art of Strategic Planning
With your destination(s) selected, it's time to craft a detailed itinerary. This is where the magic truly begins, allowing your dreams to materialize.
- Prioritize Your "Must-See" Attractions: Compile a list of the landmarks, museums, historical sites, and activities that are at the top of your priority list. Research opening hours, ticket prices, and availability. Consider booking tickets in advance, especially for popular attractions, to avoid long queues and potential disappointment.
- Create a Realistic Daily Schedule: Once you've identified your must-sees, begin to organize them into a daily schedule. Be realistic about how much you can accomplish in a day. Factor in travel time between locations, potential delays, and the need for meals and breaks. Avoid packing your schedule too tightly, as this can lead to burnout and detract from your enjoyment. Allow for spontaneity and the occasional detour.
- Consider Transportation Options: Research the best transportation options for getting around your chosen destinations. Train travel is an excellent choice for exploring multiple cities within Europe, offering comfort, scenic views, and a relatively affordable price. Within cities, utilize public transportation such as subways, buses, and trams. Consider walking, cycling, or taking taxis/rideshares, depending on your budget and preferences.
- Accommodation Selection: Research and book your accommodations in advance, especially if you're traveling during peak season. Consider a range of options, from budget-friendly hostels to luxurious hotels. Look for accommodations that are centrally located, easily accessible to public transportation, and offer amenities that meet your needs. Read reviews from other travelers to gauge the quality of the accommodation.
Phase 3: Logistics – Handling Flights, Finances, and Documentation
With the itinerary taking shape, address the essential logistical aspects of your trip.
- Booking Flights: Monitor flight prices and book your flights well in advance, particularly if you're traveling during peak season or have a specific budget. Compare prices from different airlines and consider using flight comparison websites. Factor in baggage fees, layover times, and the convenience of the departure and arrival airports.
- Managing Finances: Determine your budget carefully and establish a plan for managing your finances while traveling. Inform your bank and credit card companies of your travel dates to avoid any issues with card usage. Consider using a debit card with low foreign transaction fees for ATM withdrawals. Always carry some local currency for small purchases where credit cards may not be accepted.
- Essential Documentation: Ensure you have a valid passport with at least six months of validity remaining beyond your intended return date. Check visa requirements for your destination(s) and complete the necessary applications well in advance. Make copies of your passport, visa, and other important documents, and store them separately from the originals.
- Travel Insurance: Purchase comprehensive travel insurance that covers medical emergencies, trip cancellations, lost luggage, and other unforeseen circumstances. Read the policy carefully to understand what is covered and what is not.
Phase 4: Packing – The Art of Smart Travel
Efficient packing can significantly impact the quality of your travel experience.
- Packing Essentials: Pack versatile clothing items that can be mixed and matched. Choose neutral colors that can be easily paired with different accessories. Pack comfortable shoes for walking and exploring, and consider bringing a pair of dressier shoes for evenings out. Don't forget essential toiletries, medications, and any necessary adapters for your electronic devices.
- Luggage Strategies: Decide whether to check luggage or travel with a carry-on bag. If you choose to check luggage, pack essential items in your carry-on in case of delays or lost luggage. Consider using packing cubes to organize your belongings efficiently. Keep your luggage weight within the airline's limits to avoid extra fees.
- Consider the Weather: Research the typical weather conditions for your destination(s) during the time of your trip. Pack accordingly, bringing layers of clothing that can be easily added or removed to adjust to changing temperatures. Don't forget to pack rain gear, sunscreen, and insect repellent as needed.
- Tech and Gadgets: Bring a travel adapter if required. Pack a portable charger to keep your phone and other electronic devices powered up on the go. Consider bringing a camera to capture your memories and possibly a pair of noise-canceling headphones for long flights or train journeys.
Phase 5: Pre-Departure Preparations – Tying Up Loose Ends
Before you depart, there are a few final preparations to ensure a smooth journey.
- Notify Your Bank and Credit Card Companies: Let your bank and credit card companies know about your travel dates so they can flag your transactions as legitimate and prevent any issues with card usage. Inform them of the countries you will be visiting and set up travel alerts if necessary.
- Inform Your Phone Carrier: Contact your phone carrier and let them know your travel plans. Arrange for an international calling and data plan to avoid high roaming charges. Ensure that your phone is unlocked if you intend to use a local SIM card.
- Make Copies of Important Documents: Make copies of your passport, visa, and other important documents and store them separately from the originals. Leave copies with a trusted friend or family member at home.
- Finalize Your Itinerary and Review Bookings: Double-check all of your bookings, including flights, accommodations, and tours. Confirm your itinerary and make sure that all of the details are correct. Print out or save digital copies of all of your confirmations.
Phase 6: Navigating Your Journey – Embracing the Adventure
You've researched, planned, and prepared. Now it's time to embrace the adventure and immerse yourself in the European experience.
- Arrival and Orientation: Upon arrival at your destination, take a moment to get oriented and familiarize yourself with your surroundings. Locate the nearest public transportation options, and learn basic phrases in the local language.
- Stay Connected: Purchase a local SIM card or set up an international data plan to stay connected to the internet and communicate with family and friends. Use mapping apps and translation tools to navigate unfamiliar areas.
- Embrace Local Culture: Be open to new experiences and embrace the local culture. Try the local cuisine, visit local markets, and engage with the people. Learn a few basic phrases in the local language to enhance your interactions and show respect for the culture.
- Safety and Security: Be aware of your surroundings and take precautions to protect yourself from theft and other risks. Keep your valuables secure, avoid walking alone in poorly lit areas at night, and be mindful of scams. Report any suspicious activity to the local authorities.
- Be Flexible and Adaptable: Things don't always go according to plan. Be flexible and adaptable, and don't be afraid to deviate from your itinerary if something unexpected arises. Learn to go with the flow and embrace the spontaneity of travel.
Phase 7: Post-Trip Reflection – Cherishing the Memories
The journey doesn't end when you return home. Reflect on your experiences and create lasting memories.
- **
