how to reset wifi on laptop windows 8

Title: How to Connect to WiFi on Windows 8
Channel: HOWTECH
How to Connect to WiFi on Windows 8 by HOWTECH
how to fix wifi connection on laptop windows 8.1, how to fix wifi connection on laptop windows 8, how to change wifi password on laptop windows 8, why is my windows 8 not connecting to wifi, why my laptop is not connecting to wifi windows 8
Windows 8 WiFi Reset: The SHOCKINGLY Easy Fix!
Windows 8 WiFi Woes? A Surprisingly Simple Solution
The internet's a lifeline, isn't it? We rely on it daily for connection. When your Wi-Fi falters, frustration mounts quickly. Suddenly, you're disconnected from the world. Windows 8 users, in particular, have faced their share of Wi-Fi glitches. Nonetheless, a straightforward fix is often within reach.
The Elusive Connection: Diagnosis Time
First, let's address the elephant in the room. Is your Wi-Fi actually the culprit? Before you dive into complicated troubleshooting, verify the obvious. For instance, are other devices connected? If your phone and other gadgets are online, the issue likely lies with your Windows 8 machine. Next, check your router. Restarting it is a basic, yet often effective, solution. This simple step can often resolve minor connectivity hiccups.
Unveiling the Magic: The Reset Strategy
Now, let us delve into the heart of the matter. The "shockingly easy fix" isn't magic. It's a methodical approach designed to refresh your Wi-Fi connection. This method often works when other solutions fail. So, gather your focus, and let's begin.
Step 1: The Network Adapter Tango
First things first: let's access your network adapters. Click the Windows key and the "X" key simultaneously. This action unveils a hidden menu. From there, select "Device Manager." Find your "Network adapters" section in the list. It's usually a few items down. Click the arrow beside this category to expand it. You'll see a list of your network devices. Your Wi-Fi adapter is most likely listed here.
Step 2: Disable, Then Enable: The Dance of Disconnect and Reconnect
Locate your Wi-Fi adapter in Device Manager. Right-click on it. Then, choose "Disable device" from the options. A warning prompt will surely appear. Confirm your decision. This step temporarily shuts down the adapter. Now, give it a few seconds. Then, right-click your Wi-Fi adapter again. Choose "Enable device" this time. This action restarts your Wi-Fi adapter. This simple disable-and-enable process is surprisingly effective.
Step 3: The Renew Command: Giving Your IP Address a Kickstart
If the previous steps haven't solved the mystery, try this. This next action involves using the "Command Prompt." This action can breathe new life into your network connection. Press the Windows key and type "cmd." You'll see "Command Prompt" appear in the search results. Right-click it and select "Run as administrator." In the Command Prompt window, type ipconfig /release then press Enter. This command releases your current IP address. Following this, type ipconfig /renew and again hit Enter. This command requests a new IP address. Give the process some time. This step forces your computer to acquire a fresh IP.
Step 4: Troubleshooting Assistant - Your Digital Sherlock Holmes
Windows 8 has a built-in troubleshooter. It's like having a digital Sherlock Holmes on your side. Click the Windows key and start typing "Troubleshooting." Select the "Troubleshooting" option. In the "Network and Internet" section, click "Internet Connections." Then, follow the prompts. The troubleshooter will attempt to diagnose and fix the problem. Be patient and let it do its work.
Step 5: Consider Reinstalling Drivers: The Grand Finale (If Needed)
If nothing has worked so far, consider reinstalling your network adapter drivers. However, this should be a last resort. Head back to the Device Manager. Right-click your Wi-Fi adapter. Select "Uninstall device." Confirm the uninstall. Then, select "Action" from the top menu. Choose "Scan for hardware changes." Windows should automatically reinstall the drivers. If it doesn't, you may need to download the latest drivers from your computer manufacturer's website.
Beyond the Fix: Maintaining a Healthy Connection
So, you’ve managed to get your Wi-Fi back up and running? Excellent! But let's not stop there. Regularly updating your Windows 8 operating system is key. Similarly, ensure your router's firmware is up to date. Consider a regular restart of your router as well. Moreover, keep your drivers current. All of these actions contribute to a stable Wi-Fi experience. Furthermore, be mindful of interference. Keep electronic devices away from your router. Finally, check your router's placement. Elevate it. The better its position, the stronger the signal.
The Bottom Line: Staying Connected
Dealing with Wi-Fi issues can be annoying. However, fixing them doesn't have to be a nightmare. The steps outlined here, although simple, can often resolve the majority of connectivity problems. Therefore, don’t hesitate. Try these simple fixes the next time your Windows 8 Wi-Fi lets you down. Because we rely on seamless connectivity for work and play. In conclusion, remember that a little troubleshooting can go a long way. Now, go forth and conquer those Wi-Fi woes!
Laptop 5GHz WiFi Upgrade: Blazing-Fast Speeds, Goodbye Lag!Windows 8 WiFi Reset: The SHOCKINGLY Easy Fix!
Ever stared at your Windows 8 laptop, a flickering deathly silence where your Wi-Fi signal should be? We’ve all been there. The frustration mounts, the deadlines loom, and the endless scrolling of help forums begins. But what if the solution wasn't buried in complex tech jargon or hidden behind a maze of cryptic settings? What if, in fact, the fix was surprisingly simple? That's what we're diving into today. Buckle up, buttercups, because we're about to demystify that pesky Windows 8 Wi-Fi problem and get you back online faster than you can say "Netflix and chill."
1. The Wi-Fi Woes of Windows 8: A Shared Experience
Let's be honest, Windows 8 had its… quirks. Remember the tile interface? The sudden disappearance of the start button? Love it or hate it, many of us wrestled with Wi-Fi glitches on this operating system. Whether it was intermittent drops, slow speeds, or no connection at all, these issues were as common as finding a lost sock in the dryer. I vividly recall a time when I was struggling to send an important email, and my Wi-Fi decided to take a vacation just as I was about to hit "send." Pure, unadulterated panic! But hey, we learn from our battles, right?
2. Before We Begin: Troubleshooting Basics (The "Is It Plugged In?" Checklist)
Before we launch into the heroics, let's cover the basics. Think of this as your pre-flight checklist. Are you sure your router is on? Is your internet service provider (ISP) having issues? Have you tried restarting your router and your laptop? Sometimes, these simple steps are all it takes. It's like forgetting your keys are in your pocket – the solution is staring you right in the face! If you've tackled these preliminary checks and still have issues, then let's proceed.
3. The Unsung Hero: The Network Troubleshooter
Windows 8, like its successors, packs a surprisingly useful tool: the Network Troubleshooter. This little gem is often overlooked, but it's your first line of defense. Imagine it as a digital detective, sifting through the clues to identify the problem.
- How to Find It: Right-click on the Wi-Fi icon in the system tray (bottom-right corner of your screen). Select "Troubleshoot problems."
- What It Does: The troubleshooter will scan your network connection, diagnose any issues, and often offer a solution – sometimes even automatically fixing the problem! It's like having a tech expert on call, ready to jump into action.
4. Driver Drama: Keeping Your Network Adapter Up-to-Date
Outdated or corrupted network adapter drivers are another common culprit. Think of drivers as the translators that allow your computer to communicate with your hardware. If the translation is off, well, you get a frustrating disconnect.
- Updating Your Drivers:
- Press the Windows key + X, then select "Device Manager."
- Expand "Network adapters."
- Right-click on your Wi-Fi adapter (e.g., "Wireless Network Adapter").
- Select "Update driver." Choose "Search automatically for updated driver software."
- If an update is found, follow the on-screen instructions.
- Restart your computer.
5. The Nuclear Option (But Actually, Pretty Mild): Resetting Your Network Settings
If the troubleshooter and driver updates haven't done the trick, it's time to consider resetting your network settings. This resets your network configurations to their defaults, often resolving persistent issues. It's like hitting the reset button on a complicated board game; it clears the tangled pieces and starts fresh.
- How to Reset Network Settings (Windows 8):
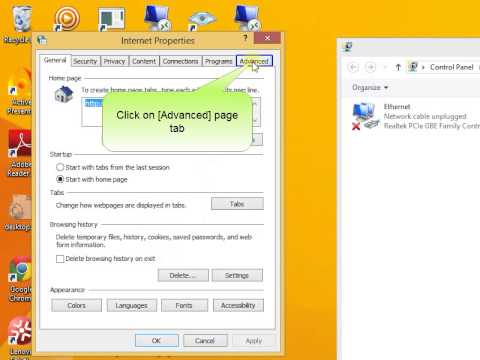
- Search for "Network Connections" in the Windows search bar.
- Right-click your Wi-Fi connection.
- Select “Disable”.
- Then Right-click again and select "Enable"
- Restart your computer.
- Important Note: Resetting your network settings might require you to re-enter your Wi-Fi password. Make sure you have it handy!
6. The Power of the Command Prompt: A Slightly More Advanced Tactic
For the more tech-savvy among us, the Command Prompt offers some powerful tools. Think of it as the secret laboratory where you can fine-tune your network settings.
- Using the Command Prompt:
- Search for "cmd" in the Windows search bar. Right-click on "Command Prompt" and select "Run as administrator."
- Type the following commands, pressing Enter after each:
netsh winsock resetnetsh int ip resetipconfig /releaseipconfig /renewipconfig /flushdns
- Restart your computer.
7. Firewall Follies: Is Your Firewall Blocking You?
Sometimes, your firewall might mistakenly block your Wi-Fi connection. This is like having a security guard who's a little too enthusiastic about their job.
- Checking Your Firewall Settings:
- Open the Control Panel (search for "Control Panel").
- Select "System and Security," then "Windows Firewall."
- Click "Allow an app or feature through Windows Firewall."
- Ensure your Wi-Fi adapter is allowed. If not, click "Change settings" and add it.
8. Airplane Mode: The Accidental Culprit
Let's not forget the simplest of solutions: Airplane mode. It’s surprisingly easy to accidentally engage this setting, suddenly cutting off any internet access. It is like suddenly forgetting you put on a pair of sunglasses on after having them for ages, when you don't need them.
- Check Your Tray: This is usually the easiest way to spot airplane mode. Do you see an airplane icon? If so, simply turn it off!
9. Checking Your Physical Connections: The Often-Overlooked Link
Sometimes, the solution is as simple as ensuring all your cables are securely plugged in. It's like checking your shoelaces before a race; a small detail with big consequences.
- Examine the Physical: Check the physical connection to your router from your laptop. Is the cable plugged in? Is the router on?
10. The Router's Role: Rebooting for a Fresh Start
Your router is a key player in your internet connection. Like any piece of technology, it can experience glitches.
- Rebooting Your Router: Unplug your router from the power outlet, wait for 30 seconds, and plug it back in. It's like giving your router a quick reset, helping it process what is going on.
11. Signal Strength: Are You Within Range?
Wi-Fi signals have limits. If you're too far from your router, you may not have a good signal.
- Check Your Signal: This is a straightforward one. Move close to the router and see if the signal improves.
12. Malware Mayhem: The Silent Saboteur
Malware can also hinder your internet connection. It's like a sneaky guest, causing problems behind everyone's backs.
- Running Scans: Conduct a virus scan using your security software to deal with potential attackers.
13. Contacting Your Internet Service Provider (ISP): When All Else Fails
If you've exhausted all other options, it's time to contact your ISP. They can check for outages or problems.
- Reach Out: Explain the steps you've taken so far. They might be able to provide assistance or identify a network issue.
14. Prevention is Key: Maintaining Your Network Health
Once you've fixed your Wi-Fi, consider taking some steps to prevent future issues. This step is similar to a medical follow-up.
- Security and Maintenance: Keep your drivers updated, scan for malware or viruses, and change your Wi-Fi password, periodically.
15. The Shockingly Easy Fix: A Recap
We've covered a lot of ground! The key takeaways? Often, the solution to a Windows 8 Wi-Fi problem is refreshingly straightforward. From the Network Troubleshooter to a simple router reboot, many fixes don't involve complex tech knowledge. Focus on the basics first, and work your way down.
Conclusion: Back to Browsing!
So, there you have it. We've navigated the choppy waters of Windows 8 Wi-Fi issues and hopefully, equipped you with the knowledge to conquer those annoying connection problems. Remember, don't panic. Take a deep breath, work methodically through the steps, and chances are, you'll be back online in no time. Now go forth and browse the web, download those files, and enjoy the digital world, Wi-Fi-free! Remember, it won't be as hard as you think.
FAQs: Your Burning Questions Answered
1. My Wi-Fi suddenly stopped working after a Windows 8 update. What gives?
Software updates can sometimes introduce issues
HP Printer WiFi Nightmare? Solved in 60 Seconds!how to reset Internet setting in Windows 8 and windows 8.1
By SuperSimple Howto Tutorial in Technology how to reset Internet setting in Windows 8 and windows 8.1 by SuperSimple Howto Tutorial in Technology
how to fix limited wifi connection on windows 8-how to fix limited wifi connection on windows 8.1

By Theta Box how to fix limited wifi connection on windows 8-how to fix limited wifi connection on windows 8.1 by Theta Box
Cara mengatasi Wifi adapter hilang windows 7,8,10

By Ani Saja Cara mengatasi Wifi adapter hilang windows 7,8,10 by Ani Saja

Title: Windows 8 - How to turn on WiFi
Channel: HowTo
Windows 8 - How to turn on WiFi by HowTo
My Laptop Work
How to Cultivate a Thriving Herb Garden: A Comprehensive Guide for Beginners and Experienced Gardeners
We all yearn for the vibrant flavors and aromas of fresh herbs, readily available to enhance our culinary creations and elevate our home environments. Cultivating your own herb garden is not merely a gardening endeavor; it's an immersion into the essence of nature, a sustainable practice that connects us to the earth and rewards us with an abundance of natural goodness. Whether you possess a sprawling backyard, a sunny balcony, or even a well-lit windowsill, developing a flourishing herb garden is within your reach. This detailed guide will lead you through every stage of the process, ensuring your herbs thrive and provide you with a bountiful harvest.
Planning Your Herb Garden: Location, Location, Location
The foundation of any successful herb garden lies in meticulous planning. The selection of the right location is paramount. Most herbs flourish under optimal sunlight exposure, usually requiring a minimum of six to eight hours of direct sunlight daily. Consider the orientation of your space and observe how sunlight patterns shift throughout the day and across the seasons. South-facing locations generally receive the most sunlight, making them ideal for sun-loving herbs such as rosemary, thyme, and oregano. East-facing locations receive morning sun, perfect for herbs that prefer less intense heat, like parsley and chives.
Assess the soil conditions. Herbs prosper in well-drained soil, which prevents root rot and encourages healthy growth. Before planting, conduct a soil test to determine its composition and pH level. A slightly acidic to neutral pH, typically ranging from 6.0 to 7.0, is generally suitable for most herbs. Amend your soil accordingly by incorporating organic matter such as compost or well-rotted manure. These additions not only improve drainage but also enrich the soil with essential nutrients that promote robust plant growth.
Consider your available space. Herb gardens can be adaptable, ranging from a small container on a windowsill to a dedicated raised bed in your yard. Plan your garden layout, taking into account the mature size of each herb variety. Taller herbs, such as dill and fennel, should be placed in the back, while smaller, spreading herbs like thyme and oregano can be positioned in the front where they receive ample sunlight. Planting in containers is an excellent option for those with limited space or poor soil conditions, allowing you to control the environment and move your herbs as needed.
Selecting the Right Herbs: A Culinary and Aromatic Journey
Choosing the right herbs involves aligning your preferences with your growing conditions. Begin by determining which herbs you frequently use in your cooking. Consider the flavors and uses you want to emphasize in your garden. Are you a fan of Italian cooking, requiring basil, oregano, and rosemary? Perhaps you enjoy the freshness of Thai cuisine and want to grow Thai basil, cilantro, and mint.
Popular choices for beginner herb gardeners include basil, which thrives in warm weather and requires ample sunlight and regular watering. Mint, while easy to grow, is best planted in containers to prevent it from spreading aggressively. Parsley, both flat-leaf and curly, is a versatile herb that thrives in partial shade. Chives, with their delicate onion flavor, are incredibly easy to grow and add a subtle touch to various dishes.
For more experienced gardeners, consider growing herbs such as rosemary, which thrives in sunny, well-drained conditions and benefits from occasional pruning. Thyme, with its delicate flavor and ability to tolerate drought, is an excellent addition. Sage, known for its distinctive flavor, requires well-drained soil and full sun exposure. Lavender, with its fragrant blooms and calming aroma, adds beauty and aromatherapy benefits to your garden, thriving in well-drained soil and full sun.
Starting Your Herbs: Seeds, Seedlings, or Propagation
You have several options for starting your herb garden: seeds, seedlings, or propagation. Each method has its advantages and disadvantages. Starting from seeds is the most affordable option and allows you to choose from a wide variety of herbs. However, seed germination can be unpredictable and requires patience, the correct environment, and careful attention to watering and lighting.
Seedlings, or starter plants, offer a faster track to harvest. You can purchase seedlings from your local nursery or garden center. They are already well-established and require less initial care than seeds. When purchasing seedlings, carefully inspect them for signs of disease or pests. Choose plants with healthy green foliage and strong root systems.
Propagation, the process of creating new plants from existing ones, is an excellent way to expand your herb garden at little cost. Many herbs, such as mint, rosemary, and basil, can be easily propagated from cuttings. Take a cutting from a healthy plant, remove the lower leaves, and place the stem in a glass of water. After a few weeks, roots should develop, and you can then transplant the rooted cutting into soil.
Planting and Caring for Your Herb Garden: Nurturing Growth
Planting your herbs at the appropriate time is crucial for success. In general, planting outdoors should occur after the last expected frost. Consider the specific needs of each herb. Basil, for instance, thrives in warm weather and should be planted after the soil has warmed up. Rosemary and thyme prefer drier conditions and should be planted in well-drained soil.
When planting, space your herbs according to their mature size. Overcrowding can lead to poor air circulation, increasing the risk of disease. Dig a hole slightly larger than the root ball of your seedling or plant. Gently loosen the roots if they are root-bound. Place the plant in the hole, ensuring the top of the root ball is level with the soil surface. Backfill the hole, gently firming the soil around the plant. Water thoroughly after planting to settle the soil and encourage root development.
Watering is essential for healthy herb growth. The frequency of watering will depend on the type of herb, the weather conditions, and the soil drainage. In general, water your herbs deeply and regularly, allowing the soil to dry out slightly between waterings. Avoid overwatering, which can lead to root rot. Observe your plants and adjust your watering schedule accordingly.
Fertilizing your herbs is generally not necessary, especially if you have amended your soil with organic matter. However, if your plants appear to be struggling or showing signs of nutrient deficiency, you can apply a balanced, slow-release fertilizer. Avoid over-fertilizing, as this can lead to excessive foliage growth at the expense of flavor.
Pest and Disease Management: Protecting Your Precious Herbs
Like all plants, herbs are susceptible to pests and diseases. Regular monitoring is crucial for early detection and effective management. Common pests include aphids, spider mites, and whiteflies. Inspect your plants regularly, paying attention to the undersides of leaves, where pests often hide.
Organic pest control methods are the most environmentally friendly and sustainable approach. Encourage beneficial insects, such as ladybugs and lacewings, which prey on pests. Spray affected plants with insecticidal soap or neem oil. Avoid using chemical pesticides, as they can harm beneficial insects and may contaminate your herbs.
Common diseases include powdery mildew, a fungal disease that appears as a white, powdery coating on leaves. Improve air circulation by spacing your plants adequately and pruning any overcrowded foliage. Treat affected plants with a solution of baking soda and water. Other diseases may include fungal leaf spots, root rot, and blight. Remove infected plants promptly and consider crop rotation to prevent the spread of disease.
Harvesting and Preserving Your Herbs: Savoring the Bounty
Harvesting your herbs at the right time encourages continued growth and ensures optimal flavor. The best time to harvest is in the morning when the essential oils are most concentrated. Use sharp scissors or a pruning knife to snip stems rather than pulling leaves, which can damage the plant.
Harvesting herbs for fresh use as needed will be the most common practice. For herbs such as basil and mint, pinch off the top leaves or stems regularly to promote bushier growth. For woody herbs such as rosemary and thyme prune a few stems at once.
Preserving your herbs allows you to enjoy their flavors throughout the year. There are several methods for preserving herbs, including drying, freezing, and making herb-infused oils or vinegars. Drying is a simple and effective method for preserving many herbs. Hang bundles of herbs upside down in a well-ventilated area away from direct sunlight. Alternatively, use a food dehydrator. Once the herbs are dried, store them in airtight containers. Freezing is an excellent way to preserve herbs such as basil and cilantro. Chop the herbs and freeze them in ice cube trays with water or oil.
Making herb-infused oils and vinegars adds a touch of elegance to your culinary creations. Infuse olive oil or vinegar with your favorite herbs. The flavor combinations are endless. Store the infused oils and vinegars in a cool, dark place.
Extending Your Herb Garden's Lifespan: Season-by-Season Care
The care of your herb garden is ongoing. Adapt your approach to the seasonal changes. As summer wanes, consider bringing tender herbs indoors or protecting them from frost. Winter care involves adjusting your watering habits and ensuring adequate light and air circulation.
Regular maintenance, such as weeding, mulching, and pruning, is critical for healthy herb growth year-round. Mulching with organic materials like straw or shredded leaves helps to retain moisture, suppress weeds, and regulate soil temperature. Pruning encourages bushier growth and prevents your herbs from becoming leggy.
By following these guidelines, you can cultivate a thriving herb garden that will provide you with a continuous supply of fresh, flavorful herbs. Embrace the joy of growing your own food, and enjoy the journey of connecting with nature, one delicious herb at a time. You will cultivate a beautiful space, a place to connect with nature, and a source of culinary delight that will bring joy and flavor to your life.
