how to configure my laptop as wifi hotspot

Title: How to use Your Laptop as WiFi Hotspot
Channel: Ricardo Gardener
How to use Your Laptop as WiFi Hotspot by Ricardo Gardener
Laptop Hotspot: The ULTIMATE Guide to Free WiFi Anywhere!
Unlocking the Digital Universe: Your Laptop as a WiFi Hotspot Champion
Picture this: You’re stranded. No WiFi signal. You’re desperate for a connection. Your laptop, however, holds the key. Forget expensive data plans. Learn to transform your trusty device into a mobile hotspot. It's easier than you think!
The Genesis of Your Personal WiFi Oasis
So, what does setting up a laptop hotspot truly entail? It's essentially sharing your internet. Your laptop acts as a router. It broadcasts a WiFi signal for other devices to connect. This is especially handy when you're on the move. You can create a personal network. You can then share your internet.
Taming the Beast: Hardware & Software Harmony
First, ensure your laptop has the right ingredients. You must have a working wireless network adapter. This is standard on most laptops. You'll also need a stable internet connection. This could be through a wired Ethernet cable. Or, a mobile broadband USB dongle. Essentially, you need a source of internet.
Now, let's dive into the software side. Windows and macOS offer built-in hotspot features. These are relatively straightforward to use. Therefore, you don’t need to download extra apps. Alternatively, several third-party applications provide additional features. These can include security enhancements. Consider all options when making your decision.
Windows Whispers: The Hotspot Revelation
Windows makes it simple. Open "Settings". Then, navigate to "Network & Internet". Select "Mobile Hotspot." Toggle it "On." You can then customize your network name. Also, set a strong password. Choose the internet connection to share. You are then ready to go! It really is that simple, generally speaking.
macOS Magic: Unleashing the WiFi Genie
For Mac users, the process is equally elegant. Open "System Preferences". Click on "Sharing." Select "Internet Sharing." Choose your internet connection. From the "Share your connection from" dropdown. Select "WiFi." Configure your network name. Subsequently, set a password. Start your WiFi. This is the beginning of your adventure.
Beyond the Basics: Fine-Tuning Your Fortress
Don’t just stop at the default settings. Take time to secure your hotspot. Use a strong, unique password. Therefore, it prevents unauthorized access. Monitor connected devices. You should, therefore, be aware of who is using your bandwidth. Consider setting data limits. This can prevent exceeding your data allowance. Furthermore, it can also conserve battery life.
Troubleshooting Troubles: When the Signal Stalls
Occasionally, things might not go as seamlessly. If your hotspot isn't working, first, check these things. Ensure your internet connection is active. Restart your laptop. Verify that the hotspot feature is enabled. Also, check your firewall settings. Sometimes, firewalls block hotspot functionality. Updating your network drivers can occasionally resolve issues. Additionally, disable any conflicting software. These quick fixes can make a difference.
The Power of Portability: Use Cases Unleashed
The utility of a laptop hotspot is immense. Imagine working remotely from a park. Connect your tablet to stream movies on a train. It's perfect for sharing internet with family. It can also be used in a hotel room with limited WiFi. You are no longer confined by location.
Avoiding the Pitfalls: Data & Security Considerations
Be mindful of data usage. Streaming videos consumes a lot of data. Monitor your data consumption carefully. Always use a password-protected network. Furthermore, keep your laptop's software updated. This ensures robust security. Be smart about the web you use. Avoid sharing sensitive information on public networks.
Embrace the Freedom: Your WiFi Odyssey Begins
Your laptop offers a gateway to connectivity. Mastering its hotspot capabilities brings freedom. You can connect anywhere. With a few simple steps, you can make your laptop a powerful WiFi source. So, unlock the digital universe. Enjoy the limitless possibilities. Happy browsing!
HP Wifi On: The Secret Shortcut You NEED!Laptop Hotspot: The ULTIMATE Guide to Free WiFi Anywhere!
Hey there, fellow digital nomads, remote workers, and anyone who's ever felt the sting of a slow or non-existent internet connection! We've all been there. You're trying to catch up on emails at your favorite coffee shop, stream a movie on a long train ride, or simply get some work done in the park, and bam – no WiFi. Frustrating, right? But fear not! We're about to dive deep into the magical world of laptop hotspots, your personal key to unlocking the internet kingdom, no matter where you are. Consider this your ultimate survival guide for staying connected, even in the most WiFi-challenged zones. This is the laptop hotspot guide.
1. Decoding the Laptop Hotspot: Your Personal WiFi Portal
So, what exactly is a laptop hotspot? Imagine your laptop as a magical portal, transforming its internet connection into a wireless network that other devices can tap into. Think of it like a mobile router, but instead of relying on a separate piece of hardware, it's all powered by your trusty laptop. This connection can come from various sources: your phone's mobile data, a wired Ethernet connection, or (and this is where the magic happens) sometimes, even free public WiFi (more on that later!). It's like having your own personal WiFi cloud following you around.
2. Why Bother? Unveiling the Benefits of a Laptop Hotspot
Why should you even bother with this? Well, the benefits are numerous! Here's a quick breakdown to show you why setting up a laptop hotspot can be a total game-changer:
- Connectivity on Demand: No more frantic searching for WiFi passwords or pleading with baristas for the secret code. Your connection is always available.
- Share the Love: Sharing your connection with friends, family, or colleagues. Need to let someone borrow your internet? Boom: Hotspot activated!
- Enhanced Security: Using your own hotspot can be safer than connecting to public WiFi, which can be vulnerable to hacking. You control the security settings.
- Work from Anywhere: Turning a park bench into your office? Possible. Need to send that urgent email from a hiking trail? Done!
- Cost Savings: When you leverage free WiFi, you can avoid excessive data charges, especially when traveling.
3. Gearing Up: Essential Tools for Hotspot Success
Before we get into the nitty-gritty, let's make sure you have the right tools:
- A Laptop (duh!): Any modern laptop with WiFi capabilities will do.
- An Internet Connection: This is the fuel for your hotspot. This could be through mobile data (via your phone or a dedicated mobile hotspot device), an Ethernet connection, or a public WiFi network.
- A Mobile Device (Optional, but helpful): Your smartphone or tablet will be the primary beneficiary of your hotspot, but it could also be a laptop or any device that needs WiFi.
- Patience (and Maybe a Coffee): Sometimes, setting up a hotspot can take a few minutes of tweaking. Don't get discouraged if it doesn't work perfectly on the first try!
4. Turning Your Laptop into a Hotspot: The Windows Way
Let’s get this show on the road! On Windows, the process is relatively simple:
- Go to Settings: Click the Start menu (that little Windows logo), then click the gear icon to open Settings.
- Network & Internet: Select this option.
- Mobile Hotspot: Click on "Mobile Hotspot".
- Turn It On: Toggle the "Share my internet connection with other devices" switch to "On".
- Select Your Connection: Choose the internet connection you want to share (e.g., your Ethernet connection, or WiFi if connected to another network.)
- Edit the Hotspot Settings: Click "Edit" to change the network name (SSID) and password to something secure and easy to remember.
- Connect Your Devices: On your phone, tablet, or another laptop, find your hotspot's name in the list of available WiFi networks and enter the password.
Voila! You're now broadcasting your internet connection.
5. Mac Magic: Creating a Hotspot on Your Apple Device
Apple makes the hotspot process equally straightforward:
- Go to System Preferences: Click the Apple menu (top left corner of your screen) and select "System Preferences".
- Sharing: Click on the “Sharing” icon.
- Internet Sharing: In the list on the left, select “Internet Sharing”.
- Share Your Connection From: Choose the internet connection you want to share.
- To Computers Using: Check “Wi-Fi”.
- Wi-Fi Options: Click “Wi-Fi Options” to set a network name and password.
- Start Sharing: Check the box next to "Internet Sharing" to enable the hotspot.
Now, search for the network name on your other devices and enter the password to connect. Easy peasy!
6. Mobile Data Mastery: Using Your Phone to Power Your Laptop Hotspot
This is where things get really interesting. You can use your phone as the primary source of internet for your laptop hotspot. This works best if you have a data plan with a generous allowance, or if you are connected to a source of free wifi. Here's a general guide:
- Enable Mobile Hotspot on Your Phone:
- Android: Go to Settings > Network & internet > Hotspot & tethering > Wi-Fi hotspot.
- iPhone: Go to Settings > Personal Hotspot.
- Connect Your Laptop: On your laptop, find your phone's hotspot name in your WiFi settings and enter the password.
Remember, using mobile data can drain your phone's battery and potentially deplete your data allowance, so keep an eye on your usage! Do you have a data plan with a generous data allowance or unlimited data?
7. Tapping Into Public WiFi (Safely!)
Free WiFi is alluring, but it can be like a siren song. Public WiFi networks are often less secure. Here’s how to navigate them safely:
- Use a VPN: A Virtual Private Network (VPN) encrypts your internet traffic, protecting your data from prying eyes. It is like an impenetrable shield for your internet activity
- Verify the Network: Be sure you are connecting to the official WiFi network of the establishment. Cybercriminals can create fake networks with similar names.
- Avoid Sensitive Transactions: Don’t do online banking, shopping, or enter personal information on public WiFi.
- Enable Two-Factor Authentication: Protect your accounts with two-factor authentication.
- Keep Your Software Updated: Ensure your laptop and phone have the latest security updates.
By following these steps, you can minimize the risks and enjoy free WiFi.
8. Troubleshooting: When Things Go Wrong
Let’s be honest, technology isn't always perfect. Here's a quick guide to common issues:
- "No Internet Access": Often, the simplest solution works: turn off both your hotspot and the device trying to connect, wait a minute, and then turn them back on. Also, check if your internet connection on your laptop is working properly.
- Slow Speeds: Mobile data speeds can vary. WiFi speeds depend on several factors like the distance to the router, the number of users, and network congestion. Try moving closer to your hotspot source or switching to a less congested network.
- Devices Won’t Connect: Double-check that you’ve entered the correct password. Make sure that the hotspot is on and broadcasting correctly.
9. Maximizing Your Mobile Hotspot Experience: Pro Tips
Let's boost your hotspot game:
- Extend Battery Life: Close unused apps and dim your screen brightness to conserve power.
- Manage Data Usage: Track your data consumption, especially if you’re using mobile data.
- Choose Your Location: Avoid areas with poor cell service or congested WiFi networks.
- Consider a Mobile Hotspot Device: If you frequently need a hotspot, a dedicated mobile hotspot device can offer better speed and battery life than using your phone's hotspot.
10. The Ethernet Advantage: Wired Connections to Wireless Freedom
Even though this is all about wireless connectivity, it's worth mentioning that you can also turn a wired Ethernet connection into a wireless hotspot. This is particularly useful in hotels or places where the only internet access is via Ethernet. Simply plug the Ethernet cable into your laptop, then configure your laptop's hotspot as described above.
11. Data Saver Mode: Controlling Consumption
Many devices offer data saver or data monitoring options. Take advantage of these to limit what your devices consume in the background. It’s like having a budget for your internet usage, so the data doesn’t get spent too quickly.
12. Securing Your Hotspot: Fort Knox for Your Data
Strong passwords and encryption are your shield. Choose a password that is unique, complex, and difficult to guess. WPA2 or WPA3 encryption is recommended for the highest level of security. It's a bit like the lock on your front door – you want it to be robust!
13. The Art of Finding
Asus 7739 WiFi Card: The SHOCKING Upgrade That Blew My Mind!We Can't setup Mobile Hotspot Windows 10 SOLVED

By Nam Anh Cap We Can't setup Mobile Hotspot Windows 10 SOLVED by Nam Anh Cap
Use Your Computer As WiFi Router Without Any Software

By A2MTech Use Your Computer As WiFi Router Without Any Software by A2MTech
Fix We Can't Setup Mobile Hotspot Because Your PC Doesn't Have an Ethernet WiFi - Mobile Mobile Data
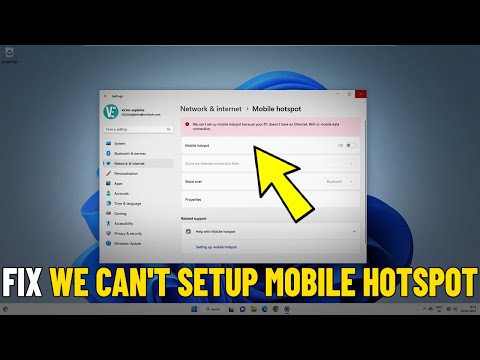
By Victor Explains Fix We Can't Setup Mobile Hotspot Because Your PC Doesn't Have an Ethernet WiFi - Mobile Mobile Data by Victor Explains

Title: How to Create Wifi Hotspot in Windows 10 Tutorial
Channel: MDTechVideos
How to Create Wifi Hotspot in Windows 10 Tutorial by MDTechVideos
Working With Laptop
I am ready. Let's begin.
Title: Mastering the Art of Gourmet Coffee Brewing at Home: A Comprehensive Guide
We, the discerning admirers of the perfect cup, understand that the journey from bean to brew is an art form. It necessitates a delicate balance of science and intuition, passion and precision. This guide serves as your comprehensive companion, equipping you with the knowledge and techniques to elevate your home coffee experience from satisfactory to sublime. We'll navigate the intricacies of bean selection, grinding, water temperature, and brewing methods, ensuring you unlock the full potential of every single bean. Prepare to transform your kitchen into a haven of aromatic delight, a sanctuary where the daily ritual of coffee becomes an extraordinary experience.
The Foundation: Selecting Your Beans and Understanding Their Origins
The genesis of exceptional coffee rests upon the shoulders of exceptional beans. Consider the diverse world of coffee varieties, each possessing a unique character and flavor profile shaped by its terroir, the environment in which it is cultivated. Begin your journey by exploring single-origin coffees. These beans, sourced from a specific region or farm, allow you to appreciate the nuanced flavors imparted by the local climate, soil composition, and processing methods. Ethiopian Yirgacheffe, known for its bright acidity and floral notes, stands in stark contrast to the rich, chocolatey depths of Sumatran Mandheling. Brazilian Santos often provides a balanced foundation for blends, while Kenyan AA offers a vibrant, complex acidity that can dance on the palate.
As you delve deeper, consider the processing methods. Washed coffees, meticulously cleaned of their fruit pulp, often exhibit a cleaner, crisper flavor profile. Natural (or dry-processed) coffees, sun-dried with the fruit intact, tend to boast bolder, fruitier notes. Honey-processed coffees offer a middle ground, with a sweet, syrupy complexity. Each method contributes a distinct dimension to the final cup.
Beyond origin and processing, pay attention to the roast level. Light roasts, typically chosen for their vibrant acidity and delicate floral aromas, showcase the bean's inherent characteristics. Medium roasts offer a balanced profile, often highlighting a blend of acidity, sweetness, and body. Dark roasts, with their robust, often smoky notes, cater to those who crave a bold, intense coffee experience. Experiment with different roasts to discover your personal preferences.
Grinding for Glory: The Importance of Precise Particle Size
The grind is the unsung hero of coffee brewing. It determines the rate at which water extracts the flavors from the coffee grounds. The ideal grind size varies depending on your chosen brewing method. For the French press, a coarse grind is essential to prevent excessive sediment in the cup. Pour-over methods, like the Hario V60, demand a medium-fine grind to allow for optimal extraction. Espresso, with its rapid brewing time, requires a very fine grind to achieve the desired pressure and crema.
Investing in a burr grinder is paramount. Burr grinders, in contrast to blade grinders, crush the beans between two abrasive surfaces, resulting in a consistent particle size. This uniformity is crucial for even extraction, which is the key to unlocking the full potential of your coffee. Blade grinders, on the other hand, chop the beans inconsistently, leading to under-extraction and over-extraction, and ultimately, a less-than-stellar cup. The choice between a manual or electric burr grinder depends on your budget and brewing frequency. Manual grinders offer a satisfying, hands-on experience, while electric grinders provide convenience and speed.
The Water Factor: Temperature and Quality are Key
Water, often overlooked, plays a pivotal role in coffee brewing. The temperature of the water directly influences the extraction process. Water that is too cold will result in under-extracted coffee, lacking in flavor and acidity. Water that is too hot will lead to over-extraction, resulting in a bitter and astringent cup. The ideal water temperature for brewing coffee typically ranges between 195°F and 205°F (90°C and 96°C).
A gooseneck kettle is an invaluable tool for precise pouring, allowing for controlled and even saturation of the coffee grounds. Using a thermometer is essential to ensure that the water reaches and maintains the optimal temperature.
The quality of your water is equally important. Use filtered water to remove impurities and minerals that can detract from the coffee's flavor. Hard water can interfere with the extraction process, resulting in a flat and lackluster cup. Experiment with different water sources to discover which produces the best results with your specific coffee beans.
Brewing Methods: Exploring the Landscape of Coffee Preparation
The world of coffee brewing offers a diverse array of methods, each with its unique characteristics and advantages. We'll explore a few key techniques:
Pour-Over (e.g., Hario V60, Chemex): This method prioritizes precision and control, allowing for exquisite flavor definition. The process involves slowly pouring hot water over coffee grounds held in a filter, often paper or metal. The technique allows for a delicate extraction, producing a clean and flavorful cup. Experiment with different pour rates and techniques to adapt to the coffee bean and create the best possible flavor for your specific needs.
French Press: A method that celebrates simplicity and immersion. Coarsely ground coffee is steeped in hot water, and then the grounds are separated from the brewed coffee using a mesh filter. This method yields a full-bodied cup with a rich mouthfeel, but can also result in some sediment at the bottom of the cup.
AeroPress: A versatile, portable, and fast brewing method. The AeroPress uses a manual, plunger-style mechanism to generate pressure, producing a concentrated coffee that can be enjoyed as is or diluted with hot water. It's known for its versatility, allowing for a variety of brew strengths and flavor profiles.
Espresso: The pinnacle of coffee extraction. This method involves forcing hot water under high pressure through finely ground coffee, resulting in a concentrated, flavorful shot of espresso. Espresso forms the basis for a wide range of specialty coffee drinks, including lattes, cappuccinos, and macchiatos. Achieving proper espresso requires both the proper grinder and machine.
Cold Brew: A method that elevates coffee's flavor profile by allowing the coffee grounds to steep in cold water for an extended period, often 12 to 24 hours. This process extracts the coffee's flavors slowly and gently, resulting in a smooth, low-acidity concentrate that can be enjoyed cold or diluted with hot water.
The Art of the Brew: Mastering the Techniques
Regardless of your chosen brewing method, certain techniques are critical for achieving consistently exceptional results.
Bloom: Pre-wetting the coffee grounds with a small amount of hot water (typically twice the weight of coffee) allows the coffee to "bloom," releasing trapped carbon dioxide and preparing the grounds for optimal extraction. This step is particularly important for pour-over and espresso methods.
Water Flow: Pouring with a steady, controlled flow rate is essential for even saturation of the coffee grounds. For pour-over methods, consider the "pulse pour" technique, which involves pouring water in short bursts to control the extraction.
Timing: Keep track of your brewing time to ensure that your extraction is optimal. The ideal brew time varies depending on the method, and you may need to adjust your grind size or water temperature to achieve the desired results.
Tamping (Espresso): In espresso brewing, the tamping process is crucial for compacting the coffee grounds into a puck, ensuring an even flow of water through the coffee. The pressure of the tamp should be consistent.
Storage and Freshness: Preserving the Precious Brew
Coffee beans are highly susceptible to degradation, so proper storage is essential for maintaining their freshness and flavor. Store your beans in an airtight container, away from direct sunlight, heat, and moisture. Whole beans typically retain their freshness for several weeks, while pre-ground coffee degrades more quickly. Grinding your beans just before brewing is always recommended for the best possible flavor.
Beyond the Basics: Experimentation and Refinement
The journey to coffee mastery is a continuous process of experimentation and refinement. Don't be afraid to try different beans, grind sizes, brewing methods, and water temperatures. Keep track of your results and adjust your techniques accordingly. Taste your coffee carefully, paying attention to its acidity, body, sweetness, and finish. Note how the temperature might impact your perception of the overall aromas and flavors. Over time, you'll develop a deep understanding of your own preferences and the nuances of coffee brewing. Embrace the learning curve, savor the discoveries, and ultimately, enjoy the exquisite pleasure of a perfectly brewed cup.
