how to repeat a wifi signal with windows 7 laptop
Title: Turn your Windows 7 Laptop into a Wi-Fi Hotspot or Repeater
Channel: Len Farneth
Turn your Windows 7 Laptop into a Wi-Fi Hotspot or Repeater by Len Farneth
**Windows 7 WiFi Repeater: Boost Your Signal NOW!**
Supercharge Your Wi-Fi: Unleashing the Power of Your Windows 7 Repeater
Ever felt the frustration of weak Wi-Fi? That agonizingly slow loading, those dropped connections? We've all been there, haven't we? Don't despair, though. You are not alone. There's a secret weapon hiding within your trusty Windows 7 machine. It's something you likely haven't tapped into, but it's there. It’s a Wi-Fi repeater. Let's find out how this hidden gem can significantly boost your signal strength.
The Wireless Weakness: Recognizing the Signal Struggle
Before we dive in, let's acknowledge the problem. Think about the dead zones in your home. That far corner office or the basement that seems to be a wireless graveyard. These are prime examples of Wi-Fi struggles. Distance from your router plays a huge part. Walls, furniture, and even appliances can also interfere. Your existing network might be subpar. That’s because it's struggling to reach all corners of your digital domain.
Windows 7's Secret Weapon: Your Built-In Repeater
Surprise! Windows 7 has built-in capabilities you might not realize. It gives you the power to turn your computer into a Wi-Fi repeater. It’s like having a mini-router. It grabs the signal and rebroadcasts it. This extends the reach of your network. It sounds technical, but the process is surprisingly straightforward. It leverages the wireless capabilities already present in your laptop or desktop.
Setting the Stage: Preparing Your Windows 7 Machine
Before everything else, you'll need a few things. First, check your Windows 7 machine. Ensure it has a wireless network card. You also need an active internet connection from a primary router. Make sure you know your network's password. Consider your computer’s location too. Position it strategically between your main router and the weak signal areas. This setup is critical for optimal performance.
Step-by-Step Activation: Making Your Repeater Work
Let's get started. It's time to unlock the repeater functionality. First, go to the "Network and Sharing Center.” Click the "Set up a new connection or network" link. Select "Manually connect to a wireless network." This initiates the process. You'll then need to configure your connection settings.
Creating the Virtual Hosted Network
Inside this panel, provide a network name. This is the name your extended network will use. Create a security key too. Make it a strong password. Select the security type. After this, activate the virtual hosted network. Open the command prompt. Type "netsh wlan set hostednetwork mode=allow ssid=YourNetworkName key=YourPassword." Then, type "netsh wlan start hostednetwork” after this.
Sharing the Connection: Bridging the Gap
Now, share your existing internet connection. Head back to the Network Connections window. Identify your internet connection. Right-click and choose "Properties.” Go to the “Sharing” tab. Check the box that says “Allow other network users to connect through this computer’s internet connection." Select your newly created virtual adapter from the dropdown menu. Click "OK."
Fine-Tuning for Peak Performance: Additional Tips
Congratulations. You've successfully created your Wi-Fi repeater. However, fine-tuning can boost it further. Positioning your PC is vital. Place it centrally for best coverage. Regularly check your network speeds. You can do this with online speed tests. Update your wireless network card drivers. Keep drivers current for optimal performance.
Troubleshooting Common Issues: Conquering Connection Roadblocks
Encountering problems? It’s perfectly normal. First, double-check your password and network names. Ensure your Wi-Fi adapter is enabled. If you still have issues, restart your computer. Consider restarting your main router. If the problem persists, delve into the command prompt. Double-check the parameters of your commands.
Beyond Windows 7: The Broader Wireless World
While this focuses on Windows 7, the concept resonates. You can apply it to many devices. Modern routers often have built-in repeater modes. This simplifies the process. Wi-Fi extenders are another option. They're specifically designed for this purpose. They offer plug-and-play convenience.
Embrace the Boost: Reclaiming Your Wireless Freedom
There you have it. You've unlocked the power of your Windows 7 machine. It’s now a Wi-Fi repeater. You can banish those dead zones. Enjoy faster, more reliable internet. The setup might take a bit of effort. Yet, the payoff is worth it. You’re now in control of your wireless experience. Go forth and boost that signal!
Laptop WiFi Nightmare? FIX It NOW!Windows 7 WiFi Repeater: Boost Your Signal NOW!
Hey there, fellow digital explorers! Ever feel like your Wi-Fi signal is playing hide-and-seek, leaving you frustrated and disconnected? I know the feeling. You're trying to stream your favorite show, join a crucial video call, or just browse the web, and suddenly… buffering hell! That’s when you wish you had a Wi-Fi signal booster. I've been there. Thankfully, we can turn things around, specifically if you're still rocking Windows 7 (hey, no judgment – I’m a fan of a vintage operating system myself!). Today, we’re diving into how to turn your Windows 7 machine into a WiFi repeater, effectively boosting your signal and banishing those dreaded dead zones. Let's get this party started!
1. The Wi-Fi Woes: Understanding Your Signal Struggles
Before we jump into solutions, let’s understand the problem. Think of your Wi-Fi signal like a lighthouse. The closer you are, the brighter and stronger the beam. But walls, distance, and even the type of furniture can obstruct the signal, creating “blind spots” where your connection fades. This is where a Wi-Fi repeater comes in handy. It’s like adding a secondary lighthouse that catches the original beam and re-broadcasts it, extending the signal’s reach.
Think of your current setup. Does your signal drop off dramatically in certain rooms? Are you constantly fighting with weak bars? If so, you're a prime candidate for a DIY Wi-Fi repeater.
2. What Exactly Is a Wi-Fi Repeater, Anyway?
In simple terms, a Wi-Fi repeater (also known as a range extender) grabs the existing Wi-Fi signal from your router and rebroadcasts it, creating a larger coverage area. It's a bit like a middleman, essentially. The signal is received, amplified (if necessary), and then sent on its way to your devices. Unlike a router that creates a new network, a repeater extends the existing one. Therefore, your devices will simply see one network name.
3. Why Use Your Windows 7 PC as a Repeater? The Unexpected Perks!
You might be thinking, “Why not just buy a dedicated repeater?” Well, using your Windows 7 PC has some unique advantages:
- Cost-Effectiveness: It’s a free solution if you already have a Windows 7 computer. It’s like a free upgrade!
- Recycling Old Tech: That old laptop you've got gathering dust? Give it a new lease on life!
- Customization: You control the settings and can adjust things to fit your specific needs.
4. The Prerequisites: What You’ll Need to Get Started
Alright, let's round up our tools, we will make sure we have everything we need so we can get everything set up right away. You'll need a few things:
- A Windows 7 Computer: This is, of course, the star of the show! A laptop is ideal, as it's portable.
- A Wireless Network Adapter: Most computers have them built-in, but make sure yours is enabled, and that it works.
- An Internet Connection: You'll need to connect to your existing Wi-Fi network.
- Patience: There's nothing like a little patience to get you through.
5. Diving into the Setup: Enabling the Hosted Network Feature
The magic behind turning your Windows 7 PC into a repeater lies in its built-in "Hosted Network" feature. This allows your computer to act as a virtual Wi-Fi access point. Unfortunately, it's not always activated by default, so we'll need to enable it. Here’s how:
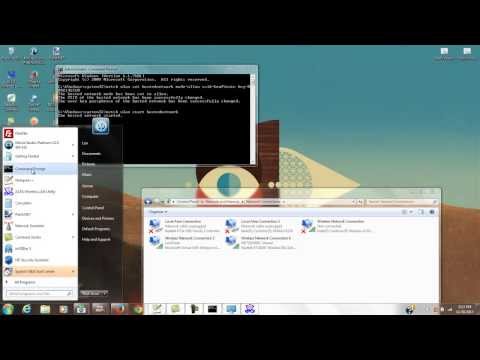
- Open Command Prompt as Administrator: Search for "cmd" in the Start menu, right-click on "Command Prompt," and select "Run as administrator."
- Run a Simple Command: Type the following command and press Enter:
netsh wlan set hostednetwork mode=allow ssid="YourNetworkName" key="YourPassword"- Replace "YourNetworkName" with the name you want for your extended Wi-Fi network (e.g., "MyExtendedWiFi").
- Replace "YourPassword" with a secure password for this new network.
- Start the Hosted Network: Type
netsh wlan start hostednetworkand press Enter. This starts the virtual access point.
6. Sharing Your Internet Connection: The Crucial Step
Now that we've created the virtual network, we need to share the internet connection from your existing Wi-Fi.
- Open Network and Sharing Center: Open the Control Panel and go to "Network and Sharing Center."
- Change Adapter Settings: On the left side, click "Change adapter settings."
- Find Your Wi-Fi Connection: Locate your active Wi-Fi connection (the one that connects to your existing router).
- Open Properties: Right-click on your Wi-Fi connection and select "Properties."
- Sharing Tab: Go to the "Sharing" tab.
- Enable Sharing: Check the box that says "Allow other network users to connect through this computer's Internet connection."
- Select the Hosted Network: In the "Home networking connection" dropdown, select your Hosted Network adapter (the one we just created).
- Click Okay: And close the properties window.
7. Testing the Waters: Checking if the Repeater is Working
Grab a device, like your phone or another laptop, and search for available Wi-Fi networks. You should see the network name you gave to your hosted network. Connect to it using the password you set. If you can browse the internet, congratulations! Your Windows 7 Wi-Fi repeater is working!
8. Fine-Tuning and Optimization: Getting the Most Out of Your Repeater
While the basic setup is straightforward, you can tweak things to maximize performance:
- Placement is Key: Position your Windows 7 computer halfway between your router and the weak signal area. Avoid placing it near obstructions like walls or metal objects.
- Channel Selection: Your router and repeater should ideally use different Wi-Fi channels. This can reduce interference. Check your router's settings to change the channel.
- Security: Ensure your repeater network is password protected with a strong password.
- Antenna Considerations: If your Windows 7 laptop has external antenna ports, consider using an external antenna to improve signal strength.
9. Troubleshooting: When Things Go Wrong
Tech hiccups happen. If your repeater isn’t working, here are some common issues and how to address them:
- No Internet Access: Double-check all the steps, especially the internet connection sharing. Ensure the password is correct.
- Weak Signal from Repeater: Relocate the computer closer to the weak signal areas, or troubleshoot the router’s signal.
- "Can't connect to this network" error: Make sure your network adapter drivers are up to date. Restart your computer. Try restarting your internet router and computer as well.
10. The Limitations: What to Expect (And Not Expect)
Let's be realistic. A Windows 7 Wi-Fi repeater isn't a miracle cure. It can improve your signal, but it won’t magically transform your connection. Some limitations to be aware of:
- Reduced Speed: The extended Wi-Fi network will likely have slightly lower speeds than your main network.
- Hardware Dependence: Performance depends on the speed of your Windows 7 computer and its wireless adapter.
- Compatibility: While it’s generally reliable, there might be compatibility issues with some devices.
11. Other Options: Exploring Alternatives to a Windows 7 Repeater
We've looked at the DIY approach. However, here are a few alternatives:
- Dedicated Wi-Fi Repeaters: These are inexpensive and easy to set up.
- Mesh Wi-Fi Systems: More robust but pricier, these offer seamless coverage throughout your home.
- Powerline Adapters: These use your home's electrical wiring to transmit the internet signal.
12. Securing Your Repeater: Protecting Your Network
Security is paramount. Here's what you must do:
- Strong Password: Use a complex, unique password for your extended network.
- Encryption: Ensure your network uses WPA2 or WPA3 encryption.
- Regular Updates: Keep your Windows 7 system updated to patch security vulnerabilities.
13. Monitoring Your Repeater's Performance: Are You Getting What You Need?
Keep an eye on your signal strength and speed. Run speed tests on devices connected to the repeater network to gauge its effectiveness. If the performance isn't satisfactory, adjust the placement, or consider further optimization.
14. The Future of Wi-Fi: Beyond the Repeater
Wi-Fi technology continues to evolve. Newer standards like Wi-Fi 6 and Wi-Fi 6E offer improved speeds, coverage, and efficiency. While a Windows 7 repeater is a practical solution, consider upgrading your router or investing in a modern mesh system for the best experience.
15. Embracing the Boost: A Final Word of Encouragement
You've now got the
Laptop WiFi Cards: The Ultimate Guide to Choosing the PERFECT One!Make Your Laptop's Wifi Signal Faster On Windows 1087 Tutorial

By MDTechVideos Make Your Laptop's Wifi Signal Faster On Windows 1087 Tutorial by MDTechVideos
How to make any Windows computer or laptop as WiFi Repeater or WiFi Extender

By UniqueTutorials How to make any Windows computer or laptop as WiFi Repeater or WiFi Extender by UniqueTutorials
How to enable your network connection in Windows 7

By MHELP2U How to enable your network connection in Windows 7 by MHELP2U

Title: FIXED Red X Over Network Connection Windows 7
Channel: the fiX files
FIXED Red X Over Network Connection Windows 7 by the fiX files
My Laptop Work
Let's assume the title provided is: "The Ultimate Guide to Mastering Sourdough Baking at Home"
The Ultimate Guide to Mastering Sourdough Baking at Home
The aroma. The texture. The sheer, primal satisfaction of crafting a loaf of sourdough from scratch. It's a journey that transcends mere baking; it's a connection to heritage, a mindful practice, and a delicious reward for your efforts. This guide, crafted with meticulous detail and a passion for perfection, will equip you with everything you need to confidently embark on your sourdough adventure, transforming your kitchen into a haven of warm, crusty, and undeniably superior bread. Forget the supermarket shelves; let’s unlock the secrets to truly exceptional sourdough.
Understanding the Soul of Sourdough: The Starter
At the heart of every magnificent sourdough loaf lies the starter, a living culture of wild yeasts and beneficial bacteria. This is your baking companion, your time-traveling portal to the flavors of the past. Nurturing a healthy starter is not a chore, but a rewarding relationship that directly translates to the quality of your bread.
- Cultivating Your Starter: Begin by mixing equal parts, by weight, of unbleached, all-purpose flour (or a combination of flours—rye and whole wheat add complexity) and filtered, non-chlorinated water. The chlorine in tap water can inhibit yeast activity. Combine these in a clean glass jar, ensuring ample space for expansion. Cover loosely with a lid or cheesecloth secured with a rubber band, allowing air circulation.
- The Waiting Game: Initially, the mixture will be a thick slurry. Over the next few days (the timeline varies based on ambient temperature, but typically 7-14 days), you’ll observe changes: bubbles will form, the mix will expand, and a slightly sour aroma will emerge. This is the work of the wild yeasts and bacteria, colonizing your flour-water mixture.
- Feeding and Discarding: Once you observe consistent bubbling and doubling (or near-doubling) in size within a few hours after feeding, your starter is ready. This means the yeast population is robust enough to leaven your dough. At this point, start the feeding schedule: discard approximately half of the starter (this discard is often used creatively in pancakes, crackers, or pizza dough—more on that later) and replace it with equal parts flour and water. The timing of feeding depends on the environment. You may need to feed it once a day, or even more, based on the activity.
- Monitoring Activity: A healthy starter is bubbly, active, and has a slightly sweet-sour aroma. Observe how quickly it doubles in size after feeding. This rise time is a critical indicator of health. The faster it rises, the more active your starter. A sluggish starter, one that barely rises or collapses after feeding, needs a boost. This might involve increasing the feeding frequency, adjusting the flour type, or changing the temperature.
Choosing Your Flour: The Foundation of Flavor
The flour you select plays a significant role in the final flavor, texture, and overall performance of your sourdough. Experimentation is key, but understanding the basics will set you on the right path.
- All-Purpose Flour: A reliable starting point, offering a good balance of gluten development and ease of handling.
- Bread Flour: Higher in protein content than all-purpose, bread flour promotes a stronger gluten network, resulting in a chewer crumb and better oven spring (the dramatic, upward rise in the oven).
- Whole Wheat Flour: Adds a nutty flavor and a more complex crumb structure. Be aware that whole wheat absorbs more water and can affect the dough's hydration.
- Rye Flour: Imparts a distinct, slightly tangy flavor and a softer texture. Rye flour lacks gluten, so it's typically blended with wheat flour.
- Spelt Flour: Offers a mild, slightly sweet flavor and a fluffy crumb. It may not be suitable for beginners.
- Flour Grades: Many flours have different grades. These grades refer to the milling of the flour. Experiment with different grades of flours to find the one you love.
Mastering the Mixing and Kneading Process
The mixing and kneading stages transform a simple combination of flour, water, starter, and salt into a cohesive dough, ready for its transformative proof.
- Autolyse (Optional but Recommended): This initial rest period, where flour and water are combined and allowed to hydrate, helps develop gluten and improves the texture. Mix your flour and water thoroughly and let it sit, covered, for 30-60 minutes before adding the starter and salt.
- Incorporating the Starter: Gently mix the starter into the autolysed dough until it is evenly distributed. You may need to use wet hands to fully incorporate the often sticky starter.
- Adding the Salt: Salt controls yeast activity and enhances flavor. Add it after the starter is mixed in and make sure the ingredients are consistently combined.
- The Bulk Fermentation and Folding: This is where the magic happens. Allow the dough to bulk ferment in a lightly oiled bowl, covered. This is the rise before shaping and baking. During bulk fermentation, you'll perform a series of "folds" at regular intervals (every 30-60 minutes for the first few hours) to develop strength and structure. To fold: wet your hands and gently stretch a portion of the dough upwards, folding it over onto itself. Rotate the bowl and repeat, working your way around the entire dough. This strengthens the gluten. The duration of bulk fermentation depends on the environment.
- Determining Bulk Fermentation Readiness: The optimal bulk fermentation duration depends on your starter's activity and the ambient temperature. Signs of readiness include the dough's increase in volume (usually 20-50% depending on the flour), increased air bubbles, and a slight jiggle when the bowl is gently shaken.
Shaping Your Loaf: Crafting Aesthetics and Texture
The shaping stage is where your sourdough takes on its final form, influencing both its appearance and its internal structure.
- Pre-Shaping: Gently turn the dough out onto a lightly floured surface. Gently shape the dough into a round (boule) or oblong (batard) shape. Let it rest, covered, for 20-30 minutes to relax the gluten.
- Final Shaping: Gently stretch and fold the dough, creating tension on the surface. This helps to develop the crust and the structure.
- Proofing in a Banneton or Basket: Place the shaped loaf, seam-side up, in a banneton (a specialized proofing basket, lined with cloth) that has been dusted with flour (rice flour is excellent for preventing sticking). Alternatively, line a bowl with an unstarched, clean linen cloth dusted with flour.
- The Cold Proof: Refrigerate the proofed loaf for 12-24 hours. This slow, cold proofing develops complex flavors and makes the bread easier to score.
Baking Your Sourdough: The Grand Finale
The culmination of all your efforts – the baking process – is a delicate dance between heat, steam, and time.
- Preheating: Preheat your oven to 450°F (232°C) with your Dutch oven (or baking stone and a roasting pan) inside. This is crucial for the initial oven spring and a crisp crust. The Dutch oven simulates a professional bread oven.
- Scoring: Before baking, carefully score the surface of the loaf with a sharp lame (a specialized bread-scoring tool) or a razor blade. Scoring controls the direction of expansion during baking and creates beautiful patterns.
- Baking with Steam: Carefully remove the hot Dutch oven from the oven. Gently place the proofed loaf inside. Cover the Dutch oven and return it to the oven to bake for the initial part of the baking process. The covering of the baking vessel traps steam, creating a moist environment that encourages oven spring.
- Baking Without Steam: After the initial covered baking period (typically 20-25 minutes), remove the lid of the Dutch oven. This allows the crust to form and brown. Continue baking until the crust is deeply golden brown and the internal temperature registers 200-210°F (93-99°C) using an instant-read thermometer.
- Cooling: Transfer the baked loaf to a wire rack and let it cool completely (several hours, ideally) before slicing. This allows the crumb to set and prevents a gummy texture.
Troubleshooting Common Sourdough Challenges
Even with the best intentions, things can go awry. Here's how to handle common sourdough pitfalls.
- Flat Loaf: This can be caused by a weak starter, under-proofing, or over proofing, or not enough gluten development. Ensure your starter is active, and adjust proofing and bulk fermentation times based on the ambient temperature. Pay close attention to the signs of a good bulk fermentation.
- Dense Crumb: The same issues as a flat loaf, inadequate fermentation, or proofing. Ensuring adequate Gluten is good. If you are unsure of the rise, bake a small amount of dough by itself to check.
- Sour Taste: A very sour flavor comes from over-fermentation. Reduce bulk fermentation or retard the proofing period. Adjust the ratio of starter to the dough to see if this helps.
- Tough Crust: Overbaking or insufficient steam can result in a tough crust. Monitor the baking time and ensure the Dutch
